Bottom view
1
Hard disk drive
2
Optional DIMM slot
3
Battery pack
4
Battery pack lock
5
Docking connector
6
Battery pack latch
7
Infrared port
8
Built-in stereo speakers
9
LCD latch
Locations
ThinkPad T40/T40p, T41/T41p Series
141
Страница 1: ...73 1050 Keyboard 75 1060 DIMM standard 79 1070 Modem daughter card MDC 80 1080 Bluetooth Modem daughter card BMDC 82 1090 Palm rest 84 1100 Mini PCI adapter 86 1110 Fan assembly 89 1120 Backup battery 90 1130 Speaker assembly 92 1140 PC Card slot assembly 94 1150 Keyboard bezel 96 1160 LCD assembly 98 1170 CPU 103 1180 Ultrabay Slim guide rail assembly 104 1190 VGA and Ultrabay Slim device eject b...
Страница 2: ...s XP Professional T40 T40p series 175 For Windows 2000 T40 T40p series 176 For Windows XP Professional T41 T41p series 177 For Windows 2000 T41 series 178 Miscellaneous parts 178 AC adapters 181 Optional FRUs 181 Common parts list 182 Tools 182 Power cords system 182 Power cords ThinkPad Dock and ThinkPad Dock II 183 Notices 184 Trademarks 184 44 MT 2373 2374 2375 2376 2378 2379 ...
Страница 3: ...ntel Pentium M processor 1 4 GHz L2 1 MB cache v Intel Pentium M processor 1 6 GHz L2 1 MB cache v Intel Pentium M processor 1 7 GHz L2 1 MB cache Bus architecture T40 T40p series v 400 MHz PSB Processor System Bus v 266 MHz DDR SDRAM PC2100 v HUB link v PCI bus v LPC bus T41 T41p series v 400 MHz PSB Processor System Bus v 333 MHz DDR SDRAM PC2700 v HUB link v PCI bus v LPC bus Graphic memory chi...
Страница 4: ...SDRAM SO DIMM PC2100 card v 256 MB DDR SDRAM SO DIMM PC2100 card v 512 MB DDR SDRAM SO DIMM PC2100 v 1 GB DDR SDRAM SO DIMM PC2100 T41 T41p series v 128 MB DDR SDRAM SO DIMM PC2700 card 1 v 256 MB DDR SDRAM SO DIMM PC2700 card 1 v 512 MB DDR SDRAM SO DIMM PC2700 card 1 v 1 GB DDR SDRAM SO DIMM PC2700 card 1 maximum of 2048 MB CMOS RAM v 242 bytes Hard disk drive v 20 0 GB 4200 rpm 2 5 inch IDE int...
Страница 5: ...apter v Cisco Aironet Wireless 802 11b v Intel PRO Wireless LAN 2100 3B Mini PCI Adapter T41 T41p series v Cisco Aironet Wireless 802 11b v Intel PRO Wireless LAN 2100 3B Mini PCI Adapter v IBM 11a b g Wireless LAN Mini PCI Adapter PC Card v One Type III v Two Type II Ethernet on the system board T40 T40p series v 10 100Base Ethernet v Gigabit Ethernet T41 T41p series v Gigabit Ethernet Communicat...
Страница 6: ...Status indicators The system status indicators show the status of the computer as follows 2 2 2 3 2 4 2 5 2 6 2 7 2 8 2 9 1 2 8 3 Product overview 48 MT 2373 2374 2375 2376 2378 2379 ...
Страница 7: ...charged the battery completely Blinking green The battery is being charged but still has enough power to operate At regular intervals the indicator light turns off briefly Orange The battery is being charged but the battery power is still low Blinking orange The battery needs to be charged When the indicator starts blinking orange the computer beeps three times 4 Power on Green The computer is on ...
Страница 8: ...s CPU Coprocessor 2 Diagnostics Systemboard 3 If the docking station or the port replicator is attached to the ThinkPad computer undock it Place the computer on a horizontal surface and run Diagnostics Other Devices IBM HDD Active Protection Test Note Do not apply any physical shock to the computer while the test is running Power Diagnostics Other Devices IBM AC Adapter IBM Battery 1 IBM Battery 2...
Страница 9: ...k the air turbulence at the louver near the PC Card slot 2 Run Diagnostics Other Devices IBM Fan TrackPoint or pointing device If the TrackPoint does not work check the configuration as specified in the ThinkPad Configuration program If the TrackPoint is disabled select Automatic to enable it After you use the TrackPoint the pointer may drift on the screen for a short time This drift can occur whe...
Страница 10: ...ination of keys functions as a sleep button The setting can be changed so that pressing it puts the computer into hibernation mode or even shuts the computer down Fn F5 Control the power source of the built in Bluetooth wireless device This combination of the keys functions as a toggle switch of the power state Note In Windows 98 Windows 2000 or Windows XP this combination of keys enables or disab...
Страница 11: ...top images are displayed on the computer display and the external monitor the Extend desktop function 2 This function does not work while a DVD movie or a video clip is playing 3 For Windows 2000 or Windows XP a hotkey application might take over the switching function Fn F8 Note This function is not supported in Windows 2000 and Windows XP If the image displayed on the computer is smaller than th...
Страница 12: ...ity main window v Fn F9 Settings Configures the settings for the Fn F9 function You can use this utility to stop and remove all ejectable devices connected to the ThinkPad computer the ThinkPad Mini Dock or the ThinkPad Port Replicator II You cannot use it to detach the computer from the ThinkPad Mini Dock or the ThinkPad Port Replicator II Note This function is supported only in Windows 2000 and ...
Страница 13: ...ystem operation In the displays n can be any number If no numeric code is displayed check the narrative descriptions of symptoms If the symptom is not described there go to Intermittent problems on page 63 Note For an IBM device not supported by diagnostic codes in the ThinkPad notebook computers see the manual for that device Numeric error codes Symptom or error FRU or action in sequence 0175 Bad...
Страница 14: ...board 0190 Critical low battery error 1 Charge the battery pack 2 Battery pack 0191 System Security Invalid Remote Change requested 1 Run IBM BIOS Setup Utility and then save current setting by pressing F10 2 System board 0192 System Security IBM Embedded Security hardware tamper detected System board 0199 System Security IBM Security password retry count exceeded 1 Run IBM BIOS Setup Utility and ...
Страница 15: ...e the backup battery and run IBM BIOS Setup Utility to reset the time and date 0251 System CMOS checksum bad Default configuration used Replace the backup battery and run IBM BIOS Setup Utility to reset the time and date 0252 Password checksum bad The password is cleared Reset the password by running IBM BIOS Setup Utility 0260 System timer error 1 Replace the backup battery and run IBM BIOS Setup...
Страница 16: ...MI failed 1 DIMM 2 System board 02F7 Fail safe timer NMI failed 1 DIMM 2 System board 1802 Unauthorized network card is plugged in Turn off and remove the miniPCI network card 1 Remove Mini PCI network card 2 System board 1803 Unauthorized daughter card is plugged in Turn off and remove the daughter card 1 Remove the daughter card that you installed 2 System board Symptom to FRU index 58 MT 2373 2...
Страница 17: ...e Welcome screen in RECOVER TO FACTORY CONTENTS Run FDISK and then delete all partitions Run RECOVER TO FACTORY CONTENTS in Access IBM Predesktop Area again 4 If item 3 failed select CD ROM boot in Startup in Access IBM Predesktop Area Boot from the Recovery CD and perform full recovery from it 5 If item 4 failed replace the hard disk drive 2000 IBM Hard Drive Active Protection sensor diagnostics ...
Страница 18: ...the operating system has no failure and is installed correctly 2 Enter IBM BIOS Setup Utility and see whether the hard disk drive and the diskette drive are properly identified 3 Reseat the hard disk drive 4 Reinstall the operating system 5 Diskette drive 6 Hard disk drive 7 System board Hibernation error 1 Restore the system configuration to what it was before the computer entered hibernation mod...
Страница 19: ...system Four cycles of four short beeps and a blank screen System board IBM security chip Five short beeps and a blank screen System board No beep symptoms Symptom or error FRU or action in sequence No beep power on indicator on LCD blank and no POST 1 Make sure that every connector is connected tightly and correctly 2 DIMM 3 System board No beep power on indicator on and LCD blank during POST 1 Re...
Страница 20: ...l of 16 or more bright and dark dots Note A bright dot means a pixel is always on white or color A dark dot means a pixel is always off black color Symptom or error FRU or action in sequence No beep power on indicator on and a blank LCD during POST System board v LCD backlight not working v LCD too dark v LCD brightness cannot be adjusted v LCD contrast cannot be adjusted 1 Reseat the LCD connecto...
Страница 21: ...te the failing FRU do not isolate FRUs that have no defects Verify that all attached devices are supported by the computer Verify that the power supply being used at the time of the failure is operating correctly See Power system checkout on page 39 1 Turn off the computer 2 Visually check each FRU for damage Replace any damaged FRU 3 Remove or disconnect all of the following devices a Non IBM dev...
Страница 22: ... be used only once Do the following when you service this machine v Keep the screw kit for the P N see Miscellaneous parts on page 178 in your tool bag v Always use new screws v Use a torque screwdriver if you have one Tighten screws as follows v Plastic to plastic Turn an additional 90 degrees after the screw head touches the surface of the plastic part 90 degrees more Cross section v Logic card ...
Страница 23: ...t to its original value Before replacing the system board save the original serial number by doing the following 1 Install the ThinkPad Hardware Maintenance Diskette Version 1 69 and restart the computer 2 From the main menu select 1 Set System Identification 3 Select 2 Read S N data from EEPROM The serial number of each device in your computer is displayed the serial number of the system unit is ...
Страница 24: ...s until the year A D 3400 No two computers in the world have the same number When you replace the system board you must set the UUID on the new system board as follows 1 Install the ThinkPad Hardware Maintenance Diskette Version 1 69 and restart the computer 2 From the main menu select 4 Assign UUID A new UUID is created and written If a valid UUID already exists it is not overwritten FRU replacem...
Страница 25: ...e new FRU in place reverse the removal procedure and follow any notes that pertain to replacement For information about connecting and arranging internal cables see Locations on page 138 8 When replacing a FRU use the correct screw as shown in the procedures DANGER Attention After replacing a FRU do not turn on the computer until you have made sure that all screws springs and other small parts are...
Страница 26: ... Battery pack DANGER 1 continued Use only the battery specified in the parts list for your computer Any other battery could ignite or explode Removing and replacing a FRU 68 MT 2373 2374 2375 2376 2378 2379 ...
Страница 27: ...ack 3 2 3 When installing Install the battery pack along the slide rails on the left and right sides of the battery pack slot Then make sure that both battery latches a and b are locked as in the following figure a b Removing and replacing a FRU ThinkPad T40 T40p T41 T41p Series 69 ...
Страница 28: ...ices v Ultrabay 2000 devices For devices compatible with the Ultrabay Slim bay see Optional FRUs on page 181 Note When you release the switch in step 1 the lever pops out In step 2 pull the lever a little to release the device from the bay 2 1 3 Removing and replacing a FRU 70 MT 2373 2374 2375 2376 2378 2379 ...
Страница 29: ...ave the user make a backup copy of all the information on it if possible v Never remove the drive while the system is operating or is in suspend mode For access remove this FRU v 1010 Battery pack on page 68 1 Note The hard disk is attached to the cover Step Screw quantity 1 HDD screw 1 or security screw 1 Note Use a 2 5 mm Allen wrench to remove the security screw continued Removing and replacing...
Страница 30: ...2 3 3 4 When installing Make sure that the hard disk connector is attached firmly Removing and replacing a FRU 72 MT 2373 2374 2375 2376 2378 2379 ...
Страница 31: ...1040 DIMM optional For access remove this FRU v 1010 Battery pack on page 68 Note Loosen the screw 1 but do not remove it 2 1 continued Removing and replacing a FRU ThinkPad T40 T40p T41 T41p Series 73 ...
Страница 32: ...ched end of the DIMM into the socket Press the DIMM firmly and pivot it until it snaps into the place Make sure that it is firmly fixed in the slot and does not move easily Removing and replacing a FRU 74 MT 2373 2374 2375 2376 2378 2379 ...
Страница 33: ...remove this FRU v 1010 Battery pack on page 68 1 3 Step Icon Screw quantity Color Torque 1 3 M2 10 mm flat head nylon coated 4 Black 0 245 Nm 2 5 kgfcm continued Removing and replacing a FRU ThinkPad T40 T40p T41 T41p Series 75 ...
Страница 34: ...ow This releases the latches of the keyboard from the frame so that the front side of the keyboard pops out 2 Pull the keyboard a little in the direction of the arrow 3 and then detach the connector 4 3 4 Removing and replacing a FRU 76 MT 2373 2374 2375 2376 2378 2379 ...
Страница 35: ...hen installing 1 Attach the connector 1 1 2 Make sure that the keyboard edges marked a in the figure are under the frame a a a continued Removing and replacing a FRU ThinkPad T40 T40p T41 T41p Series 77 ...
Страница 36: ... to slide the keyboard towards you 4 Make sure that all the projections on the front side of the keyboard b are firmly attached under the frame b b 5 Secure the keyboard from the underside of the computer using the new screws provided with the keyboard Removing and replacing a FRU 78 MT 2373 2374 2375 2376 2378 2379 ...
Страница 37: ... Keyboard on page 75 1 1 2 When installing Insert the notched end of the DIMM into the socket Press the DIMM firmly and pivot it until it snaps into the place Make sure that it is firmly fixed in the slot and does not move easily Removing and replacing a FRU ThinkPad T40 T40p T41 T41p Series 79 ...
Страница 38: ...68 v 1050 Keyboard on page 75 2 1 1 Step Screw quantity Color Torque 1 M2 10 mm flat head nylon coated 2 Black 0 245 Nm 2 5 kgfcm In step 2 remove the card by pulling the tab with your fingers in the direction of the arrow continued Removing and replacing a FRU 80 MT 2373 2374 2375 2376 2378 2379 ...
Страница 39: ...er 3 and detach the modem connector 4 3 4 When installing Make sure that connector 4 and the connector on the underside of the card are firmly attached Removing and replacing a FRU ThinkPad T40 T40p T41 T41p Series 81 ...
Страница 40: ...page 68 v 1050 Keyboard on page 75 2 1 1 Step Screw quantity Color Torque 1 M2 10 mm flat head nylon coated 2 Black 0 245 Nm 2 5 kgfcm In step 2 remove the card by pulling the tab with your fingers in the direction of the arrow continued Removing and replacing a FRU 82 MT 2373 2374 2375 2376 2378 2379 ...
Страница 41: ...en unplugging the Bluetooth wireless antenna jack do not pull the cable it might snap Unplug the jack by pulling the tab with your fingers 3 4 5 When installing Make sure that connector 4 the jack 5 and the connector on the underside of the card are firmly attached Removing and replacing a FRU ThinkPad T40 T40p T41 T41p Series 83 ...
Страница 42: ... Color Torque 1 1 M2 4 mm small head nylon coated 4 Black 0 245 Nm 2 5 kgfcm 2 2 M2 5 mm bind head nylon coated 1 Silver 0 245 Nm 2 5 kgfcm 3 Models with a 802 11b wireless LAN Mini PCI adapter 4 M2 14 mm bind head nylon coated 2 Black 0 204 Nm 2 0 kgfcm Models with a 802 11a b wireless LAN Mini PCI adapter 4 M2 14 mm TR7 nylon coated 2 Black 0 204 Nm 2 0 kgfcm 3a 4 Special screw 1 Black 0 245 Nm ...
Страница 43: ... models skip step 4 4 5 When installing On a model with a touch pad make sure that connector 4 is firmly attached Note for LG IBM models Korea in T40 T40p series New palm rest FRU is shipped with the LG IBM logo plate When you replace the palm rest you need to stick the LG IBM logo plate as shown in this figure 15 mm 15 mm Removing and replacing a FRU ThinkPad T40 T40p T41 T41p Series 85 ...
Страница 44: ... v 1030 Hard disk drive on page 71 v 1050 Keyboard on page 75 v 1090 Palm rest on page 84 Note When unplugging the antenna jack do not pull the cable it might snap Unplug the jack by pulling the tab with your fingers 1 2 3 3 4 Removing and replacing a FRU 86 MT 2373 2374 2375 2376 2378 2379 ...
Страница 45: ...e tab marked MAIN into jack M and the black antenna cable with the tab marked AUX into jack A MAIN AUX Cisco Aironet Wireless 802 11b Plug the gray antenna cable with the tab marked MAIN into jack M and the black antenna cable with the tab marked AUX into jack A MAIN MAIN AUX AUX Removing and replacing a FRU ThinkPad T40 T40p T41 T41p Series 87 ...
Страница 46: ...N Mini PCI Adapter Plug the gray antenna cable with the tab marked MAIN into jack MAIN and the black antenna cable with the tab marked AUX into jack AUX MAIN AUX Insert the notched end of the card into the socket and then press the card firmly Pivot the card until it snaps into place Make sure that it is firmly fixed in the slot and does not move easily Removing and replacing a FRU 88 MT 2373 2374...
Страница 47: ...1090 Palm rest on page 84 3 2 1 Step Screw quantity Color Torque 1 M2 10 mm flat head nylon coated 3 Black 0 245 Nm 2 5 kgfcm When installing 1 Make sure that the connector 3 is firmly attached 2 Apply thermal grease on the part marked a in this figure a Bottom view of the fan assembly Removing and replacing a FRU ThinkPad T40 T40p T41 T41p Series 89 ...
Страница 48: ... on page 68 v 1030 Hard disk drive on page 71 v 1050 Keyboard on page 75 v 1090 Palm rest on page 84 1 continued Use only the battery specified in the parts list for your computer Any other battery could ignite or explode Removing and replacing a FRU 90 MT 2373 2374 2375 2376 2378 2379 ...
Страница 49: ...2 When installing Make sure that the battery connector 2 is firmly attached Removing and replacing a FRU ThinkPad T40 T40p T41 T41p Series 91 ...
Страница 50: ... pack on page 68 v 1030 Hard disk drive on page 71 v 1050 Keyboard on page 75 v 1090 Palm rest on page 84 1 Step Screw quantity Color Torque 1 M2 10 mm flat head nylon coated 2 Black 0 245 Nm 2 5 kgfcm continued Removing and replacing a FRU 92 MT 2373 2374 2375 2376 2378 2379 ...
Страница 51: ...elease the speaker cables from the cable guide 4 2 3 When installing Make sure that the connector 4 is firmly attached Then route the cable as in 3 Removing and replacing a FRU ThinkPad T40 T40p T41 T41p Series 93 ...
Страница 52: ...8 v 1030 Hard disk drive on page 71 v 1050 Keyboard on page 75 v 1090 Palm rest on page 84 v 1130 Speaker assembly on page 92 1 Step Screw quantity Color Torque 1 M2 4 mm bind head nylon coated 2 Black 0 204 Nm 2 0 kgfcm continued Removing and replacing a FRU 94 MT 2373 2374 2375 2376 2378 2379 ...
Страница 53: ...n installing Make sure that the connector on the underside of the PC card slot 2 is firmly attached and then secure the slot with the screws Removing and replacing a FRU ThinkPad T40 T40p T41 T41p Series 95 ...
Страница 54: ...ack on page 68 v 1030 Hard disk drive on page 71 v 1050 Keyboard on page 75 v 1090 Palm rest on page 84 1 1 Step Screw quantity Color Torque 1 M2 19 mm bind head nylon coated 2 Black 0 245 Nm 2 5 kgfcm continued Removing and replacing a FRU 96 MT 2373 2374 2375 2376 2378 2379 ...
Страница 55: ...cm In step 3 make sure that all the latches marked a are detached and then remove the bezel When installing Make sure that all the latches marked a are firmly attached Attach harness left b and then secure the keyboard bezel with the screws Removing and replacing a FRU ThinkPad T40 T40p T41 T41p Series 97 ...
Страница 56: ...on page 75 v 1080 Bluetooth Modem daughter card BMDC on page 82 v 1090 Palm rest on page 84 v 1100 Mini PCI adapter on page 86 v 1150 Keyboard bezel on page 96 1 1 1 1 Step Screw quantity Color Torque 1 M2 5 4 8 mm bind head nylon coated 4 Black 0 245 Nm 2 5 kgfcm continued Removing and replacing a FRU 98 MT 2373 2374 2375 2376 2378 2379 ...
Страница 57: ...45 Nm 2 5 kgfcm After removing the screw remove bracket 3 Then detach the LCD connector 4 When installing Make sure that the bracket 3 and the connector 4 are firmly attached and then secure them with the screw continued Removing and replacing a FRU ThinkPad T40 T40p T41 T41p Series 99 ...
Страница 58: ...5 Step Screw quantity Color Torque 5 M2 10 mm flat head nylon coated 1 Black 0 245 Nm 2 5 kgfcm continued Removing and replacing a FRU 100 MT 2373 2374 2375 2376 2378 2379 ...
Страница 59: ...enna cables from the cable guide 6 6 6 6 6 6 6 When installing Make sure that the antenna cables are correctly routed and securely in place continued Removing and replacing a FRU ThinkPad T40 T40p T41 T41p Series 101 ...
Страница 60: ...lling Make sure that the security keyhole which is on the left rear corner of the base cover and the keyhole of the bracket inside are aligning firmly Removing and replacing a FRU 102 MT 2373 2374 2375 2376 2378 2379 ...
Страница 61: ...n page 96 v 1160 LCD assembly on page 98 v 1110 Fan assembly on page 89 Rotate the head of the screw in the direction shown by arrow 1 to release the lock then remove the CPU 2 2 1 b a When installing Place the CPU on the CPU socket a and then rotate the head of the screw in the direction shown by arrow b to secure the CPU Removing and replacing a FRU ThinkPad T40 T40p T41 T41p Series 103 ...
Страница 62: ...t on page 84 v 1130 Speaker assembly on page 92 v 1140 PC Card slot assembly on page 94 v 1150 Keyboard bezel on page 96 v 1160 LCD assembly on page 98 1 2 Step Screw quantity Color Torque 1 M2 14 mm bind head nylon coated 1 Black 0 204 Nm 2 0 kgfcm 2 M2 4 mm bind head nylon coated 1 Black 0 204 Nm 2 0 kgfcm continued Removing and replacing a FRU 104 MT 2373 2374 2375 2376 2378 2379 ...
Страница 63: ...m small head nylon coated 3 Silver 0 245 Nm 2 5 kgfcm In step 5 remove the Ultrabay Slim guide rail assembly and the hard disk drive guide rail together Separate the Ultrabay Slim guide rail assembly a and the hard disk drive guide rail b 6 6 a b Removing and replacing a FRU ThinkPad T40 T40p T41 T41p Series 105 ...
Страница 64: ...on page 75 v 1090 Palm rest on page 84 v 1150 Keyboard bezel on page 96 v 1160 LCD assembly on page 98 v 1180 Ultrabay Slim guide rail assembly on page 104 1 3 2 Step Screw quantity Color Torque 2 Hex stud 2 Silver 0 392 Nm 4 kgfcm When installing Make sure that the connector 1 is firmly attached continued Removing and replacing a FRU 106 MT 2373 2374 2375 2376 2378 2379 ...
Страница 65: ...5 4 6 Step Screw quantity Color Torque 4 M2 4 mm bind head nylon coated 1 Black 0 245 Nm 2 5 kgfcm Removing and replacing a FRU ThinkPad T40 T40p T41 T41p Series 107 ...
Страница 66: ... v 1120 Backup battery on page 90 v 1130 Speaker assembly on page 92 v 1140 PC Card slot assembly on page 94 v 1150 Keyboard bezel on page 96 v 1160 LCD assembly on page 98 v 1170 CPU on page 103 v 1180 Ultrabay Slim guide rail assembly on page 104 v 1190 VGA and Ultrabay Slim device eject button cable on page 106 Important notice for handling the system board in ThinkPad T40 series There are two ...
Страница 67: ...If the security chip is removed by accident reinstall it on the system board immediately Make sure that it is firmly fixed on the system board and does not move easily v The security chip cannot be used with any other system board v The system board cannot be used with any other security chip v The system board cannot be used without the security chip v If you return a defective system board you m...
Страница 68: ... the security chip a is soldered on the underside of the system board as in this figure a In ThinkPad T41 series accelerometer chip for the IBM HDD Active Protection System b is also soldered on the topside of the system board b Removing and replacing a FRU 110 MT 2373 2374 2375 2376 2378 2379 ...
Страница 69: ...on still functions see below Note If the test shows that IBM HDD Active Protection is not functioning be sure to document the drop in any reject report and replace the system board v Avoid rough handling of any kind v At every point in the process be sure not to drop or stack the system board v If you put a system board down be sure to put it only on a padded surface such as an ESD mat or conducti...
Страница 70: ...ling Make sure that the connectors 2 are firmly attached to the system board 5 4 Step Screw quantity Color Torque 4 M2 10 mm flat head nylon coated 1 Black 0 245 Nm 2 5 kgfcm 5 M2 5 4 mm bind head nylon coated 1 Black 0 392 Nm 4 kgfcm continued Removing and replacing a FRU 112 MT 2373 2374 2375 2376 2378 2379 ...
Страница 71: ...l head nylon coated 1 Silver 0 245 Nm 2 5 kgfcm 7 M2 10 mm flat head nylon coated 1 Black 0 245 Nm 2 5 kgfcm In step 8 remove the I O plate bracket c and the system board d together continued Removing and replacing a FRU ThinkPad T40 T40p T41 T41p Series 113 ...
Страница 72: ... 3 mm bind head nylon coated 1 Gold 0 392 Nm 4 kgfcm When installing Attach the system board so that the two small projections on the base cover fit into the holes provided and then secure the system board with the screw Removing and replacing a FRU 114 MT 2373 2374 2375 2376 2378 2379 ...
Страница 73: ...with the label on the old base cover defective FRU on the new base cover In some models you also need to stick one or two FCC labels b Check the old base cover and if there is one or two FCC labels on it find the same one from the label kit and stick it on the new base cover Stick the labels on the new base cover as shown in this figure a b b Removing and replacing a FRU ThinkPad T40 T40p T41 T41p...
Страница 74: ...age 84 v 1100 Mini PCI adapter on page 86 v 1150 Keyboard bezel on page 96 v 1160 LCD assembly on page 98 3 3 3 3 3 3 2 2 1 1 2 Step Screw cap Screw quantity Color Torque 1 M2 3 mm pan head nylon coated 2 Black 0 245 Nm 2 5 kgfcm 2 M2 5 4 8 mm bind head nylon coated 3 Black 0 392 Nm 4 kgfcm 3 M2 3 mm pan head nylon coated 6 Black 0 245 Nm 2 5 kgfcm continued Removing and replacing a FRU 116 MT 237...
Страница 75: ... series New LCD front bezel FRU is shipped with the LG IBM logo kit When you replace the LCD front bezel you need to stick the LG IBM logo plate as shown in this figure 21 mm 7 mm Removing and replacing a FRU ThinkPad T40 T40p T41 T41p Series 117 ...
Страница 76: ...adapter on page 86 v 1150 Keyboard bezel on page 96 v 1160 LCD assembly on page 98 v 2010 LCD front bezel on page 116 1 2 3 4 Step Screw quantity Color Torque 1 M2 3 mm small head nylon coated 1 Silver 0 245 Nm 2 5 kgfcm When installing Make sure that connectors 2 and 3 are firmly attached Cable routing When replacing the inverter card route the connector cable as in this figure Removing and repla...
Страница 77: ...rive on page 71 v 1050 Keyboard on page 75 v 1080 Bluetooth Modem daughter card BMDC on page 82 v 1090 Palm rest on page 84 v 1100 Mini PCI adapter on page 86 v 1150 Keyboard bezel on page 96 v 1160 LCD assembly on page 98 v 2010 LCD front bezel on page 116 Slide the spiral tube binding the antenna cables 1 first and then release the cables from the cable guide 2 2 1 continued Removing and replaci...
Страница 78: ...4 3 3 Step Screw quantity Color Torque 3 M2 3 mm small head nylon coated 2 Silver 0 245 Nm 2 5 kgfcm Removing and replacing a FRU 120 MT 2373 2374 2375 2376 2378 2379 ...
Страница 79: ... BMDC on page 82 v 1090 Palm rest on page 84 v 1100 Mini PCI adapter on page 86 v 1150 Keyboard bezel on page 96 v 1160 LCD assembly on page 98 v 2010 LCD front bezel on page 116 v 2020 Inverter card on page 118 v 2030 Bluetooth wireless antenna assembly on page 119 Before removing the LCD panel remove the left latch first In step 1 unlatch the latch bar as in this figure 1 continued Removing and ...
Страница 80: ...tion of the arrow 2 and then remove the left latch in the direction of the arrow 3 2 3 When installing Attach the left latch to the LCD cover as follows 2 1 continued Removing and replacing a FRU 122 MT 2373 2374 2375 2376 2378 2379 ...
Страница 81: ...4 Step Screw quantity Color Torque 4 M2 3 mm small head nylon coated 1 Silver 0 245 Nm 2 5 kgfcm continued Removing and replacing a FRU ThinkPad T40 T40p T41 T41p Series 123 ...
Страница 82: ...les from the cable guide 5b Lift the LCD panel in the direction of arrow 6 and detach the wireless LAN antenna 7 and the ThinkLight 8 Then remove the LCD panel in the direction of arrow 9 6 9 8 7 5b 5a continued Removing and replacing a FRU 124 MT 2373 2374 2375 2376 2378 2379 ...
Страница 83: ... small head nylon coated 2 Silver 0 245 Nm 2 5 kgfcm Remove the hinges b from the LCD assembly 13 13 13 b 13 14 14 b Step Screw quantity Color Torque 13 M2 3 mm small head nylon coated 4 Silver 0 245 Nm 2 5 kgfcm continued Removing and replacing a FRU ThinkPad T40 T40p T41 T41p Series 125 ...
Страница 84: ...over the LCD panel and strip off the tape 15 securing the FPC c Then detach the connector 16 in the direction of the arrow 16 15 c continued Removing and replacing a FRU 126 MT 2373 2374 2375 2376 2378 2379 ...
Страница 85: ...Remove the right latch from the LCD cover 17 18 Removing and replacing a FRU ThinkPad T40 T40p T41 T41p Series 127 ...
Страница 86: ...When installing Attach the right latch to the LCD cover as follows 1 2 Removing and replacing a FRU 128 MT 2373 2374 2375 2376 2378 2379 ...
Страница 87: ...Routing the cables of the wireless LAN antenna Route the antenna cables as in the following drawings 3 3 2 1 continued Removing and replacing a FRU ThinkPad T40 T40p T41 T41p Series 129 ...
Страница 88: ...4 4 5 5 continued Removing and replacing a FRU 130 MT 2373 2374 2375 2376 2378 2379 ...
Страница 89: ...Coil the spiral tube round the antenna cables 6 Slide the spiral tube in the direction shown by arrow 7 7 continued Removing and replacing a FRU ThinkPad T40 T40p T41 T41p Series 131 ...
Страница 90: ...ral tube until it reaches at the cable guide of the LCD cover as in this figure Make sure that the antenna cable is not pinched by cable clip a 8 a Removing and replacing a FRU 132 MT 2373 2374 2375 2376 2378 2379 ...
Страница 91: ...d to stick the LG IBM logo plate as shown in this figure 10 mm 15 mm Note for LG IBM models Korea in T41 T41p series New LCD cover FRU is shipped with the LG IBM logo kit When you replace the LCD cover you need to stick the LG IBM logo plate as shown in this figure 22 mm 16 mm Removing and replacing a FRU ThinkPad T40 T40p T41 T41p Series 133 ...
Страница 92: ...3010 ThinkPad Dock II PCI cover 1 2 1 Bottom view Removing and replacing a FRU 134 MT 2373 2374 2375 2376 2378 2379 ...
Страница 93: ... cover 1 1 1 Rear view Step Screw quantity Torque 1 M2 5 4 8 mm 3 0 392 Nm 4 kgfcm 2 2 2 2 Step Screw quantity Torque 2 M2 5 4 8 mm 4 0 392 Nm 4 kgfcm continued Removing and replacing a FRU ThinkPad T40 T40p T41 T41p Series 135 ...
Страница 94: ...3 3 Bottom view Step Screw quantity Torque 3 M2 5 4 8 mm 6 0 392 Nm 4 kgfcm continued Removing and replacing a FRU 136 MT 2373 2374 2375 2376 2378 2379 ...
Страница 95: ...k key A is set to the Unlock position Release the front latches in step 4 and then remove the top cover 5 Then detach the connector cable 6 as in the figure 4 5 A 6 Removing and replacing a FRU ThinkPad T40 T40p T41 T41p Series 137 ...
Страница 96: ... 5 External monitor connector 6 Ultrabay Slim status indicator 7 Ultrabay Slim latch 8 Ultrabay Slim device eject lever 9 Ultrabay Slim 10 TrackPoint pointing stick 11 TrackPoint buttons 12 Touch pad buttons 13 Touch pad 14 UltraNav 15 Access IBM button 16 Volume control buttons 17 Power switch 18 ThinkLight Locations 138 MT 2373 2374 2375 2376 2378 2379 ...
Страница 97: ...1 2 3 4 5 6 7 8 9 15 10 11 12 13 14 18 16 17 Locations ThinkPad T40 T40p T41 T41p Series 139 ...
Страница 98: ... Card slots 5 Microphone jack 6 Stereo headphone jack 7 RJ 45 Ethernet connector 8 RJ 11 modem connector 9 TV out connector 10 Universal serial bus USB connectors 11 Security keyhole 12 Parallel connector 13 AC power connector 1 2 11 10 12 8 9 13 7 6 5 4 3 Locations 140 MT 2373 2374 2375 2376 2378 2379 ...
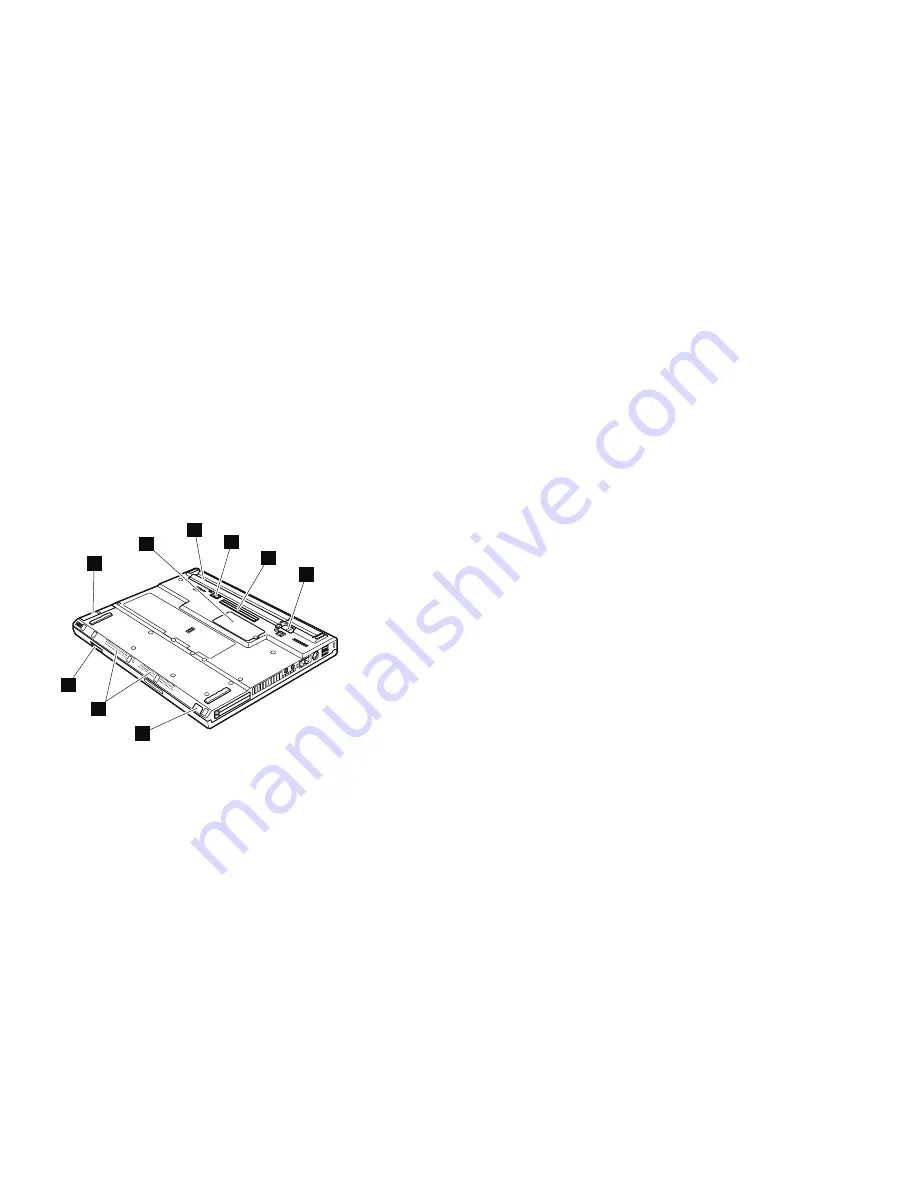
Страница 99: ... drive 2 Optional DIMM slot 3 Battery pack 4 Battery pack lock 5 Docking connector 6 Battery pack latch 7 Infrared port 8 Built in stereo speakers 9 LCD latch 3 4 7 9 1 2 5 6 8 Locations ThinkPad T40 T40p T41 T41p Series 141 ...
Страница 100: ... 61x 66x DVD ROM 2373 6Bx 6Dx SC 802 11b Intel 2373 54x 40 GB 5400 rpm T40 CPU Ban 1 3G memory 256 MB video chip M7 32 LCD 14 1 in XGA 2373 24x DVD ROM 10 100 MDC 40 GB 5400 rpm 2373 2Bx SC 802 11b Intel 2373 29x SC DVD CD RW combo 2373 2Ax 2374 2Ax SC 802 11 a b combo 2373 22x 25x SC 802 11b Intel 2373 17x Gigabit 30 GB 4200 rpm 2373 1Bx SC DVD ROM 802 11b Intel 10 100 2373 19x SC DVD CD RW combo...