


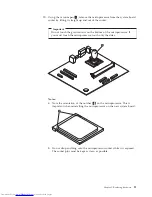


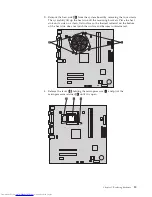
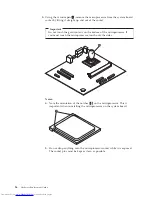


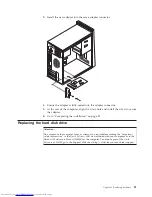


11.
On
the
new
system
board,
release
and
pivot
the
locking
lever,
then
pivot
the
microprocessor
retainer
until
it
is
open.
Note:
There
will
be
a
black
plastic
cover
on
the
retainer
to
protect
the
microprocessor
socket.
As
you
close
the
microprocessor
retainer,
remove
the
black
plastic
cover.
Place
the
black
plastic
cover
on
the
microprocessor
retainer
of
the
defective
system
board.
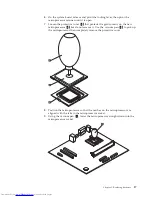
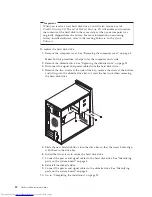
12.
Position
the
microprocessor
so
that
the
notches
on
the
microprocessor
are
aligned
with
the
tabs
in
the
microprocessor
socket.
Important
To
avoid
damaging
the
microprocessor
contacts,
do
not
tilt
the
microprocessor
when
installing
it
into
the
socket.
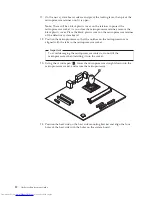
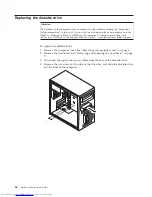
13.
Using
the
vacuum
pen
1
,
lower
the
microprocessor
straight
down
into
the
microprocessor
socket,
and
secure
the
microprocessor.
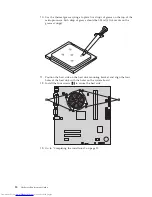
14.
Position
the
heat
sink
on
the
heat
sink
mounting
bracket
and
align
the
four
holes
of
the
heat
sink
with
the
holes
on
the
system
board.
12
Hardware
Replacement
Guide
Содержание ThinkCentre Types 8288
Страница 1: ...Hardware Replacement Guide Types 8288 8297 8326 Types 8329 8342 8380 ...
Страница 2: ......
Страница 3: ...Hardware Replacement Guide Types 8288 8297 8326 Types 8329 8342 8380 ...
Страница 6: ...iv Hardware Replacement Guide ...
Страница 40: ...32 Hardware Replacement Guide ...
Страница 43: ......
Страница 44: ...Part Number 41D4474 Printed in USA 1P P N 41D4474 ...


