background image

Chapter 2: The Basics

16

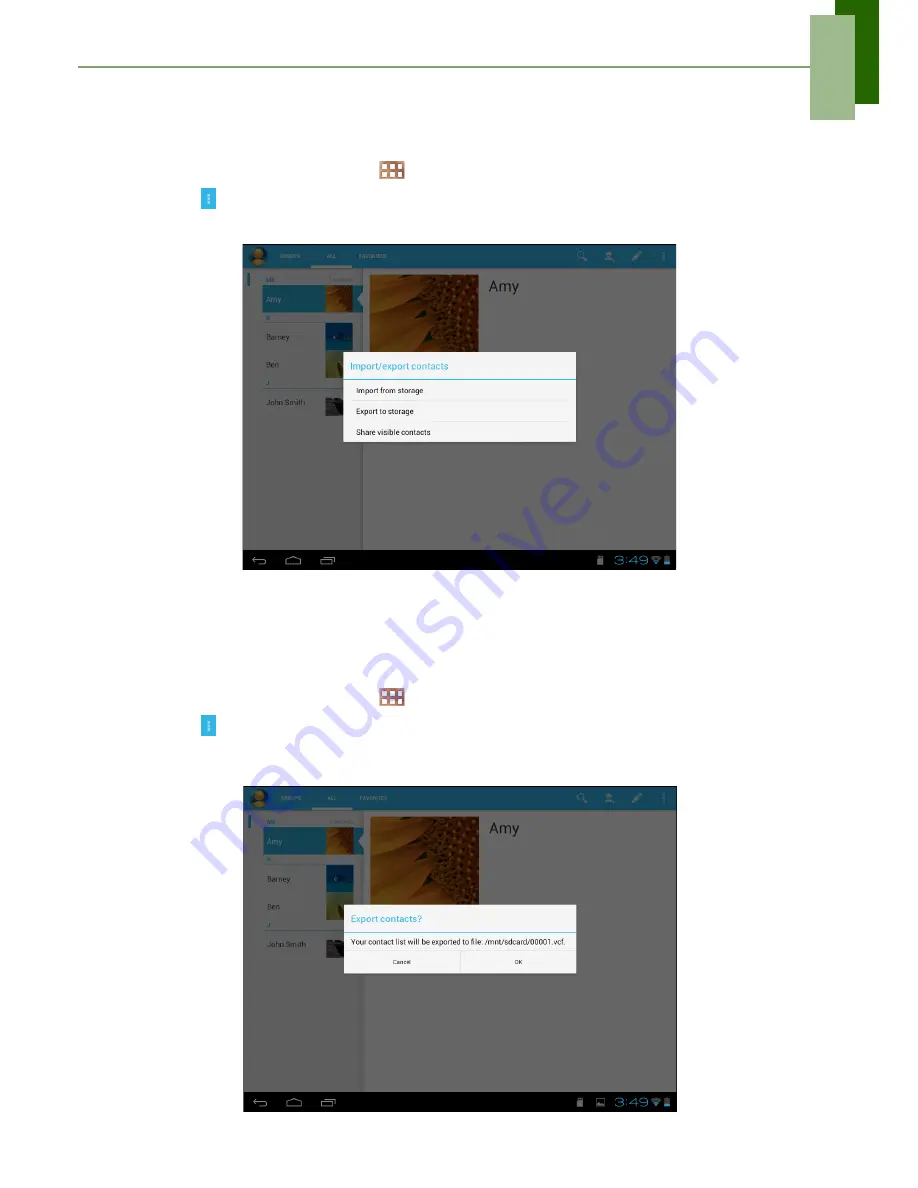
Importing contacts

You can import contacts from the memory card to your device.

1. From the Home screen, tap 

 > 

People

.

2. Tap  

Import/export

.

3. Select 

Import from storage

.

4. Select the vCard files to import and tap 

OK

.

Backing up contacts

You can copy contacts to the memory card to back up your contacts information.

1. From the Home screen, tap 

 > 

People

.

2. Tap  

Import/export 

Export to storage

.

3. A warning message pops up, tap 

OK

 to proceed. All contacts are copied to the 

memory card.

Содержание IdeaTab S1209A

Страница 1: ...IdeaTab S2109A F User Guide ...

Страница 2: ...Adjusting Volume 11 2 3 Setting up Wi Fi 12 2 4 People 15 Adding contacts 15 Importing contacts 16 Backing up contacts 16 Favorite contacts 17 Chapter 3 Email 18 3 1 Email Accounts 18 Setting up an Internet email account 18 Viewing email accounts 19 Chapter 4 Using Internet 20 4 1 Browsing Web Pages 20 Managing web pages 21 Chapter 5 Using Bluetooth 22 5 1 Connecting to Bluetooth Devices 22 Chapte...

Страница 3: ...4 7 8 FM Radio 35 7 9 Gallery 36 7 10 Places 36 7 11 Search 37 Searching information by entering text 37 7 12 Settings 37 7 13 Voice Note 38 Chapter 8 Managing Your Device 39 8 1 Device Settings 39 WIRELESS NETWORKS 39 DEVICE 39 PERSONAL 40 SYSTEM 41 8 2 Changing Basic Settings 44 Date and time settings 44 Alarms settings 45 Display settings 45 Ringtone settings 46 8 3 Using Wireless networks 47 8...

Страница 4: ...Chapter 1 Getting Started 1 Chapter 1 Getting Started 1 1 Your Device Front Back Touch screen Camera Light sensor Power button Speakers Speakers ...

Страница 5: ...roSD card as shown Make sure the gold contacts are facing down To remove the memory card 1 Open the card cover 2 Push to eject the microSD card from the slot NOTE Do not remove the memory card while the device is turned on Sudden removal of the memory card may cause data loss or unpredictable system hang up Volume button Microphone MicroSD slot Headset jack Micro HDMI port DC jack Micro USB port ...

Страница 6: ...atus bar When the battery is fully charged and the AC adapter is removed from the device the icon is displayed on the status bar NOTE Battery can also be charged when the device is connected to a computer using the micro USB cable Users have to use the connection to USB interfaces with USB 2 0 version or higher 1 4 Turning the Device On or Off After installing the memory card and charging the batt...

Страница 7: ...he Power button again 1 5 Unlocking the Screen By default the screen automatically locks after a period of inactivity You can set the length of time until the screen locks see To turn off backlight when the device is idle on page 45 To unlock the screen 1 Press the Power button to turn on the display from Sleep mode 2 Drag the middle circle to to unlock the screen NOTE To use the camera function d...

Страница 8: ... right across the Home screen The two extensions to the left and to the right of the Home screen provide more space for icons widgets shortcuts and other items Recent Apps Tap to view the recent applications Launcher icon Tap to view the applications and settings of the device Swipe left right to view the extended Home screen Return Tap to return to the previous screen Status bar Displays status a...

Страница 9: ...view system information easily To close the window tap Icon Description Icon Description Battery full Wi Fi is connected Battery low Bluetooth connection active Battery charging File download in progress New Email notification Headset connected Device is connected to PC via USB connection FM radio on Operation icons Return Home History See Home Screen on page 5 Battery icon Network icon Current ti...

Страница 10: ...application tap an icon Customizing shortcut menu To add a shortcut 1 Tap 2 Tap APPS to display the applications 3 To add an item drag the application icon to the specific Home screen To remove shortcut 1 Tap and hold an application icon 2 Drag the application icon to to delete The application icon is removed from the Home screen ...

Страница 11: ... and customize the Widgets on the Home screen as you like 1 From the Home screen tap 2 Tap WIDGETS to display applications All available widgets are displayed 3 To add a widget drag the widget icon to the specific Home screen To remove widgets 1 From the Home screen tap and hold the desired widget 2 Drag the widget to to delete it from the Home screen ...

Страница 12: ...ustomize the wallpaper of your Home screen with a default wallpaper or with pictures taken with your device Set wallpaper from My Gallery 1 From the Home screen tap and hold the screen 2 Tap Gallery 3 Browse the files Tap to select the picture you want to use as wallpaper Tap an icon to access the application ...

Страница 13: ...paper gallery 1 From the Home screen tap and hold the screen 2 Tap Live Wallpapers 3 Tap to browse the desired live wallpaper 4 Tap Set wallpaper to set the desired live wallpaper to set as Home screen wallpaper Set wallpaper from Wallpaper gallery 1 From the Home screen tap and hold the screen 2 Tap Wallpapers 3 Browse the available wallpapers ...

Страница 14: ...be adjusted separately Media volume Set the volume for music videos games and other media Notification volume Set the volume for notifications Alarm volume Set the volume for alarms To adjust the volume 1 From the Home screen tap Settings 2 In DEVICE tap Sound Volumes 3 To adjust the volume drag the respective volume slider to adjust the volume 4 Tap OK to save your settings ...

Страница 15: ...connection To turn Wi Fi on 1 From the Home screen tap Settings 2 In WIRELESS NETWORKS tap Wi Fi and set it to ON To connect to a Wi Fi network 1 Turn Wi Fi on 2 The available networks are listed Tap a network to connect to NOTE You can also tap ADD NETWORK to manually add a connection See To add a Wi Fi network on page 13 3 If you select an unsecured network the connection is automatically establ...

Страница 16: ... then tap Connect When Wi Fi is connected the connection icon is displayed on the status bar To add a Wi Fi network 1 From the Home screen tap Settings 2 In Wi Fi networks tap ADD NETWORK A new window is displayed 3 Follow the on screen instructions and enter the necessary information then tap Save to save the settings ...

Страница 17: ...Chapter 2 The Basics 14 To view Wi Fi settings 1 From the Home screen tap Settings 2 In Wi Fi networks tap Advanced Network information appears on the screen ...

Страница 18: ...eople 2 Tap to add a contact NOTE If the contact list is empty tap one of the following Create a new contact to save the contact to the device memory Sign in to an account to retrieve the contacts stored on a corporate or other account Import export contacts to import export contacts from to the storage 3 Enter contact information such as name phone number email address etc 4 When finished tap to ...

Страница 19: ...mport export 3 Select Import from storage 4 Select the vCard files to import and tap OK Backing up contacts You can copy contacts to the memory card to back up your contacts information 1 From the Home screen tap People 2 Tap Import export Export to storage 3 A warning message pops up tap OK to proceed All contacts are copied to the memory card ...

Страница 20: ...easily Add to Favorites List 1 From the Home screen tap People 2 Tap ALL tab and select a contact 3 Tap and the icon turns blue The contact is now displayed in the FAVORITES list Remove from Favorites List 1 From the Home screen tap People 2 Tap ALL tab and select a contact 3 Tap a contact and tap The contact is removed from the FAVORITES list ...

Страница 21: ...mail Yahoo Mail etc Setting up an Internet email account 1 From the Home screen tap Email 2 Enter your Email address and Password 3 Tap Next The device will automatically retrieve the email settings 4 Set your account options and tap Next 5 Enter Your Name and Account display name NOTE The Account display name is the name shown to the recipients of your emails 6 Tap Next Once the account set up is...

Страница 22: ...ox at the top left of the screen 3 Tap the account you want to access from the available email accounts Customizing email settings Configure message settings using the Account settings menu 1 From the Home screen tap Email 2 Tap the account you want to access 3 Tap Settings to open the email setting menu ...

Страница 23: ...or up To scroll left or right tap and swipe your finger to the right or left To bookmark the page 1 Tap 2 Enter the label and change other default settings if necessary 3 Tap OK to save your settings To set the Home page 1 While viewing a web page tap Settings Set homepage 2 Select the page that you want to set as the home page Tap OK to save your settings If Other is selected enter the URL of the...

Страница 24: ...data location and password Accessibility Select to configure text size zoom and inverted screen rendering settings Advanced Select to set search engine open in background enable JavaScript enable plug ins advanced settings for individual website page content settings and reset all settings to the factory default Bandwidth management Select to allow browser to preload high confidence search results...

Страница 25: ...connection to a Bluetooth device is called a partnership You need to pair and create a partnership with a Bluetooth device to exchange information 1 From the Home screen tap Settings 2 In WIRELESS NETWORKS tap Bluetooth and set it to ON 3 To search for a new device tap SEARCH FOR DEVICES 4 Tap a detected device 5 To start pairing enter the PIN and tap OK NOTE The PIN of the device must be the same...

Страница 26: ... take photos and videos Taking a photo 1 From the Home screen tap Camera 2 Aim the device at the subject Slide to or to zoom in out on the subject 3 Tap to take the shot The latest photo will be displayed on the top right of the screen Tap the thumbnail to view it in full screen Tap to take a photo Tap to preview the latest captured photo ...

Страница 27: ... 4 To start recording tap To stop recording tap Reviewing a photo After taking a photo tap the window located at top right corner to preview the latest captured photo on the screen To share the photo tap an application for sharing To view other photos in Gallery tap To return to Camera mode tap Tap to record video Tap to preview the latest recorded video ...

Страница 28: ... video on the screen Tap to play the video To share the video tap an application for sharing To view other videos in Gallery tap To return to Camcorder mode tap Configuring camera settings Tap to access the camera camcorder menu Tap the menu item icon to open the respective menu and select the desired setting Tap an option to configure camera settings ...

Страница 29: ...ation On Off Picture quality Super fine Fine Normal Shutter sound On Off Picture size 1 3M pixels VGA QVGA Restore defaults OK Cancel Camcorder mode White balance Auto Incandescent Daylight Fluorescent Cloudy Effect SILLY FACES Squeeze Big eyes Big mouth Small mouth Big nose Small eyes Time lapse interval Off 1s 1 5s 2s 2 5s 3s 5s 10s Video quality HD 720p SD 480p Camera settings Video duration 30...

Страница 30: ... Tap the desired folder to view the images in thumbnails 3 Tap an image to view 4 Swipe your finger to the left right to view the previous next image To share the photo tap then tap an application for sharing To delete the photo tap Then tap Delete to confirm file deletion To edit the photo tap to show more options ...

Страница 31: ...Chapter 6 Multimedia Applications 28 Playing videos 1 From the Home screen tap Gallery 2 Tap the desired folder to view the videos in thumbnails 3 Tap the video to playback ...

Страница 32: ...m the computer From the Home screen tap Music Music screen Playback screen Displays the playback area with the playback controls Drag the slider left right to go forward or backward Play or pause the song Go to next song Audio information display area Go to previous song Album art picture or animation ...

Страница 33: ...k 3 Swipe your fingers right and left to flip to the previous and the next page Customizing the Viewing Settings On any page touch the screen Select one of the following options that you want to adjust Tap to search for desired content in the book Tap to jump to the desired chapter Tap to toggle night or daylight reading mode configure the font type and size brightness level text alignment and lin...

Страница 34: ... to view web pages See Browsing Web Pages on page 20 7 3 Calculator With Calculator you can perform basic arithmetic functions on your device 1 From the Home screen tap Calculator 2 Use the on screen calculator keypad to perform arithmetic calculation ...

Страница 35: ...ap Calendar 2 Tap 3 Enter the event details 4 Select the date and time for From and To fields NOTE For an all day event check All day 5 To set repetition select the repetition from the list 6 To set a reminder select the time from the list 7 When finished tap TIP From the Calendar screen tap and hold a day or a time slot then set a new appointment on the selected date or time 7 5 Clock Set alarms ...

Страница 36: ...m the Home screen tap Downloads 2 Tap an item to view Managing files To delete a file tap the check box on the left side of the image A blue tick appears tap To share a file tap the check box on the left side of the image A blue tick appears tap To sort the file by size tap Sort by size To sort the file by time tap Sort by date To view files that have been downloaded earlier tap the headings ...

Страница 37: ...file tap the file or folder To move delete rename or view file or folder details tap and hold to view the options Then tap a desired option To copy tap and hold a file or folder then tap Copy To paste a file or folder tap Paste To create a new folder tap New folder To sort items tap Sort then tap a sorting option To mark a file or folder tap Mark To copy all files and folders tap Copy all To delet...

Страница 38: ...a frequency tap on a desired frequency To tune to another radio station tap or To view the Favorite List tap To add the current radio station into the Favorite list tap and then enter the station name and tap OK To set the desired radio station frequency tap Enter the radio frequency and tap OK To turn on the speaker tap Speaker on To mute the sound tap Mute To change other radio settings tap Sett...

Страница 39: ...deos are displayed in thumbnails 4 To view photos or videos see Viewing Photos Videos on page 27 7 10 Places Places is a location based application that helps you find the places and things around you Local information available includes restaurants cafes bars attractions entertainment gas stations post office ATMs hotels taxi and more This application also helps you get where you are going with m...

Страница 40: ... box 3 As you type matching items on your device and suggestions from web search are added to the list of previously chosen search results Tap a match item in the list 4 If what you are searching is not in the list tap The Browser opens displaying results of a search on the web 7 12 Settings In the Settings menu you can view and make adjustments for wireless network settings and the general and se...

Страница 41: ... a voice memo To record a voice note 1 From the Home screen tap Voice Note 2 The recording screen is displayed 3 Tap to record your voice 4 To stop recording tap To play a voice note 1 Tap 2 A list of voice notes is displayed 3 Tap the voice note you want to listen to ...

Страница 42: ...device Data usage View data usage used by the applications Airplane mode Disable all wireless connections VPN Set up and manage Virtual Private Networks VPNs Tethering Share your tablet s data connection via USB or Bluetooth Item Description SRS Enable SRS TruMedia sound system Sound Volumes Adjust the volume for media notification and alarms Default notification Set your default notification ring...

Страница 43: ...ing services Application Description Location services Location service Allow location to be determined by Wi Fi GPS satellites Enable GPS satellites Location search Use your location to improve search results and other services Security Screen lock Set the lock screen by sliding the screen or with a pattern PIN or password Owner info Show owner information on the lock screen Encrypt tablet Requir...

Страница 44: ...er speed Configure pointer speed Backup reset Back up my data Back up the current settings and other application data Backup account Back up the account data for debugging purpose Automatic restore Automatically restore backed up settings and other data after reinstalling an application Factory data reset Delete all data on the device and restore to factory default settings Application Description...

Страница 45: ...creen to never sleep while charging Allow mock locations Allow mock location Desktop backup password Set desktop backup password Strict mode enabled Screen flashes when applications do long operations on main thread Pointer location Screen overlays to show the current touch data Show touches Show visual feedback for touches Show screen updates The updated screen flashes when it is being updated Sh...

Страница 46: ...m update settings and view the last check status Status View the status of battery network and other information User Guide View the device user s manual Legal information View Open source licenses and legal information Model number View the device model number Android version View Android version Kernel number View Kernel version Build number View Build number Application Description ...

Страница 47: ...2 In SYSTEM tap Date time 3 Tap Set date to set the date To adjust the date tap the month day or year field and tap S or T to increase or decrease the value Tap Set to apply the values To change the date format tap Select date format and select the date format from the list 4 Tap Select time zone to select the time zone from the list 5 Tap Set time to set the time To adjust the time tap the hour m...

Страница 48: ...s then tap OK 6 To set the ringtone tap Ringtone Tap an option then tap OK 7 To vibrate when alarm sounds check Vibrate 8 To add an alarm label tap Label 9 After all settings are complete tap OK Display settings The display settings of this device affect the battery and external power level To turn off backlight when the device is idle 1 From the Home screen tap Settings 2 In DEVICE tap Display 3 ...

Страница 49: ...ntation 1 From the Home screen tap Settings 2 In DEVICE tap Display 3 Tap Auto rotate screen to automatically switch the screen orientation when rotating the device Ringtone settings You can assign a default ringtone whenever a new notification is received To change the notification ringtone 1 From the Home screen tap Settings 2 In DEVICE tap Sound 3 Tap Default notification 4 Tap the preferred ri...

Страница 50: ...an protect your device from unauthorized users by requiring the PIN code or entering a password Screen lock protection settings You can increase your device s security by creating a screen unlock pattern disabled by default When enabled you must trace the correct unlock pattern on the screen to unlock and regain access to the device 1 From the Home screen tap Settings 2 In PERSONAL tap Security 3 ...

Страница 51: ... remove the embedded battery by themselves Use only approved battery Keep the battery dry and away from any liquid since this may cause a short circuit Keep the battery away from metal objects since this may cause a short circuit Do not use damaged or deformed batteries If the battery emits a foul odor discontinue use Keep the battery away from babies and small children If the battery leaks Do not...

Страница 52: ...EK SAR Information THIS MOBILE DEVICE MEETS GUIDELINES FOR EXPOSURE TO RADIO WAVES Your mobile device is a radio transmitter and receiver It is designed not to exceed the limits for exposure to radio waves recommended by international guidelines These guidelines were developed by the independent scientific organization ICNIRP and include safety margins designed to assure the protection of all pers...

Страница 53: ... measures Reorient or relocate the receiving antenna Increase the separation between the equipment and receiver Connect the equipment into an outlet on a circuit different from that to which the receiver connected Consult the dealer or an experienced radio TV technician for help Changes or modifications not expressly approved by the party responsible for compliancecould void the user s authority t...

Страница 54: ...e radioélectrique subi même si le brouillage est susceptible d en compromettre le fonctionnement This Class B digital apparatus complies with Canadian ICES 003 Cet appareil numérique de la classe B est conforme à la norme NMB 003 du Canada The County Code Selection feature is disabled for products marketed in the US Canada For product available in the USA Canada markets only channel 1 11 can be op...

Страница 55: ...Council Recommendation of 12 July 1999 on the limitation of exposure of the general public to electromagnetic fields 0 300 GHz This equipment meets the following conformance standards EN62311 EN 62209 2 EN 62479 EN 60950 1 EN 55022 EN55024 EN 50332 1 EN 50332 2 EN 301 489 1 3 17 EN 300 328 EN 300 400 1 2 For the device which tests accordance to EN60950 1 2006 it is mandatory to perform audio tests...

Страница 56: ... owned by Bluetooth SIG Inc Java JME and all other Java based marks are trademarks or registered trademarks of Sun Microsystems Inc in the United States and other countries microSD is a trademark of SD Card Association The prediction engine of the input method is TOUCHPAL provided by COOTEK Products with 2 4 GHz Wireless LAN Devices France For 2 4 GHz wireless LAN operation of this product certain...

Отзывы: