


Applying labels to the base cover
The new base cover FRU is shipped with a kit containing labels of several kinds.
If the Windows Certificate of Authentication label (COA)
12
is attached to a part that is replaced, return the
old part with the label attached to the customer, or provide a letter to the customer stating what the label
was originally on the system and what the label part number, serial number, and product key were.
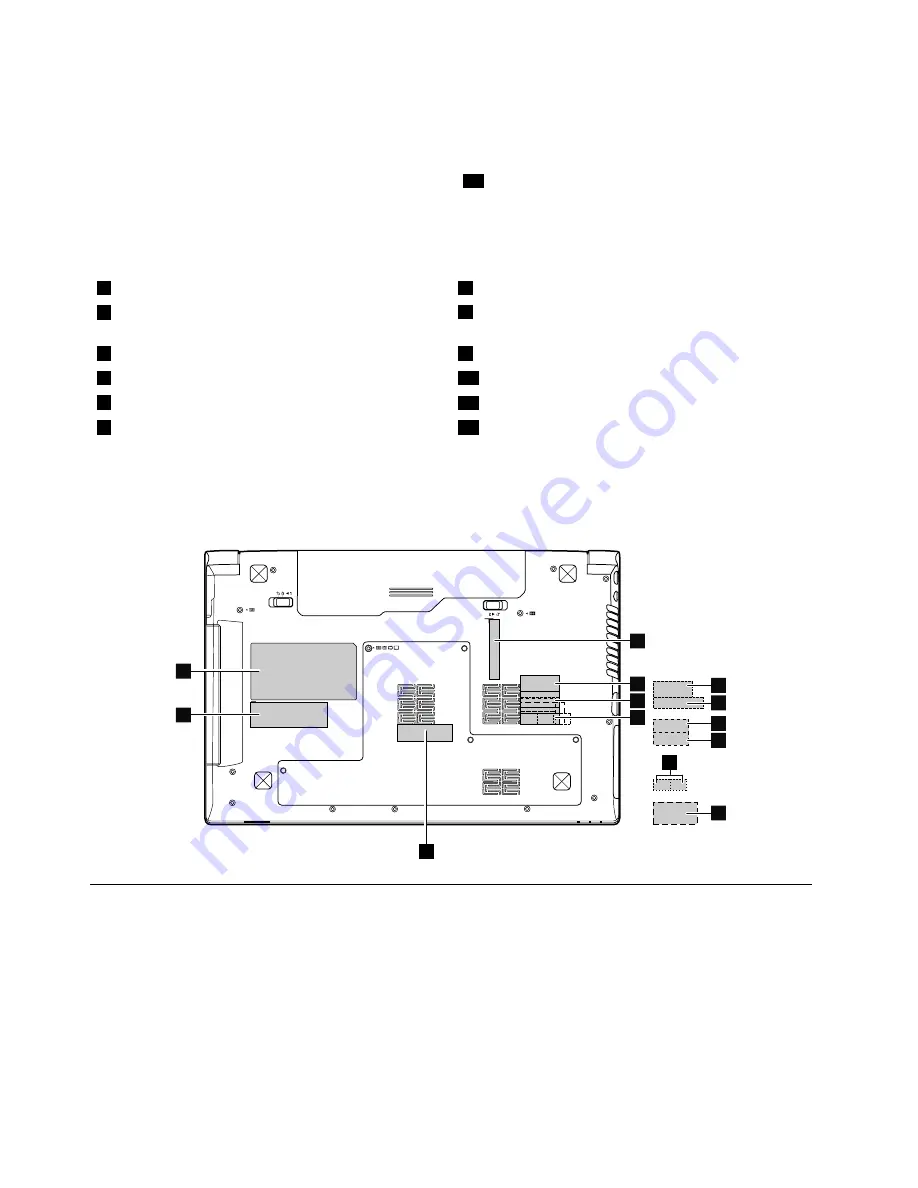
The following labels need to be peeled off from the old base cover, and need to be put on the new base cover.
1
Wistron label Indonesia D side label
7
Indonesia WLAN and Bluetooth label
2
Brazil Bluetooth label or Bluetooth label for US/CA/TW
WWAN IMEI barcode label
8
Indonesia WLAN and Bluetooth label
3
Brazil WLAN label or WLAN label for US/CA/TW
9
Malaysia SIRIM label
4
Brazil WLAN label or WLAN label for US/CA/TW
10
PPT label
5
Israel label
11
PRC label or KCC label
6
Israel label PPT label
13
Rating label
For some models, you need to apply two FCC labels. Check the old base cover; if it has two FCC labels,
apply both to the new base cover.
For the location of each label, refer to the following figure:
2
1
12
13
3
4
11
5
6
7
8
10
9
2010 LCD front bezel
For access, remove these FRUs in order:
•
“1010 Battery pack” on page 43
•
“1020 Bottom slot cover” on page 44
•
“1030 Hard disk drive” on page 45
•
“1040 Optical drive” on page 46
•
“1050 Memory modules” on page 47
•
“1060 PCI Express Mini Card for wireless LAN” on page 48
•
“1070 Backup battery” on page 50
•
“1080 Keyboard” on page 51
72
Hardware Maintenance Manual
Содержание B575e
Страница 1: ...Hardware Maintenance Manual Lenovo B575e ...
Страница 4: ...ii Hardware Maintenance Manual ...
Страница 6: ...iv Hardware Maintenance Manual ...
Страница 11: ...DANGER DANGER DANGER DANGER DANGER Chapter 1 Safety information 5 ...
Страница 12: ...DANGER 6 Hardware Maintenance Manual ...
Страница 13: ...Chapter 1 Safety information 7 ...
Страница 14: ...PERIGO PERIGO PERIGO PERIGO PERIGO PERIGO 8 Hardware Maintenance Manual ...
Страница 15: ...PERIGO PERIGO DANGER DANGER DANGER Chapter 1 Safety information 9 ...
Страница 16: ...DANGER DANGER DANGER DANGER DANGER VORSICHT 10 Hardware Maintenance Manual ...
Страница 17: ...VORSICHT VORSICHT VORSICHT VORSICHT Chapter 1 Safety information 11 ...
Страница 18: ...VORSICHT VORSICHT VORSICHT 12 Hardware Maintenance Manual ...
Страница 19: ...Chapter 1 Safety information 13 ...
Страница 20: ...14 Hardware Maintenance Manual ...
Страница 21: ...Chapter 1 Safety information 15 ...
Страница 22: ...16 Hardware Maintenance Manual ...
Страница 23: ...Chapter 1 Safety information 17 ...
Страница 24: ...18 Hardware Maintenance Manual ...
Страница 26: ...20 Hardware Maintenance Manual ...
Страница 27: ...Chapter 1 Safety information 21 ...
Страница 28: ...22 Hardware Maintenance Manual ...
Страница 29: ...Chapter 1 Safety information 23 ...
Страница 30: ...24 Hardware Maintenance Manual ...
Страница 31: ...Chapter 1 Safety information 25 ...
Страница 32: ...26 Hardware Maintenance Manual ...
Страница 38: ...32 Hardware Maintenance Manual ...
Страница 42: ...36 Hardware Maintenance Manual ...
Страница 46: ...40 Hardware Maintenance Manual ...
Страница 48: ...42 Hardware Maintenance Manual ...
Страница 59: ...The keyboard will open up slightly 3 3 Chapter 7 Removing and replacing a FRU 53 ...
Страница 67: ...Remove the I O board 4 3 Chapter 7 Removing and replacing a FRU 61 ...
Страница 84: ...78 Hardware Maintenance Manual ...
Страница 98: ...92 Hardware Maintenance Manual ...
Страница 101: ......
Страница 102: ...Part Number Printed in China 1P P N 1P ...