background image

User’s Guide A7-3G 

37 

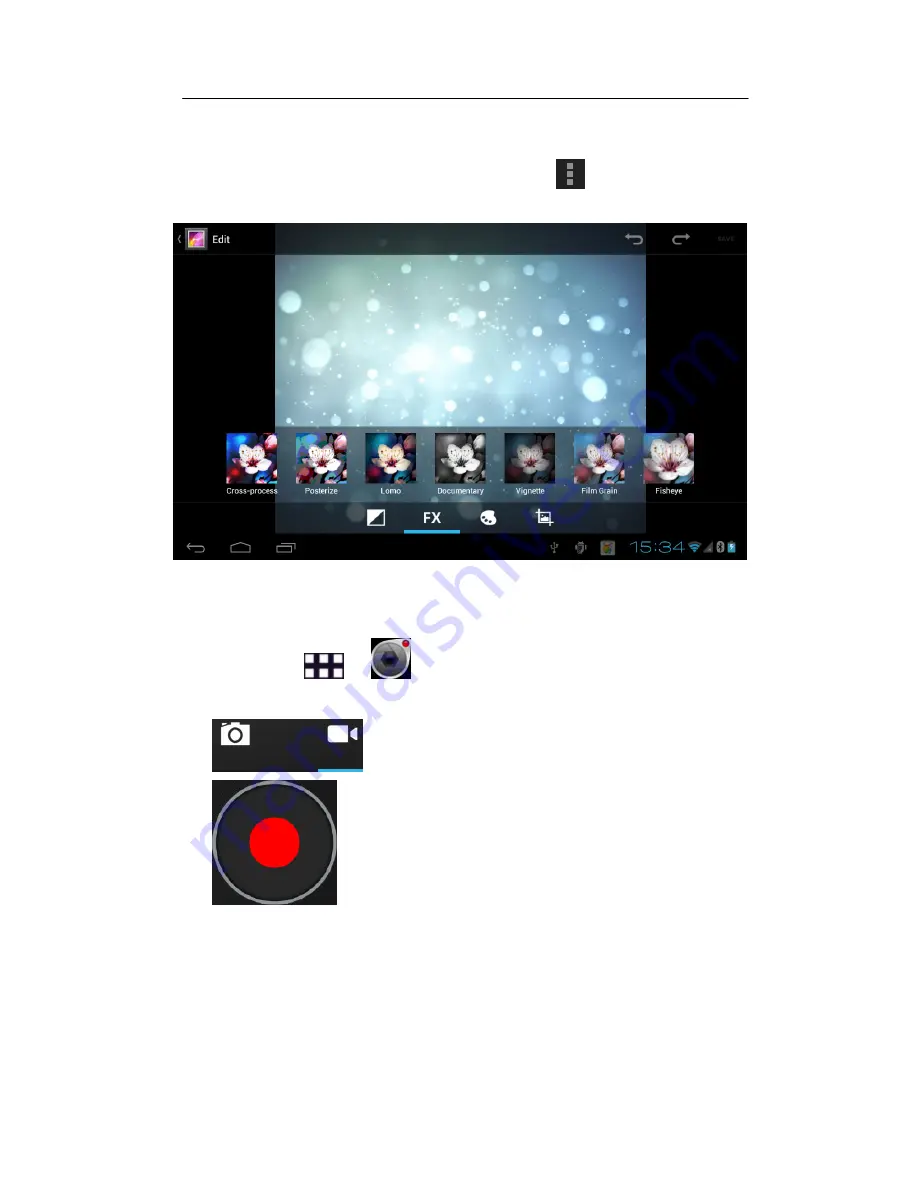
Edit photos 

Enter the picture browsing interface, then click 

, select "Edit" to enter 

the photo editing interface.   


7.3 Camcorder 

Steps

Click 

 > 

Camcorder. 

·Screen display framing the landscape of the region. 

·

  Can switch between camera and camcorder. 

·

  icon to record video. 

Содержание A7 3G

Страница 1: ...User s Guide A7 3G ...

Страница 2: ...8 SD card 8 1 4 Charging and headphones 9 Charging 9 Headphones 9 1 5 Turning On Off 9 Turning On 9 Turning Off 9 Standby 9 CHAPTER 2 BASIC OPERATION 10 2 1 Home Screen 10 The main key 10 Status Bar 11 Shortcuts 11 Widgets 11 Wallpapers 12 Touch screen 13 2 2 Volumes 13 Set the volumes 13 2 3 People 14 New contact 14 Edit contacts Delete contacts 14 Backup contacts 15 Import contacts 15 Favorite c...

Страница 3: ... 2 Gmail 22 Write a new Gmail 22 4 3 E mail 23 E mail account settings 23 Write and send messages 24 View and save e mail 24 Reply e mail 25 CHAPTER 5 NETWORK AND BROWSER 26 5 1 Mobile Networks 26 Check your network connection 26 5 2 WLAN 26 On off the WLAN 26 Search and connect WLAN 27 5 3 Browser 27 View the links in the page 28 Zoom pages 28 Set your browser 29 6 1 Using Bluetooth 30 Turn On Of...

Страница 4: ...B connection 43 8 2 SD card 44 CHAPTER 9 OTHER APPLICATIONS 45 9 1 Alarm Clock 45 Add alarm 45 9 2 Calendar 46 New event 46 Edit the event 47 9 3 Maps 47 Use the maps 48 View Maps 49 Get Directions 50 CHAPTER 10 SETTINGS 51 10 1 Device Settings 51 10 2 Date time 52 10 3 Language input 52 10 4 Display 53 Set the screen brightness 53 Sleep 54 10 5 Factory data reset 55 10 6 Protect your device 56 Pr...

Страница 5: ...battery and charger contact water and water vapor or operate device or charger with wet hand to avoid short circuit of the device breakdown caused by corrosion and electric shock of personnel Please don t let the device battery and charger receive strong impact or shock to prevent breakdown and damage Please don t place the device battery and charger in regions with too high or too low temperature...

Страница 6: ...radiation from A7 3G will erase information stored on the magnetic equipment Please don t use A7 3G in places with high temperature and inflammable gas such as nearby gas station Please put A7 3G and its accessories in places beyond children s touch and please don t let children use A7 3G without supervision During using of A7 3G please observe related laws and regulations respect privacy and legi...

Страница 7: ...User s Guide A7 3G 7 Chapter 1 Quick Start 1 1 Diagram of A7 3G ...

Страница 8: ...lot Remove SIM card To remove the SIM card please turning off the product or it will be damage to SIM card SD card You need a SD card to store photos music video and other data Install SD card Locate the SD card slot and then insert the SD card with its gold contacts facing down and its cut off corner facing out the card slot Remove SD card 1 Please make sure to disconnect the SD card and device C...

Страница 9: ...ur safety please do not use headphones When using headphones please do not set the volume to the maximum because it may damage your hearing 1 5 Turning On Off Turning On Press and hold power key to turning on the product it takes about 30 seconds to enter the main screen Turning Off Press and hold power key Pop up Device Options menu Click Shut Down Select OK in the pop up menu Standby 1 If you do...

Страница 10: ...orizontal sliding switch to the extended screen The main key Menu Open the application menu Google Search Use google search The main screen icon Back to the main screen Back icon Return to the previous operation screen Daemon icon Recently used applications click the desired application can be opened ...

Страница 11: ... GPS open Wifi is connected USB is connected Bluetooth Note The status indicator icons might be slightly different with your device subject to the actual software version Shortcuts To customize different home screen you can add apps shortcut reposition the shortcut Click to open the application menu long press and drag the icon to be added to the main screen Widgets You can add a clock music playe...

Страница 12: ...the screen Wallpapers 1 Touch and hold on home screen popup dialog box Click Gallery Can select the system your own pictures as wallpapers Click Live Wallpapers Can select the system live wallpapers as wallpapers Click Wallpapers Can select the system pictures as wallpapers 2 Click Settings Display Wallpaper ...

Страница 13: ... On some screens such as web pages you can also scroll side to side 4 Zoom when you view page you can double click the screen to zoom in or out the page 2 2 Volumes Media volumes Set the volumes of music video games and other media players Ringtone volumes Set the volumes of the ringtone and notifications Alarms volumes Set the alarm volumes Call volumes Set the volumes of calls Set the volumes St...

Страница 14: ...e new contact 1 Enter your contact s information 2 Click DONE to save the contact Edit contacts Delete contacts Edit contacts 1 Click open the contact list 2 Choose the contact you want to edit click After editing click DONE to save the contact Delete contacts 1 Click open the contact list 2 Click in the pop up menu choose Delete ...

Страница 15: ...to delete the checked contacts Backup contacts You can export your contact data to the SD card Steps 1 Click open the contact list 2 Click Import export 3 Click Export to storage Import contacts Import from SD card Steps 1 Click open the contact list 2 Click Import export ...

Страница 16: ...Import from storage Favorite contacts You can add commonly used contacts and special contacts to your collection in order to find and use Steps Select a contact in your contact list and then click the star icon to make it turn blue ...

Страница 17: ... end the call Note 1 Click can remove the number 1 You can also select a contact to call 2 During a call click to open the dial pad to the digital input Receive calls When the incoming call the device will issue a prompt you can hold down the drag it to the to receive calls or drag it to the to hang up Note you can hold down the and drag it to the message icon to hang up the phone and send a messa...

Страница 18: ...ty calls and outgoing calls 6 Click to connect the two sides call Call history You can view the received calls missed calls dialed calls and other information in the call history Steps Phone Click to view the call history Emergency call 1 Phone If the device is locked click Emergency Call 2 Press the number keys to enter the emergency number Note 1 Different countries have different emergency call...

Страница 19: ...Find a receiver from the contacts 2 Enter the text you want to send 3 Click send the message Answer messages The top status bar will be prompted when you receive new information Steps Messaging Select the message you want to reply 1 Enter the text you want to send 2 Click send the message Write MMS Steps Messaging new message ...

Страница 20: ...e A7 3G 20 Enter the message receiver you can also press Find a receiver Next in the following ways you can make a SMS converted into a MMS 1 Click add subject 2 Click to add pictures music or video files for MMS ...

Страница 21: ...ts and calendar in your Google account will be synchronized to the device Note If you do not have a Google account click Create Regain your Google account s password If you have forgotten your Google account s password you can perform the following steps to obtain the password 1 On tn the computer open a browser and go to http google com accounts 2 In the right side of the web page click Can t acc...

Страница 22: ... This will facilitate the continuous update of the Google application information Steps 1 Click Setting Accounts sync 2 Click the account you want to synchronize 4 2 Gmail Write a new Gmail Steps 1 Click Gmail 2 Click then select Compose ...

Страница 23: ...d or receive e mail messages Note 1 You must set up your e mail at first and then send or receive e mail 2 E mail must be send by internet connection You can consult your specific setup parameters with your network service provider E mail account settings Steps Click E mail Account setup 1 Enter the e mail address and password and then click Next ...

Страница 24: ...ltiple email addresses 1 After Set the initial e mail address Click select Settings option to enter the account settings page 2 Click the Add Account to add other email accounts Write and send messages Steps Click E mail 1 Click to editor the e mail message 2 Enter the E mail address of the recipient 3 Enter a subject 4 Write the message content 5 Click to send the E mail View and save e mail Rece...

Страница 25: ...mail to read in the Inbox Click the attachment icon can view e mail attachments Click Save to download attachments attachments are usually stored in your SD card Reply e mail In the Inbox select the mail you want to reply click to reply ...

Страница 26: ...ted you can use your network operator s 2G 3G business Check your network connection 1 Click Settings 2 WIRELESS NETWORKS More Mobile networks 3 Click Access Point Names APN to check your network connection 5 2 WLAN On off the WLAN Steps Click Settings WIRELESS NETWORKS Click switch to turn on or off the WLAN ...

Страница 27: ...he network Will appear in the status bar Note When you enter the network coverage and your WLAN is turned on your device will automatically reconnect to the network you have connected 5 3 Browser Use the browser allows your devices to access Web pages and Web based applications Consult with your network service provider for how to connect Note The network connection type depending on your network ...

Страница 28: ... search or enter the URL Click you can view all of your bookmarks history saved pages Click you can do more actions View the links in the page You can click the link in the page to open it Tap and hold the link in a Web page can choose to open the link in a new window or bookmark it You can also enter the URL you want to access directly in the address bar Zoom pages Double click the web page to zo...

Страница 29: ...User s Guide A7 3G 29 Set your browser Steps Click Browser Settings ...

Страница 30: ... is turned on and visible 3 After turn on Bluetooth click SEARCH FOR DEVICES 4 Select a device in the list to connect 5 Enter the PIN eg 0000 then press the Pair to connect the device When Bluetooth is turned on will be displayed in the status bar Note Bluetooth device connection methods may be different This manual is for reference only Disconnect the Bluetooth and equipment Click the device name...

Страница 31: ...eps Click Music Your device will automatically search your music on the SD card Select song title to play the music Play Pause Prev Next Open now playing list Repeat play all songs or current song Turn on or turn off shuffle Click in the pop up menu can do more action ...

Страница 32: ...ic continues to play 3 Click can stop the music 7 2 Camera Steps Click Camera Screen display framing the landscape of the region Can switch between camera and camcorder Photo shoot button Drag the ring to adjust the focal length of the camera Can switch between front camera and rear camera Set your camera options ...

Страница 33: ...d before you take a picture Touch the thumbnail of the photo you can open the media library to view the pictures Click Options on the screen you can operate the pictures Photo Options Click can enter the set interface You can set the following Flash mode ...

Страница 34: ...User s Guide A7 3G 34 White balance Exposure Camera settings ...

Страница 35: ...User s Guide A7 3G 35 View image Steps Click Gallery Click the picture you want to see You can also drag the screen left or right to view the next or previous picture Slideshow ...

Страница 36: ...u can start slideshow 2 Click the picture to enter the picture browsing interface click in the pop up menu select slideshow Share pictures 1 Click the picture you want to share enter the picture browsing interface then click 2 Choose ways of sharing SMS Bluetooth your Gmail e mail ...

Страница 37: ...r the picture browsing interface then click select Edit to enter the photo editing interface 7 3 Camcorder Steps Click Camcorder Screen display framing the landscape of the region Can switch between camera and camcorder icon to record video ...

Страница 38: ...g the ring to adjust the focal length of the camera Can switch between front camera and rear camera Set your camera options Note Please install the SD card before you record video Video options Click can enter the set interface ...

Страница 39: ...User s Guide A7 3G 39 You can set the following Flash mode White balance Time lapse interval ...

Страница 40: ...User s Guide A7 3G 40 Video quality Camera settings ...

Страница 41: ...n the media library view to the video Click the play button on the screen you can view the video You can also choose other buttons you want to do Manage video Play video Steps Click Videos Click the video you want to play in the list Share videos 1 When you view the video click 2 Choose ways of sharing SMS Bluetooth your Gmail e mail ...

Страница 42: ...User s Guide A7 3G 42 7 4 Sound Recorder Steps Click Sound recorder Record button stop recording After the recording is completed you can press the button to play the audio you just recorded ...

Страница 43: ... show the USB connection icon 3 Click the USB connection option and transferred to the USB connection interface and select OK connect the device to the computer Note In the meantime you can not use the devices to access the memory card so you can not use the application requires memory card such as cameras photo gallery or music 4 Find a Removable Disk icon in My Computer 5 On your computer click ...

Страница 44: ...ry card before use otherwise it will affect the use of photography camera and other functions Before removing the memory card make sure the memory card with the device disconnected Click Settings Storage Unmount SD card After unmounting SD card you can click Erase SD card to erases all data on the SD card Note Before installing or removing memory card turn off the equipment or they may damage your...

Страница 45: ...User s Guide A7 3G 45 Chapter 9 Other applications 9 1 Alarm Clock Add alarm Steps Click Clock alarm set Add alarm set the alarm information then click Done ...

Страница 46: ...an arrange and manage your schedule Note To use the calendar you must login to Google account first and correctly set the time and date of the equipment Setps Click Calendar New event Click to set new event enter the event option click Done to save the event ...

Страница 47: ...t allows you to find a place to go or address of the vector Note You must open 3G GPRS or Wi Fi to use the map Maps application does not cover all countries and cities Open the location service you must open the location service first in order to open the map and search for your location or search a place to go Steps Click Settings Location services Check Google s location services GPS satellites ...

Страница 48: ... interface click then your location on the map will display a flashing blue dot Search the place you want to go 1 In the map interface click Search Maps 2 Enter the name of the place you want to search you can choose to enter an address city or the building name for example The Oriental Pearl ...

Страница 49: ... inward sliding the screen at the same time can zoom in or out the map Change the map mode Click to change the map mode Traffic only to the specific area Real time traffic updates will display a different color lines on the road each color represents a different traffic movement speed Satellite Use the same satellite data as Google Earth However satellite imagery is not a real time video Google Ea...

Страница 50: ...ect the starting point and destination address 3 Select the way you travel By car bus or on foot 4 Click Go wait a little longer it will be a list showing the routes to go to your destination Click on the route guidance on a map showing the route 5 Complete view or finished using the routes press the Menu key then click empty the results you can reset the map Your destination will be automatically...

Страница 51: ...he status bar of the main screen then you can see the pop up menu Click to enter the setup menu Click Settings option to enter the main setup interface WIRELESS NETWORKS Set your device s wireless connection such as wifi and Bluetooth flight mode or set up roaming networks and more options DEVICE Set the theme style sound display storage devices etc ...

Страница 52: ...matically adjust the display time and date and time zone If you want to set up your own time do not check these two options If you want set up time by yourself Click Set date adjust the date month and year and then touch the Set Click Select time zone and then select your time zone in the list Click Set time adjust the hours and minutes You can check or uncheck the Use 24 hour format switch betwee...

Страница 53: ...3 Select the language you want to use 10 4 Display Set the screen brightness Steps Click Settings Display Brightness Note If you want to adjust the brightness by yourself please set the Choose Brightness Settings to Normal ...

Страница 54: ...User s Guide A7 3G 54 When the Choose Brightness Settings is Normal click Brightness adjust the brightness in the pop up box Sleep Steps Click Settings Display Sleep Set the screen auto lock delay time ...

Страница 55: ... This operation will clear the following data in your device Your account System and application s data and settings Application Does not clear the following data System software and bundled applications The file in the SD card such as music or photos Steps Click Settings Backup reset Factory data reset ...

Страница 56: ...ll Unlock the SIM card If you enter the wrong PIN code more than the allowed times 3 times your SIM card will become the PUK locked You must enter the PUK code in order to restore the device This password will be provided with the service provider s SIM card Click on an emergency call and then enter the following sequence 05 PUK New PIN New PIN For example If your PUK is 888888 and you want the SI...

Страница 57: ... It will into the lock screen after the device is turned on Press and hold move to the unlock icon to unlock Create a screen unlock pattern Create a personal screen unlock pattern can improve the security of the devices Steps 1 Click Settings Security Screen lock Pattern 2 Read the instructions on the screen and then click Next 3 Draw at least four points connected to the vertical horizontal or di...

Страница 58: ...passwords visible 2 To change the screen unlock pattern please enter the interface of the screen unlock pattern confirmed once the original stored pattern and then touch the pattern option to draw a new pattern 3 If you fail to draw the correct unlock pattern of five on the screen the screen will prompt you must wait 30 seconds later to try again If you forgot your screen unlock pattern please cli...

Отзывы: