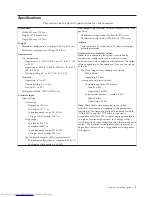


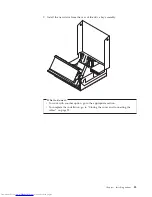


Installing
a
drive
in
bay
1
To
install
an
optical
drive
or
an
additional
hard
disk
drive
in
bay
1,
do
the
following:
1.
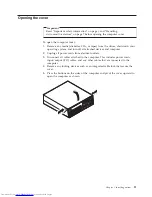
Open
the
computer
cover.
See
“Opening
the
cover”
on
page
11.
2.
Remove
the
plastic
panel
from
the
front
bezel.
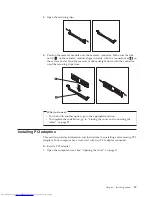
3.
Remove
the
metal
shield
from
the
drive
bay
by
using
a
flat-blade
screwdriver
to
gently
pry
it
loose.
4.
If
you
are
installing
any
type
of
drive
other
than
a
serial
ATA
hard
drive,
make
sure
the
drive
that
you
are
installing
is
set
correctly
as
either
a
master
or
a
slave
device.
Note:
A
serial
ATA
hard
disk
drive
does
not
need
to
be
set
as
either
a
master
or
a
slave
device.
If
you
are
installing
an
optical
drive
or
a
parallel
ATA
hard
disk
drive,
set
it
as
a
master
device.
Refer
to
the
documentation
that
comes
with
your
drive
for
master/slave
jumper
information.
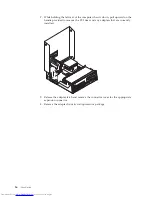
5.
For
a
5.25-inch
drive,
install
a
retainer
bracket
on
the
side
of
the
drive.
6.
For
a
3.5-inch
drive,
install
the
drive
into
the
Universal
Adapter
Bracket,
5.25
to
3.5-inch.
Note:
If
you
are
installing
a
3.5-inch
hard
disk
drive
you
must
use
a
Universal
Adapter
Bracket,
5.25
to
3.5-inch.
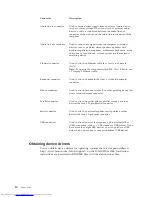
You
can
obtain
this
bracket
from
a
local
computer
retailer
or
by
contacting
the
Customer
Support
Center.
Chapter
1.
Installing
options
19
Содержание 82121QU
Страница 1: ...User Guide Types 8111 8154 8161 8162 Types 8163 8164 8165 8211 Types 8212 8213 8214 ...
Страница 2: ......
Страница 3: ...User Guide Types 8111 8154 8161 8162 Types 8163 8164 8165 8211 Types 8212 8213 8214 ...
Страница 6: ...iv User Guide ...
Страница 16: ...xiv User Guide ...
Страница 46: ...30 User Guide ...
Страница 52: ...36 User Guide ...
Страница 64: ...48 User Guide ...
Страница 69: ......
Страница 70: ...Part Number 39J8154 Printed in USA 1P P N 39J8154 ...


