background image


Chapter 2 Adjusting and using your monitor  2-5


Adjusting your monitor image 

This section describes the user control features used to adjust your monitor image. 

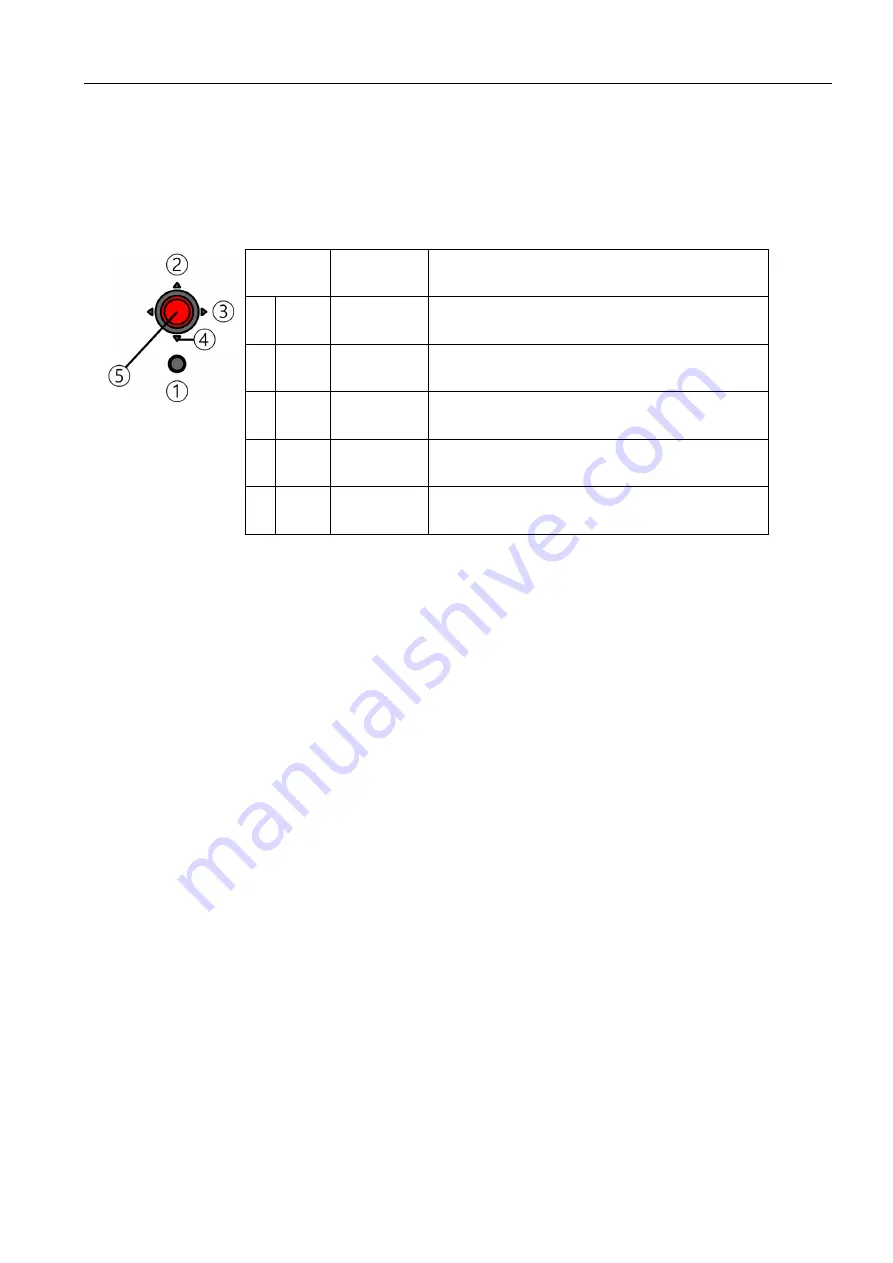
Using the direct access controls 

The direct access controls can be used when the On Screen Display (OSD) is not displayed. 

Table 2-1 Direct access controls 


Joy Button 

/Key 

Control


Description


1  Input 

Input change  Switches the video input source. 

2  Up 

Brightness 

Direct access to Brightness adjustment. 

(This is default and can be changed by Quick settings.) 

3  Right 

Color mode 

Direct access to Color mode adjustment. 

(This is default and can be changed by Quick settings.) 

4  Down  Contrast 

Direct access to Contrast adjustment. 

(This is default and can be changed by Quick settings.) 

5  Enter 

Main menu 

Open OSD main menu 


Содержание 63B3

Страница 1: ...P24h 30 LCD Monitor User s Guide Machine Type 63B3 63BB ...

Страница 2: ...at private expense and are sold to governmental entities as commercial items as defined by 48 C F R 2 101 with limited and restricted rights to use reproduction and disclosure LIMITED AND RESTRICTED RIGHTS NOTICE IF products data computer software or services are delivered pursuant a General Services Administration GSA contract use reproduction or disclosure is subject to restrictions set forth in...

Страница 3: ...2 1 Arrangingyourworkarea 2 1 HealthAdministration 2 2 LowBlueLight 2 4 Accessibilityinformation 2 4 Adjustingyour monitorimage 2 5 Usingthedirectaccesscontrols 2 5 UsingtheOn ScreenDisplay OSD controls 2 6 Selectinga supporteddisplaymode 2 10 Image rotation 2 11 Understandingpowermanagement 2 11 MirroredPowerButtonFunction 2 12 Caringforyourmonitor 2 13 Detachingthemonitorstand 2 13 Wall Mounting...

Страница 4: ...e telephonelist A 1 AppendixB Notices B 1 Recyclinginformation B 2 Collectingandrecyclingadisused Lenovo computerormonitor B 2 Disposingof Lenovo computer components B 2 Trademarks B 3 Turkishstatementof compliance B 3 Ukraine RoHS B 3 India RoHS B 3 Power cordsandpoweradapters B 3 Zambia B 3 ...

Страница 5: ...Copyright Lenovo 2022 Safety information General Safety guidelines For tips to help you use your computer safety go to http www lenovo com safety Before installing this product read the Safety Information ...

Страница 6: ... Copyright Lenovo 2022 v TCO Certified ...

Страница 7: ...vi Copyright Lenovo 2022 ...

Страница 8: ...he ampere rating Amps or A for each device Install your monitor near a power outlet that you can easily reach Disconnect the monitor by grasping the plug firmly and pulling it from the outlet Never disconnect the monitor by pulling the cord Do not allow anything to rest on the power cord Do not walk on the cord While using VESA mount application the AC Inlet must face to down side Do not face any ...

Страница 9: ...s Information Flyer Flat Panel Monitor Monitor stand Monitor base Power Cord USB C C Cable USB C A Cable optional DP cable optional HDMI Cable optional Depending on many factors such as the processing capability of peripheral devices file attributes and other factors related to system configuration and operating environments the actual transfer rate using the various USB connectors on this device ...

Страница 10: ... Do not touch the monitor within the screen area The screen area is glass and can be damaged by rough handling or excessive pressure 1 Place your monitor with the screen face down on a soft flat surface 2 Put the stand and base to the monitor Note To attach a VESA mount please see Detaching the monitor stand on page 2 13 ...

Страница 11: ...trols and using the cable lock slot Types of adjustments Tilt Please see the illustration below for an example of the tilt range Swivel With the built in pedestal you can tilt and swivel the monitor for the most comfortable viewing angle Height Adjustment After pressing the top of the monitor you can adjust the height of the monitor ...

Страница 12: ...tate clockwise or anticlockwise until the monitor stops at 90 User controls Your monitor has controls at the rear which are used to adjust the display For information on how to use these controls please see Adjusting your monitor image on page 2 5 Cable lock slot Your monitor is equipped with a cable lock slot located on the rear of your monitor Please follow the instructions that came with the ca...

Страница 13: ...e other end to the DP connector on the monitor Lenovo recommends that customers who require using the DisplayPort input on their monitor purchase the Lenovo DisplayPort to DisplayPort cable 0A36537 For more information go to the following www lenovo com support monitoraccessories 3 Connect one end of the HDMI cable to the HDMI connector on the back of the computer and the other end to the HDMI con...

Страница 14: ...ical 15V 3A 9V 3A 5V 3A Note 2 USB C upstream port supports maximum output power 75W 96W Super USB Charging Smart Power and the PDO table is as below Smart Power W 5V Fixed 9V Fixed 15V Fixed 20V Fixed Off 75W 3A 3A 3A 3 75A On 96W 3A 3A 3A 4A 4 25A 4 5A 4 8A Super USB Charging USB C up port supply capability USB A port total power consumption Panel Brightness Off 75 W 0 W 25 5W No Limit On 96 W 0...

Страница 15: ...e hearing damage hearing loss 7 Connect one end of the USB cable to the USB downstream terminal of the monitor and connect the other end of the USB cable to an appropriate USB port on your device Note 1 The USB downstream port does not provide power while the monitor is switched off Note 2 Power output for USB A 5V 0 9A USB BC1 2 5V 2 4A To use top port USB first remove the rubber cover If there a...

Страница 16: ...equipment regulations shall be considered A certified power supply cord not lighter than ordinary polyvinyl chloride flexible cord according to IEC 60227 designation H05VV F 3G 0 75mm or H05VVH2 F2 3G 0 75mm shall be used Alternative a flexible cord be of synthetic rubber according to IEC 60245 designation H05RR F 3G 0 75mm shall be used 9 After attaching all necessary cables to your monitor and c...

Страница 17: ...d monitor Note 1 It is recommended to use the best resolution 2560x1440 60Hz output to achieve the best viewing effect Note 2 Monitors sold in NA include a DP cable Note 3 Daisy Chain HDR Daisy Chain performance is controlled by graphic card Note 4 For other regions Lenovo recommends that customers who require using the Display Port input on their monitor purchase the Lenovo Display Port to Displa...

Страница 18: ...moments to register your product and provide us with information that will help Lenovo to better serve you in the future Your feedback is valuable to us in developing products and services that are important to you as well as in developing better ways to communicate with you Register your option on the following Web site http www lenovo com register Lenovo will send you information and updates on ...

Страница 19: ...ing your posture or chair position Use a viewing distance that is most comfortable for you Monitor height Position the monitor so your head and neck are in a comfortable and neutral vertical or upright position If your monitor does not have height adjustments you might have to place books or other sturdy objects under the base of the monitor to achieve the desired height A general guideline is to ...

Страница 20: ... insufficient lighting makes the display on screen harder to see Generally lighting level should not exceed 750 lux and levels ranging from 300 to 500 lux are most appropriate for computer desk work Recommended lighting arrangement includes positioning work stations away from direct sunlight or using overhead lighting with baffles or louvers that reduces glare Working Habits Long exposures to comp...

Страница 21: ...r a comfortable working experience Seating Position Placing the monitor too far or too close may lead to eye strain Far viewing distance causes users to lean forward to see small texts which strain the eyes and torso Close viewing distance on the other hand strains the eye resulting from exerting more effort to focus and also causes the user to sit in awkward body posture i e tilting the head typi...

Страница 22: ...tions Reducing flicker minimizes eye strain and headaches ThinkVision monitors allow users to use high frequency display modes that can effectively reduce flicker Low Blue Light Concerns on blue light affecting eye health have risen over the years Blue light have wavelength between 300 nm to 500 nm The monitors under default setting mode reduce blue light emissions The monitors achieve the require...

Страница 23: ...able 2 1 Direct access controls Joy Button Key Control Description 1 Input Input change Switches the video input source 2 Up Brightness Direct access to Brightness adjustment This is default and can be changed by Quick settings 3 Right Color mode Direct access to Color mode adjustment This is default and can be changed by Quick settings 4 Down Contrast Direct access to Contrast adjustment This is ...

Страница 24: ...or consumer electronics led by the U S government It was launched in 1992 by EPA and DOE to reduce energy consumption and greenhouse gas emissions Energy Star logo is a symbol of energy conservation and environmental protection It improves the concept of energy efficiency of consumers and manufacturers and effectively guides the market The regulation of Energy Star improves energy efficiency and r...

Страница 25: ... drive Off Normal Extreme Color mode Adjusts intensity of red green and blue sRGB DCI P3 BT 709 Neutral Warm Cool Custom Red Increases or decreases the saturation of red in the image Green Increases or decreases the saturation of green in the image Blue Increases or decreases the saturation of blue in the image Quick settings Right key Brightness Contrast Scenario mode Language Color mode Up key B...

Страница 26: ...ayPort HDMI USB charging On Off Upstream USB C charging always on Super USB C charging On Off Smart Power On Off DP select DP 1 4 DP 1 2 DP daisy chain Auto On Off Advanced settings Scenario modes Panel Native Image Creation Digital Cinema Video Creation Button repeat rate Default Slow Off Aspect ratio Selects type of scaled image Full Screen Expand image to full screen Original AR Ratio with inpu...

Страница 27: ...fter the last time a button is pressed OSD position Adjust osd horizontal and vertical position OSD rotation Normal 90 270 Transparency Choose the transparency of OSD Factory reset Resets monitor to the original factory settings Reset No The ENERGY STAR Logo means resets all user settings to default values so that the monitor can meet the requirements of Energy Star The use of Extreme Mode respons...

Страница 28: ...e If your system has previously been used with a CRT monitor and is currently configured to a display mode outside the range of this monitor you may need to re attach the CRT monitor temporarily until you have re configured the system preferably to 2560x1440 60Hz which is the Native Resolution Display mode The display modes shown below have been optimized at the factory Table 2 3 Factory set displ...

Страница 29: ...ower management is invoked when the computer recognizes that you have not using your mouse or keyboard for a user definable period There are several states as described in the table below For optimal performance switch off your monitor at the end of each working day or whenever you expect to leave it unused for long periods during the day Table 2 4 Power indicator State Power Indicator Screen Rest...

Страница 30: ...ton function is compatible with some Lenovo devices the compatibility list please refer to the link http support lenovo com docs p24h_30_vdm_comp_list If monitor power button can t work normally with the compatibility list Thinkpad NBs please update monitor s firmware with Lenovo Display Control Center ThinkColour and ensure the system s BIOS Drivers are up to date ...

Страница 31: ...little mild detergent Detaching the monitor stand After placing the monitor face down on a clean and soft surface push the hook of the stand and lift the stand up to remove it from the monitor Wall Mounting Optional Refer to the instructions that come with the VESA compatible base mounting kit 1 Place the monitor face down on a non abrasive surface on stable flat table 2 Remove the stand 3 Attach ...

Страница 32: ...Image Viewable image size 604 4 mm 23 8 in Maximum height 296 3 mm 11 66 in Maximum width 526 8 mm 20 74 in Pixel pitch 0 205 mm 0 00807 in V Response time Off 14 ms Normal 6 ms Extreme 4 ms Power input Supply voltage 100 240 VAC 60 50 Hz current 2 5 A USB Type C PD Function Supply voltage current 5V or 9V or 15V DC 3A or 20V DC 3 75A Typical or 20V DC 4 8A Max in smart power or super charging Aud...

Страница 33: ...Clock frequency 300 MHz Aspect Ratio Size ratio 16 9 Communications VESA DDC CI Altitude Test Operation 5000 m 16404 ft Supported Display Modes VESA Standard modes between noted ranges Horizontal frequency 28 kHz 112 kHz Vertical frequency 50 Hz 76 Hz Native Resolution 2560 x 1440 at 60 Hz Temperature Operating 0 to 40 C 32 F to 104 F Storage 20 to 60 C 4 F to 140 F Shipping 20 to 60 C 4 F to 140 ...

Страница 34: ...orted display mode for your computer If these options do not work contact the Customer Support Centre Selecting a supported display mode on page 2 10 The image quality is unacceptable The video signal cable is not connected with the monitor or system completely Be sure the signal cable is firmly plugged into the system and monitor Connecting and turning on your monitor on page 1 5 The color settin...

Страница 35: ...ontrast are at the lowest setting Adjust the brightness and contrast setting on the OSD menu Adjusting your monitor image on page 2 5 One or more of the pixels appear discoloured This is a characteristic of the LCD technology and is not an LCD defect If there are more than five pixels missing contact the Customer Support Centre Appendix A Service and Support on page A 1 Fuzzy lines in text or a bl...

Страница 36: ...he Change the display settings tab 7 Click the Advanced Settings button 8 Click the Monitor tab 9 Click the Properties button 10 Click the Driver tab 11 Click Update Driver then click Browse the computer to find the driver program 12 Select Let me pick from a list of device drivers on my computer 13 Click the Have Disk button By clicking the Browse button browse and point to the following path X M...

Страница 37: ...onitor 8 Click Update Driver then click Browse the computer to find the driver program 9 Select Let me pick from a list of device drivers on my computer 10 Click the Have Disk button By clicking the Browse button browse and point to the following path X Monitor Drivers Windows 11 where X indicates the folder in which the downloaded driver is located such as a desktop 11 Select the P24h 30 inf file...

Страница 38: ...lem please contact the Customer Support Centre For more information on contacting the Customer Support Centre please see Appendix A Service and Support on page A 1 Service parts The following parts are for use by Lenovo service or Lenovo authorized dealers to support the customer warranty Parts are for service use only The table below shows information for model 63B3 GAR6 WW Table 3 3 List of serv...

Страница 39: ...scretion 90 days after the option has been withdrawn from marketing Additional support offerings including step by step installation assistance are available for a nominal fee To assist the technical support representative have available as much of the following information as possible Option name Option number Proof of purchase Computer manufacturer model serial number and manual Exact wording of...

Страница 40: ...800 0123 Spanish Hungary 36 13 825 716 English Hungarian India Primary 1800 419 4666 Tata Secondary 1800 3000 8465 Reliance Email commercialts lenovo com English and Hindi Indonesia 1 803 442 425 62 213 002 1090 Standard Charges Apply English Bahasa Indonesia Ireland Warranty service and support 01 881 1444 English Israel Givat Shmuel Service and Center 972 3 531 3900 Hebrew English Italy Warranty...

Страница 41: ...rd Charges Apply English Mandarin Bahasa Malaysia Slovakia ThinkStation and ThinkServer 421 2 4954 5555 Slovenia 386 1 2005 60 Slovenian Spain 34 917 147 833 Spanish Sri Lanka 9477 7357 123 Sumathi Information systems English Sweden Warranty service and support 077 117 1040 Swedish Switzerland Warranty service and support 0800 55 54 54 German French Italian Taiwan 0800 000 702 Mandarin Thailand 00...

Страница 42: ...ted in new editions of the publication Lenovo may make improvements and or changes in the product s and or the program s described in this publication at any time without notice The products described in this document are not intended for use in implantation or other life support applications where malfunction may result in injury or death to persons The information contained in this document does...

Страница 43: ...with the Law for Promotion of Effective Utilization of Resources Lenovo Japan provides through its PC Collecting and Recycling Services for the collecting reuse and recycling of disused computers and monitors For details visit the Lenovo Web site at https www lenovo com jp ja services_warranty recycle pcrecycle Pursuant to the Law for Promotion of Effective Utilization of Resources the collecting ...

Страница 44: ...h statement of compliance The Lenovo product meets the requirements of the Republic of Turkey Directive on the Restriction of the Use of Certain Hazardous Substances in Electrical and Electronic Equipment EEE Lenovo and the Lenovo logo are trademarks of Lenovo in the United States other countries or both Ukraine RoHS India RoHS RoHS compliant as per E Waste Management Handling Rules 2011 Power cor...

Отзывы: