


Table 19. Removal steps of bluetooth daughter card (continued)
When installing:
Make sure that the connector on the bottom side of the card is attached firmly to the system board.
1130 System board assembly and fan assembly
Important notices for handling the system board:
When handling the system board, bear the following in mind.
• The system board has an accelerometer, which can be broken by applying several thousands of G-forces.
Note:
Dropping a system board from a height of as little as 6 inches so that it falls flat on a hard bench can subject
the accelerometer to as much as 6,000 G's of shock.
• Be careful not to drop the system board on a bench top that has a hard surface, such as metal, wood, or composite.
• If a system board is dropped, you must test it, using PC-Doctor for DOS, to make sure that the HDD Active
Protection System
™
still functions.
Note:
If the test shows that the HDD Active Protection System is not functioning, be sure to document the drop
in any reject report, and replace the system board.
• Avoid rough handling of any kind.
• At every point in the process, be sure not to drop or stack the system board.
• If you put a system board down, be sure to put it only on a padded surface such as an ESD mat or a corrugated
conductive surface.
After replacing the system board, run PC-Doctor for DOS to make sure that the HDD Active Protection System
still functions. The procedure is as follows:
1. Place the computer on a horizontal surface.
2. Run
Diagnostics
➙
ThinkPad Devices
➙
HDD Active Protection Test
.
Attention:
Do not apply physical shock to the computer while the test is running.
For access, perform the following steps in order:
•
“1000 Disabling the battery pack in UEFI BIOS” on page 48
• Remove the “1010 Hard disk drive or solid state drive assembly” on page 48.
• Remove the “1020 Keyboard” on page 50.
• Remove the “1030 Top case assembly” on page 52.
• Remove the “1080 Battery pack” on page 56.
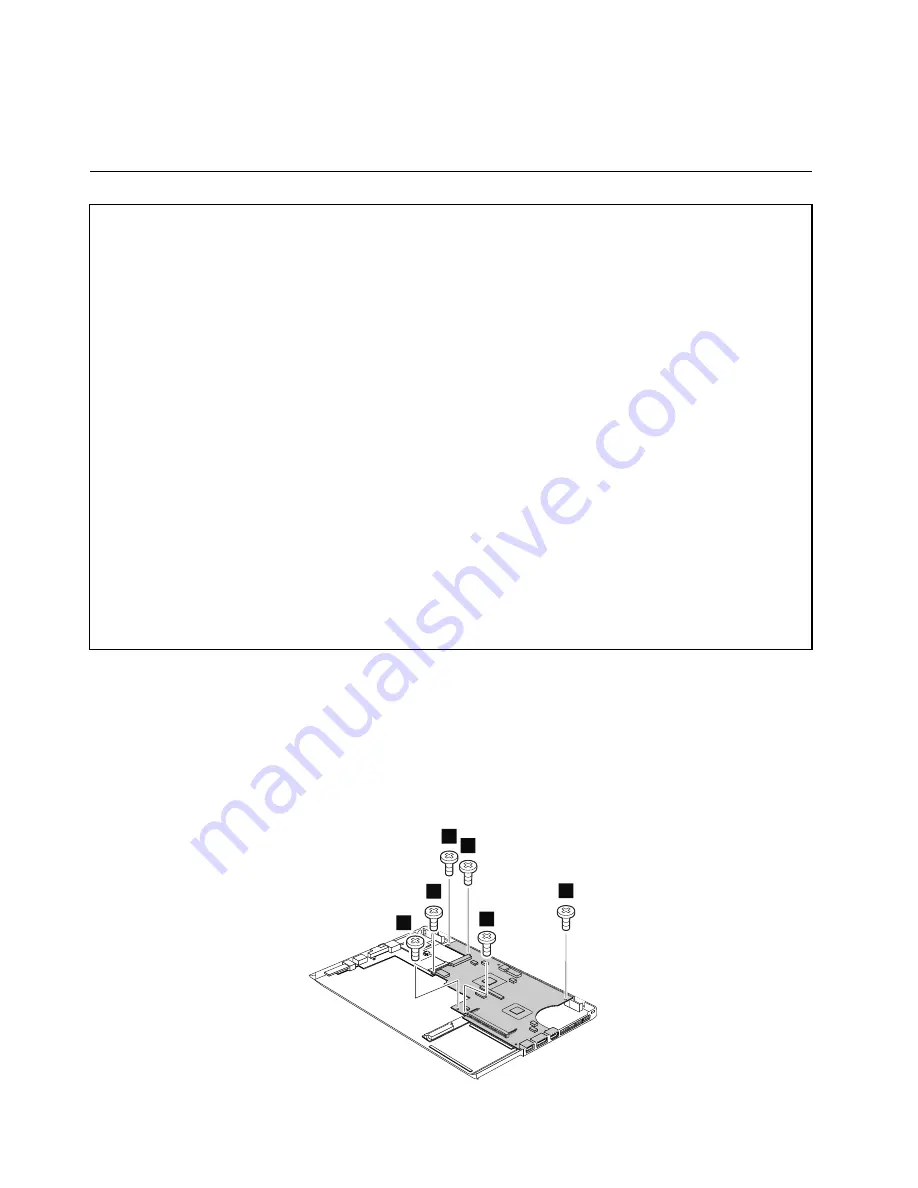
Table 20. Removal steps of system board
1
1
1
1
1
1
62
Hardware Maintenance Manual
Содержание 50382NU
Страница 1: ...Hardware Maintenance Manual ThinkPad Edge E220s ...
Страница 6: ...iv Hardware Maintenance Manual ...
Страница 11: ...DANGER DANGER DANGER DANGER DANGER Chapter 1 Safety information 5 ...
Страница 12: ...DANGER 6 Hardware Maintenance Manual ...
Страница 13: ...PERIGO PERIGO PERIGO Chapter 1 Safety information 7 ...
Страница 14: ...PERIGO PERIGO PERIGO PERIGO PERIGO DANGER 8 Hardware Maintenance Manual ...
Страница 15: ...DANGER DANGER DANGER DANGER DANGER Chapter 1 Safety information 9 ...
Страница 16: ...DANGER DANGER VORSICHT VORSICHT VORSICHT 10 Hardware Maintenance Manual ...
Страница 17: ...VORSICHT VORSICHT VORSICHT VORSICHT VORSICHT Chapter 1 Safety information 11 ...
Страница 18: ...12 Hardware Maintenance Manual ...
Страница 19: ...Chapter 1 Safety information 13 ...
Страница 20: ...14 Hardware Maintenance Manual ...
Страница 21: ...Chapter 1 Safety information 15 ...
Страница 22: ...16 Hardware Maintenance Manual ...
Страница 23: ...Chapter 1 Safety information 17 ...
Страница 24: ...18 Hardware Maintenance Manual ...
Страница 36: ...30 Hardware Maintenance Manual ...
Страница 52: ...46 Hardware Maintenance Manual ...
Страница 57: ...Table 10 Removal steps of keyboard continued 2 2 3 3 Chapter 8 Removing and replacing a FRU 51 ...
Страница 72: ...Table 22 Removal steps of DC in sub card 66 Hardware Maintenance Manual ...
Страница 76: ...70 Hardware Maintenance Manual ...
Страница 92: ...86 Hardware Maintenance Manual ...
Страница 95: ......
Страница 96: ...Part Number 0A60575 Printed in China 1P P N 0A60575 0A60575 ...


