• Damage caused by the improper insertion of a personal-computer card (PC card) or the installation of an
incompatible card
• Improper disc insertion or use of an external optical drive
• Fuses blown by attachment of a non-supported device
• Forgotten computer password (making the computer unusable)
• Sticky keys caused by spilling a liquid onto the keyboard
• Use of an incorrect ac power adapter on laptop products
The following symptoms might indicate damage caused by non-warranted activities:
• Missing parts might be a symptom of unauthorized service or modification.
• Check for obvious damage to a hard disk drive. If the spindle of a hard disk drive becomes noisy, the hard
disk drive might have been dropped or subject to excessive force.
Checking the ac power adapter
If the computer fails only when the ac power adapter is used:
• If the power problem occurs only when the docking station or the port replicator is used, replace the
docking station or the port replicator.
• If the system status indicator does not blink three times when an ac power source is connected, check the
power cord of the ac power adapter for correct continuity and installation.
• If the computer does not charge during operation, go to “Checking the battery and operational charging”
Note:
Noise from the ac power adapter does not always indicate a defect.
Checking the ac power adapter
1. Connect the computer to a power outlet and turn on the computer.
2. Start the Vantage app, and locate the
Power
section. The ac power adapter information is displayed.
Ensure that you use the ac power adapter that is shipped with the computer to provide enough power to the
computer. Otherwise a message will be displayed, prompting you that the computer will not be charged or
will be charged slowly.
Checking the battery and operational charging
Checking the battery
This system supports only batteries specially designed for this specific system and manufactured by Lenovo
or an authorized manufacturer. The system does not support unauthorized batteries or batteries designed for
other systems. If an unauthorized battery or a battery designed for another systems is installed, the system
will not charge.
Attention:
Lenovo has no responsibility for the performance or safety of unauthorized batteries, and
provides no warranties for failures or damage arising out of their use.
Move your pointer to the battery-status icon in the Windows
®
notification area to check the battery status.
The battery-status icon displays the percentage of battery power remaining and how long you can use your
computer before you must charge the battery.
Checking the operational charging
1. Discharge the battery to 50% or lower.
2. Perform operational charging. Click the battery status icon in the Windows notification area to display
detailed battery information. If it indicates that the battery is not charging, replace the battery.
22
Lenovo 10w Hardware Maintenance Manual
Содержание 10w
Страница 1: ...Lenovo 10w Hardware Maintenance Manual ...
Страница 4: ...ii Lenovo 10w Hardware Maintenance Manual ...
Страница 6: ...iv Lenovo 10w Hardware Maintenance Manual ...
Страница 11: ...DANGER DANGER DANGER DANGER DANGER DANGER Chapter 1 Safety information 5 ...
Страница 12: ...DANGER 6 Lenovo 10w Hardware Maintenance Manual ...
Страница 13: ...PERIGO Chapter 1 Safety information 7 ...
Страница 14: ...PERIGO PERIGO PERIGO PERIGO 8 Lenovo 10w Hardware Maintenance Manual ...
Страница 15: ...PERIGO PERIGO PERIGO DANGER DANGER Chapter 1 Safety information 9 ...
Страница 16: ...DANGER DANGER DANGER DANGER DANGER 10 Lenovo 10w Hardware Maintenance Manual ...
Страница 17: ...DANGER VORSICHT VORSICHT VORSICHT VORSICHT Chapter 1 Safety information 11 ...
Страница 18: ...VORSICHT VORSICHT VORSICHT VORSICHT 12 Lenovo 10w Hardware Maintenance Manual ...
Страница 19: ...Chapter 1 Safety information 13 ...
Страница 20: ...14 Lenovo 10w Hardware Maintenance Manual ...
Страница 21: ...Chapter 1 Safety information 15 ...
Страница 22: ...16 Lenovo 10w Hardware Maintenance Manual ...
Страница 23: ...Chapter 1 Safety information 17 ...
Страница 24: ...18 Lenovo 10w Hardware Maintenance Manual ...
Страница 25: ...Chapter 1 Safety information 19 ...
Страница 26: ...20 Lenovo 10w Hardware Maintenance Manual ...
Страница 30: ...24 Lenovo 10w Hardware Maintenance Manual ...
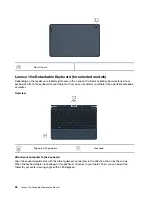
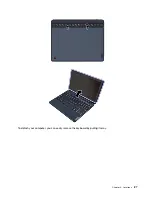
Страница 33: ...To detach your computer you can easily remove the keyboard by pulling it away Chapter 3 Locations 27 ...
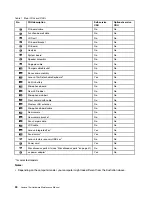
Страница 35: ...Major FRUs and CRUs Chapter 3 Locations 29 ...
Страница 38: ...32 Lenovo 10w Hardware Maintenance Manual ...
Страница 60: ...54 Lenovo 10w Hardware Maintenance Manual ...
Страница 61: ......
Страница 62: ...Part Number XXXX Printed in China 1P P N XXXX 1PXXXX ...

