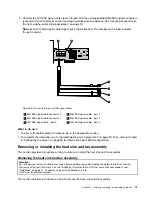


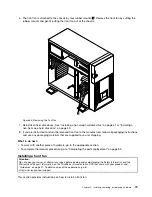

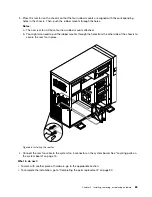

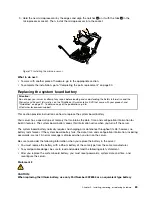


3. Place the rear fan on the chassis so that the four rubber mounts are aligned with the corresponding
holes in the chassis. Then, push the rubber mounts through the holes.
Notes:
a. The new rear fan will have four new rubber mounts attached.
b. You might also need to pull the rubber mounts through the holes from the other side of the chassis to
secure the rear fan in place.
Figure 66. Installing the rear fan
4. Connect the rear fan cable to the system fan 3 connector on the system board. See “Locating parts on
the system board” on page 15.
What to do next:
• To work with another piece of hardware, go to the appropriate section.
• To complete the installation, go to “Completing the parts replacement” on page 90.
Chapter 5
.
Installing, removing, or replacing hardware
85
Содержание 102912U
Страница 1: ...ThinkServer TD230 Installation and User Guide Machine Types 1027 1029 1039 and 1040 ...
Страница 2: ......
Страница 3: ...ThinkServer TD230 Installation and User Guide Machine Types 1027 1029 1039 and 1040 ...
Страница 12: ...x ThinkServer TD230 Installation and User Guide ...
Страница 16: ...4 ThinkServer TD230 Installation and User Guide ...
Страница 32: ...20 ThinkServer TD230 Installation and User Guide ...
Страница 106: ...94 ThinkServer TD230 Installation and User Guide ...
Страница 136: ...124 ThinkServer TD230 Installation and User Guide ...
Страница 140: ...128 ThinkServer TD230 Installation and User Guide ...
Страница 153: ......
Страница 154: ......


