background image

20

NOTE: DIAGRAMS & ILLUSTRATIONS ARE NOT TO SCALE.

Turn on gas supply and test for gas leaks using a gas leak test solution (also 

referred to as bubble leak solution).  

Note: 

Using a soapy water solution 

(50% dish soap, 50% water) is an effective leak test solution but it is not 

recommended, because the soap residue that is left on the pipes/fittings can 

result in corrosion over time.  

A. Light the appliance 

 (refer to the lighting instructions provided in the 

Homeowner's Care and Operation Instructions).

B. Brush all joints and connections with the gas leak test solution to check for 

leaks. If bubbles are formed, or gas odor is detected, turn the gas control 

knob (off/pilot/on) to the “OFF” position.  Either tighten or refasten the 

leaking connection, then retest as described above.

C. When the gas lines are tested and leak free be sure to rinse off the 

leak testing solution, 

D. Turn on burner then observe the individual tongues of flame on the burner.  

Make sure all ports are open and producing flame evenly across the burner.  

If any ports are blocked, or partially blocked, clean out the ports.


WARNING

Never use an open flame to check for leaks.

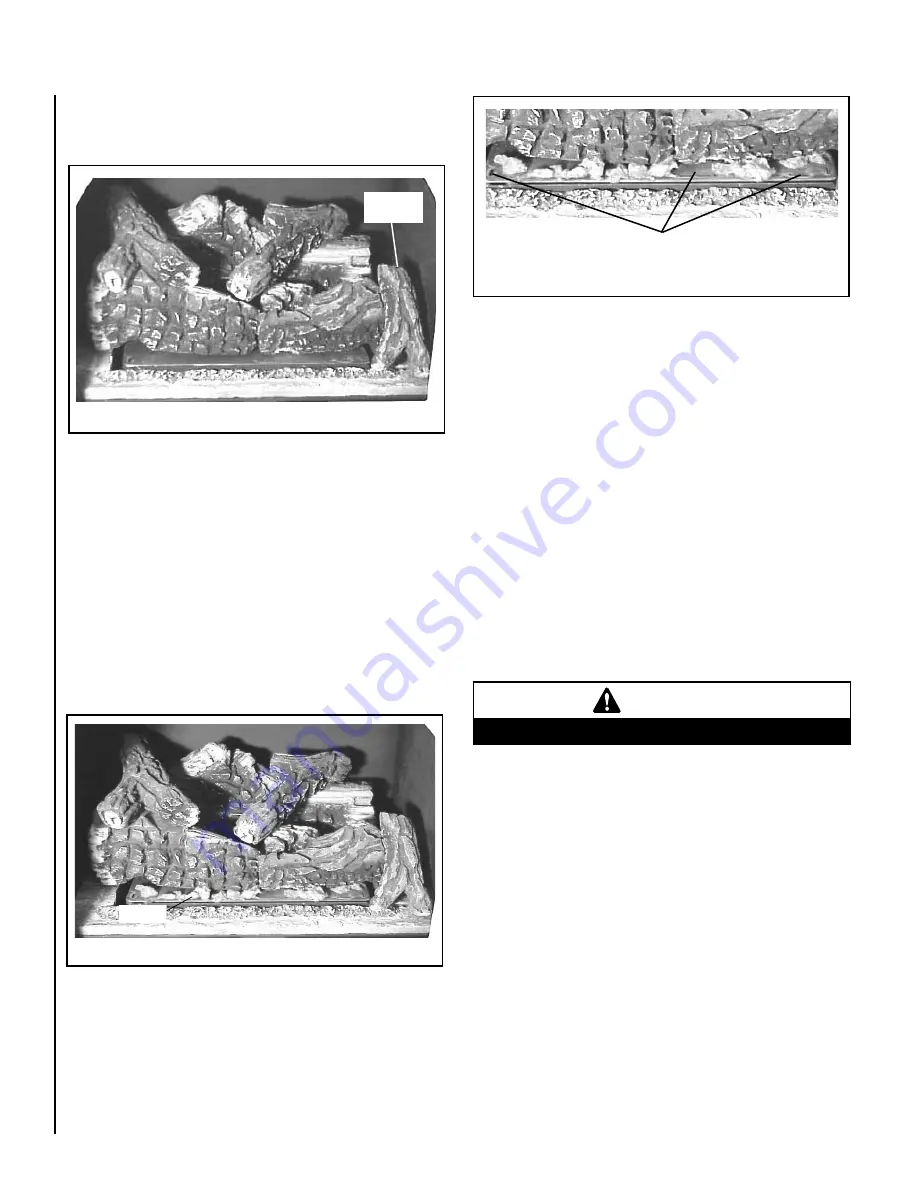
Right

Front Twig

Embers

Figure 28

8.

 Install the front right twig onto the corresponding pin on the right 

front log. Align the twig with the indentation on the front right log as 

shown in 

Figure 27

9. 

Place the glowing embers on the burner as shown in 

Figures 28 

and 29

.

One package of ember material has been included with this log set 

You will not need to use the entire bag. 

IMPORTANT: The quantity and placement of the ember material can 

affect stove performance therefore it is very important that it be placed 

as shown in


Figure

s 28 and 29

.

a.  Unpackage  and  divide  the  fine  ember  material  (mineral  wool)  into 

dime-sized fluffy pieces. 

b. Distribute the pieces over the top of the front burner ports avoiding 

covering the slots (see 

Figure 29

)

 and filling the area in front of the 

forward logs.

Figure 27

VERIFY THAT THE GAS LINE HAS BEEN PURGED OF AIR (SEE STEP 

10).

Step 12.  RE-INSTALL FRONT GLASS ENCLOSURE PANEL

(Reverse instructions on Step 4)

Retrieve the front glass enclosure panel. Visually inspect the gasket 

on the backside of the frame. Gasket surface must be clean, free of 

irregularities and seated firmly. 

With the stove top off, position the glass front enclosure panel into 

the front opening with the gasket facing the relief door (reference 

Figures  8  and  9

)

.  Let  the  bottom  of  the  door  frame  gently  slide 

down, then hook the top flange of the glass frame over the top of 

the firebox frame. 

Fasten the two latches located beneath the firebox floor to the glass 

frame vee-flange. Close both the latches securely.

Step  13.  TEST  ALL  CONNECTIONS  FOR  LEAKS  (FACTORY  AND 

FIELD).

DO NOT PLACE EMBERS ON TOP OF THE BURNER SLOTS.

Figure 29

Содержание CI1500DVF Series

Страница 1: ...rouvez Appelez immédiatement votre fournisseur de gaz depuis un voisin Suivez les instructions du fournis seur Si vous ne pouvez rejoindre le fournisseur de gaz appelez le service des incindies L installation et l entretien doivent être assurés par un installateur ou un service d entretien qualifié ou par le fournisseur de gaz AVERTISSEMENT Assurez vous de bien suivre les instructions données dans...

Страница 2: ...ng Safety in Operation Warnings Page 23 Rating Plates Page 24 This manual is part of a set of two supporting this product Refer to manual 775 148M for Care and Operation This installation manual will help you obtain a safe efficient depend able installation for your appliance and vent system Pleasereadandunderstandtheseinstructionsbeforebeginning your installation TheseMillivoltappliancesarelisted...

Страница 3: ...aller service agency or the gas supplier WARNING Failure to comply with these installation instructions will result in an improperly installed and operating appliance voiding its warranty Any change to this appliance and or its operating controls is danger ous WARNING Clothing or other flammable material should not be placed on or near the appliance AVERTISSEMENT On ne devrait pas placer de vêteme...

Страница 4: ...connected to a chimney or flue serving a separate solid fuel burning appliance These appliances are vented gas appliances Do not burn wood or other material in these appliances This appliance is only for use with the type of gas indicated on rating plate This appliance is not convertible for use with other gases unless a certified kit is used Cet appareil doit être utilisé uniquement avec les type...

Страница 5: ...11 0 WC 2 73 kPa 13 0 WC 3 23 kPa Table 2 Manifold Gas Supply Pressure millivolt models Fuel Low High Natural Gas Lo 1 6 WC 40 kPa Hi 3 5 WC 87 kPa Propane Lo 6 3 WC 1 57 kPa Hi 10 0 WC 2 49 kPa Table 3 The millivolt appliances are manually controlled and feature a spark igniter piezo thatallowstheappliance spilotgastobelitwithoutthe use of matches or batteries This system provides continued servi...

Страница 6: ...ce clothing or other flammable materials on or near this appliance AVERTISSEMENT Surveiller les enfants Garder les vêtements les meubles l essence ou autres liquides à vapeur inflam mables lin de l appareil WARNING This appliance must be properly connected to a venting system Operation of this gas appliance when not connected to a properly installed and maintained venting system can result in carb...

Страница 7: ... 1 2 1232 mm Specifications CI1500DVF CI2500DVF Min Max BTU hr Input NG 17 500 28 000 25 500 38 500 Min Max BTU hr Input LP 20 500 27 000 26 500 34 500 DV Vent Size 4 inner 6 5 8 outer 4 inner 6 5 8 outer Room Fan CFM 150 150 Weight lb 206 290 Efficiencies CI1500DVF CI2500DVF EnerGuide P4 67 NG 65 LP 67 NG 64 LP Steady State Efficiency 85 NG 87 LP 83 NG 85 LP Note Due to Lennox ongoing commitment ...

Страница 8: ...14 1 4 362mm 17 1 4 438 mm C minimum 15 7 8 403mm 19 483mm D minimum 4 102mm 4 102mm E minimum 2 51mm 2 51mm F minimum 4 102mm 4 102mm G minimum 0 0mm 0 0mm H minimum 62 1575mm 62 1575 mm I minimum 28 1 2 724mm 34 1 2 876 mm J MAXIMUM 48 1219mm 48 1219mm Table 5 Dimensions with a single asterix are reference dimensions only If the optional warming shelves are installed a greater alcove width is re...

Страница 9: ...ocal codes When installed in Manufactured Housing the following supplemental requirements must be met The appliance must be secured to the floor i e use 4 1 4 x 2 3 4 boltsandnutsorequivalent Note Notincluded forsecuringappliance to the manufactured home floor The appliance must be grounded to the chassis of the manufactured home Use a No 8 or heavier copper wire at least 18 in length The structur...

Страница 10: ...mechanical air supply inlet to building or the combustion air inlet to any other appliance 6 in 15 2 cm for appliances 10 000 BTU hr 3kW 12 in 30 cm for appliances 10 000 BTU hr 3kW and 100 000 BTU hr 30kW 36 inches 91 cm for appliances 100 000 BTU hr 30kW 6 in 15 2 cm for appliances 10 000 BTU hr 3kW 9 in 23 cm for appliances 10 000 BTU hr 3kW and 50 000BTU hr 15kW 12inches 30cm forappliances 50 ...

Страница 11: ...version kit if necessary Install any optional accessories excluding firescreens Step 8 Page 14 Install lower access door Step 9 Page 14 Venting System Installation Step 10 Page 18 Connect gas supply line to the appliance Purge Air Step 11 Page 18 Install log set ember strip and embers Step 12 Page 20 Reinstall front glass enclosure Step 13 Page 20 Test all connections for leaks factory and field S...

Страница 12: ...l doivent être utilisées CAUTION DO NOT abuse glass door by striking or slamming shut Do not remove glass door while the appliance is hot WARNING Do not attempt to substitute the materials used on these doors or replace cracked or broken glass Handle this glass with extreme care Glass is susceptible to damage Do not scratch or handle roughly while reinstalling the glass door frame The glass door s...

Страница 13: ...accessories include a wall thermostat blower kit brick liner kit warming shelves and a standard or deluxe remote control kits B If a wall mounted thermostat is selected mount it in a convenient location on a wall near the stove If the warming shelves are being installed see Homeowners Manual for installation instructions C Wire the thermostat within the millivolt control circuit using a maximum of...

Страница 14: ...e appliances must only be vented to the outside Vent terminations shall not be recessed into a wall or siding IMPORTANT Do not exceed the maximum horizontal run allowed see Figures 13 and 14 Support Brackets Install vent support brackets as specified in the vent manufacturers instructions and the National Gas Fuel Code USA NFPA 54 ANSI Z223 1 7 6 5 Support of Gas Vents Gas vents shall besupporteda...

Страница 15: ...in Figure 13 Two 45 degree elbows may be substituted for each single 90 degree elbow With a rise between 2 feet to 5 feet one 90 degree or two 45 degree elbows may be used A vertical vent system must terminate no less than 8 feet 2 44 meters and no more than 40 feet 12 meters above the appliance flue collar See Figure 14 A vertically terminated vent system must also conform to the follow ing crite...

Страница 16: ...I D 1 insula tion SV4CCK2 Factory Built Chimney Conversion Kit for 7 I D 1 insula tion 8 I D 1 insulation 6 I D 2 insulation SV4CCK3 Factory Built Chimney Conversion Kit for 10 I D 1 insula tion 7 I D 2 insulation 8 I D 2 insulation Model Brand SIMPSON DURA VENT Description 934 Masonry Chimney Conversion Kit 931 Factory Built Chimney Conversion Kit A for 6 I D 932 Factory Built Chimney Conversion ...

Страница 17: ...th Black SV4L36 36 Pipe Length Galvanized 903 36 Pipe Length Galvanized SV4LB36 36 Pipe Length Black 903B 36 Pipe Length Black SV4L48 48 Pipe Length Galvanized 902 48 Pipe Length Galvanized SV4LB48 48 Pipe Length Black 902B 48 Pipe Length Black SV4LA 6 Adj Pipe Length Galvanized 908 6 Adj Pipe Length Galvanized SV4LBA 6 Adj Pipe Length Black N A N A SV4LA12 12 Adj Pipe Length Galvanized 911 11 14 ...

Страница 18: ...N ONLY Purging Air from Supply Line a Turn gas supply line valve off b Loosen setscrew at inlet pressure tap on upper right of control valve see Figure 30 c Turn gas supply line valve on d When gas flows turn supply valve off e Close the inlet pressure tap Purging Air from Appliance Purge air from appliance by holding gas control valve down in the pilot position until pilot will light see Figure 1...

Страница 19: ... tab as shown in Figure 24 6 Install the left top twig onto the corresponding pin on the rear log and align it with the indentation on the front left log as shown in Figure 25 Rear Log Figure 21 3 Place the left front log onto the corresponding burner pin and sub floor left tab as shown in Figure 22 Note If an optional Brick Liner Kit was purchased install it now per instruc tions provided in kit ...

Страница 20: ...ight log as shown in Figure 27 9 Place the glowing embers on the burner as shown in Figures 28 and 29 One package of ember material has been included with this log set You will not need to use the entire bag IMPORTANT The quantity and placement of the ember material can affect stove performance therefore it is very important that it be placed as shown in Figures 28 and 29 a Unpackage and divide th...

Страница 21: ...e a warm yellow to orange flame that does not soot the shutter opening must be adjusted between these two extremes No smoke or soot should be present Reposition the logs if flames impinge on any of them If the logs are properly positioned and soot ing conditions exist the air shutter opening on the main burner tube should be adjusted Normally the more offsets in the vent system the greater the nee...

Страница 22: ...r installation Air Shutter Adjustment Guidelines Amount of Primary Air Flame Color Air Shutter Adjustment If air shutter is closed too far Flame will be yellow Air shutter gap should be increased If air shutter is open too far Flame will be blue Air shutter gap should be decreased Table 9 When satisfied that the appliance operates properly proceed to finish the installation Leave the control knob ...

Страница 23: ...A ousurlethermostat mural voir Figure B et le cas échéant sur le boîtier delatélécommande FigureC Pouracheverl instal lationcorrectedecefoyer procédezcommesuitavec lesétiquettesadhésivesenlanguesétrangèresfournies avec les instructions d utilisation et d entretien 1 Repérez l interrupteur ou le thermostat mural qui contrôle le foyer vérifiez que l interrupteur contrôle le fonctionnement du foyer e...

Страница 24: ...M TOLERANCE UNLESS OTHERWISE NOTED LINEAL DIM SQUARENESS NOTCH BRAKE RES 1 32 ANGLES 2 HOLES UP TO 004 005 TO 1 010 OVER 1 1 64 LENNOX Industries Inc E N G I N E E R I N G D E P T T O R O N T O O N T A R I O DESIGN OF STICKER RATING PLATE MATERIAL SEE ABOVE FOR FINISH SECS REFER TO ES 0049 PAINT INSIDE NONE SHEET NO 1 OF 1 DWG NO PAINT OUTSIDE NONE 9 1452A MATERIAL 24M8501 QTY 1 299008016 QTY 1 02...

Страница 25: ...25 notes ...

Страница 26: ... 775 147M REV E 03 2010 1508 Elm Hill Pike Suite 108 Nashville TN 37210 Lennox reserves the right to make changes at any time without notice in design materials specifications prices and also to discontinue colors styles and products Consult your local distributor for fireplace code information ...

Отзывы: