background image


Getting started


Placing the back-up battery 

This unit has a back-up battery for not losing the clock settings while turning the main power 
switch into OFF position. To place the back-up battery; 


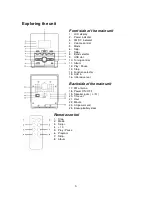
On the back side of the main remove the back-up battery door (24). 


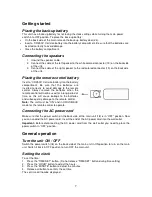
Insert a “CR2500” Cell size battery into the battery compartment. Be sure that the batteries are 
inserted correctly to avoid damage. 


Close the battery compartment. 

Connecting the speakers 

1.  Unwind the speaker cable. 
2.  Connect the cable of the left speaker to the white colored connector (19) on the backside 

of the unit. 

3.  Connect the cable of the right speaker to the red colored connector (19) on the backside 

of the unit. 

Placing the remote control battery 

Insert a “CR2500” Cell size battery into the battery 
compartment.  Be  sure  that  the  batteries  are 
inserted  correctly  to  avoid  damage  to  the  remote 
control.  Always  remove  the  batteries  when  the 
remote control will not be used for a long period of 
time,  as  this  will  cause  leakage  to  the  batteries 
and subsequently damage to the remote control. 

Note: 

The unit must be “ON” and in CD/USB/AUX 

mode for the remote control to operate. 

Connecting the AC power cord 

Make sure that the power switch on the back side of the main unit (18) is in “OFF” position. Now 
you can unwind the AC power cord. Insert the end of the AC power cord into the wall outlet. 

Important:

  Before  disconnecting  the  AC  power  cord  from  the  wall  outlet  you  need  to  place  the 

power switch in “OFF” position. 

General operation 

Turn the unit ON / OFF 

Switch the power switch (18) on the back side of the main unit in ON position to turn on the main 
unit. Switch it back in OFF position to turn OFF the main unit. 

Setting the clock 

To set the time: 
1.  Press the “TIME SET” button. (Do not release “TIME SET” button during time setting) 
2.  Press the “HOUR” button to adjust the hours. 
3.  Press the “MINUTE” button to adjust the minutes. 
4.  Release all button to confirm the set time. 
The set time will now be displayed. 

Содержание MC-144

Страница 1: ...MC 144 MICROSET WITH CD MP3 AND WMA User Manual English Lenco recommends attentive reading of the manual before operating the unit For information and support www lenco eu V1 0 ...

Страница 2: ...ode 8 USB Mode 8 Program function CD MP3 USB 8 Playback modes CD MP3 USB 9 Aux in mode 9 Specifications 9 Trouble Shooting 10 Recycling 10 Dear Customer Thank you for purchasing this microset with CD MP3 and WMA When opening the box for the first time please check whether all the accessories are present Before connecting parts and power please carefully read the user manual and always keep these i...

Страница 3: ...proper procedure for working with the laser beam CLASS 1 LASER PRODUCT LABEL This label is attached to the place as illustrated to inform that the apparatus contains a laser component WARNING LABEL INFORMING OF RADIATION This label is placed inside the unit As shown in the illustration To warn against further measures on the unit The equipment contains a laser radiating laser rays according to the...

Страница 4: ...e or corrosion Battery shall not be exposed to excessive heat such as sunshine fire or the like If at any time in the future you should need to dispose of this product please note that All batteries and accumulators need to be removed from this product Removal of Waste Batteries and Accumulators WARNING Do not install this equipment in a confined or building in space such as a book case or similar...

Страница 5: ...nect the power input the mains plug of apparatus shall be disconnected from the mains As the disconnect devices is the mains plug of apparatus The mains plug of apparatus should not be obstructed OR should be easily accessed during intended use This CD player is designed to be played on a stable no vibration position If you bump the set during CD play the music will stop or skip for a few seconds ...

Страница 6: ... selector 9 USB slot 10 Tuning control 11 Album 12 Play Pause 13 Stop 14 Function selector 15 AUX in 16 Infrared sensor Backside of the main unit 17 FM antenna 18 Power ON OFF 19 Speaker jacks L R 20 Time set 21 Hour 22 Minute 23 AC power cord 24 Backup battery door Remote control 1 Stop 2 Mode 3 Skip 4 10 5 Play Pause 6 Program 7 Skip 8 Album ...

Страница 7: ...ove the batteries when the remote control will not be used for a long period of time as this will cause leakage to the batteries and subsequently damage to the remote control Note The unit must be ON and in CD USB AUX mode for the remote control to operate Connecting the AC power cord Make sure that the power switch on the back side of the main unit 18 is in OFF position Now you can unwind the AC ...

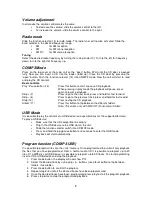
Страница 8: ...ck press and hold for fast rewind Stop 13 Press to stop the CD playback Album 11 Press this button to flip between the different folders Note This works only with MP3 CD s that contain folders USB Mode It is possible to play the content of a USB device see specifications for the supported formats To play a USB device Make sure that the CD compartment is empty Plug in the USB devise to the USB slot...

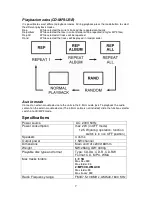
Страница 9: ...udio device to the unit via the 3 5mm audio jack To playback the audio content on the external audio device The 3 5mm cable is not included slide the function selector switch into CD MP3 mode Specifications Power source AC 230V 50Hz Power consumption max 2 W in OFF mode 12 5 W during operation function switch is in non OFF position Speakers 4 ohms Output power 1 5W channel Dimensions Main unit 141...

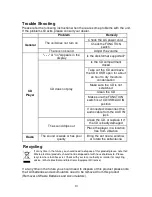
Страница 10: ...isconnect the audio cable from the AUX IN jack Clean the CD or replace it if the CD is badly damaged CD Player The sound drips out Place the player in a location free from vibration Radio The sound is weak or has poor quality Bring the set near a window or rotate the set antenna Recycling If at any time in the future you should need to dispose of this product please note that Waste electrical prod...

Отзывы: