LENCO LBT-120BK Скачать руководство пользователя страница 5


5


Information for power adaptor   

Power supply adaptor 
-  Manufacturer: Blue Iron 
-  Model number: BI12T-120100-I 
-  Adaptor type: External AC adaptor 
-  Use only the power supply listed in the user instructions 
 

Assembly


Drive belt:


The belt and turntable platter have been installed properly at factory, but the belt may be loose 
during transportation. If so, the following procedures will be taken for belt installation by yourself. 
A.  Remove the rubber mat from the turntable platter and the E ring from the turntable shaft, 

then release the turntable platter from the shaft 

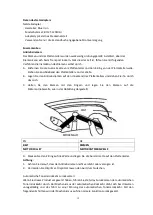
B.  Put the drive belt on the inner rim of the turntable platter and pull it through the hole 

C.  Hold the belt with your fingers and place the belt onto the motor pulley as shown in the drawing. 


EN 

EN 

BELT 

BELT 

MOTOR PULLEY 

MOTOR PULLEY 

 
D.  Clip the E ring on the shaft and place the rubber mat onto the turntable platter.   

Caution:


1.  Make sure that the drive belt is not twisted or distorted. 

2.  Avoid oil. Oil splashes will make the belt slippery. 
 
Auto Return Reset: 
Always  do  the  reset  for  Auto  Return  once  you  move  this  product.  The  mechanism  of  Auto 
Return will rotate irregularly when moving and it will cause the malfunction of Auto Return. The 
following steps will reset the mechanism to normal. 
1.  Place a record on the platter and play it. 

2.  Manually lever the tone arm and place it to the blank part of the end of the record. 

3.  The  mechanism  of  Auto  Return  function  will  be  adjusted  properly  and  the  tone  arm  will 

automatically return to the arm rest. 

Содержание LBT-120BK

Страница 1: ...uikshandleiding Platenspeler met Bluetooth en USB voor directe codering Benutzerhandbuch Plattenspieler mit Bluetooth und direkter USB Aufnahme Mode d emploi Tourne disque avec Bluetooth et encodage d...

Страница 2: ...2 Index E glish Nede la ds Deuts h F a ais Espa ol Version 1 0...

Страница 3: ...i e he o de satio a o u Although this de i e is a ufa tu ed ith the ut ost a e a d he ked se e al ti es efo e lea i g the fa to it is still possi le that p o le s a o u as ith all ele t i al applia e...

Страница 4: ...e positio o failu e to follo a othe a i g o p e autio o tai ed ithi this use a ual ill ot e o e ed a a t Ne e e o e the asi g of this appa atus Ne e pla e this appa atus o othe ele t i al e uip e t Do...

Страница 5: ...Hold the belt with your fingers and place the belt onto the motor pulley as shown in the drawing EN EN BELT BELT MOTOR PULLEY MOTOR PULLEY D Clip the E ring on the shaft and place the rubber mat onto...

Страница 6: ...6 Des iptio 1 Adaptor Use this adaptor when playing 45 RPM records 2 Platter Place a record here to play 3 33 45 RPM Switch Switch 33 or 45 rpm for playing a record at a correct speed...

Страница 7: ...to lock the Pick up Arm when not in use or for transportation 9 Dust Cover Use this to protect the turntable from exposure to dust The cover may be opened or removed during use but should remain close...

Страница 8: ...se the pick up arm clip Place the cartridge vertically over the first track of the record the turntable starts turning When the record is over the pick up arm returns to its rest the turntable stops t...

Страница 9: ...ti ula situatio All ite s des i ed i this guide fo illust atio pu poses o l a d a ot appl to pa ti ula situatio No legal ight o e title e ts a e o tai ed f o the des iptio ade i this a ual Disposal of...

Страница 10: ...at i ee o ge i g zo de statis he e sto i ge Waa s hu i g Steek ooit ee oo e p ia de e tilatie of a de e ope i ge i het p odu t E is hoogspa i g i het p odu t aa ezig e als u e ee o je t i steekt ka da...

Страница 11: ...i g te zij zij o de toezi ht staa of i st u ties he e o e het juiste ge uik a het appa aat he e gek ege a de pe soo die e a t oo delijk is oo hu eiligheid Dit p odu t is allee oo iet p ofessio eel ge...

Страница 12: ...de as B Plaats de aandrijfriem op de binnenrand van het draaiplateau en trek deze door het gat C Houd de riem met uw vingers vast en plaats de riem op de motorpoelie zoals getoond in de tekening EN NL...

Страница 13: ...ndmatig op en plaats deze op het lege gedeelte aan het einde van de langspeelplaat 3 Het mechanisme van de functie Auto Return zal juist worden aangepast en de toonarm keert automatisch terug naar de...

Страница 14: ...koppelen dan kunt u beter de Bluetooth functie van Bluetooth producten binnen 10 meter sluiten die u niet wilt koppelen 6 Houder voor arm 7 Hefboom van de arm Om de hefboom van de arm op en neer te b...

Страница 15: ...de ingang van het L kanaal Leg een plaat op het plateau Als het een 45 toerenplaat is vergeet dan niet om de adapter 1 op de as van het plateau te plaatsen Kies de gewenste afspeelsnelheid 33 toeren...

Страница 16: ...e ge aakt Daa doo ku e gedeelte a de i st u tie de spe ifi aties e af eeldi ge i deze do u e tatie e igszi s e s hille a u eige situatie Alle o de e pe die staa es h e e i deze ha dleidi g zij edoeld...

Страница 17: ...tielekt ostatis he U ge u g aus Wa u g Nie als Gege st de du h die L ftu gss hlitze ode ff u ge i das Ge t ste ke I Ge t si d hohe Spa u ge o ha de u d das Ei f h e o Gege st de ka zu St o s hlag z zu...

Страница 18: ...Si he heit e a t o tli he Pe so ei ge iese Dieses P odukt ist u f de i ht p ofessio elle Ge au h u d i ht f ge e li he ode i dust ielle Z e ke esti t Stelle Sie si he dass das Ge t i ei e sta ile Posi...

Страница 19: ...tentellers und ziehen Sie ihn durch das Loch C Halten Sie den Riemen mit den Fingern und legen Sie den Riemen auf die Motorantriebswelle wie in der Abbildung dargestellt EN DE BELT RIEMEN MOTOR PULLEY...

Страница 20: ...wieder 2 Heben Sie den Tonarm mit dem Tonarmlift manuell an und senken Sie im leeren Bereich am Ende der Schallplatte ab 3 Der Mechanismus der automatischen R ckkehrfunktion wird ordnungsgem eingestel...

Страница 21: ...ung Wenn Sie versuchen den Plattenspieler zu koppeln beenden Sie besser die Bluetooth Funktion anderer Bluetooth Produkte innerhalb eines Bereichs von 10 Metern die Sie nicht koppeln m chten 6 Tonarmh...

Страница 22: ...Verbinden Sie die Ausgangsbuchsen 10 ber ein Cinchkabel mit den AUX Eingangsbuchsen Ihres Verst rkers Den roten Stecker in den R Kanaleingang Den wei en Stecker in den L Kanaleingang Legen Sie die gew...

Страница 23: ...e ke ei gesetzt i d e l s he alle Ga a tie e pfli htu ge seite s des He stelle s Haftu gsauss hluss Aktualisie u ge de Fi a e u d ode Ha d a e Ko po e te e de egel ig du hgef h t Dahe k e ei ige de A...

Страница 24: ...ue des te sio s le es so t p se tes l i t ieu du p oduit l i se tio u o jet peut e t a e u e le t o utio et ou ou t i uite les o posa ts i te es Pou les es aiso s e e sez pas de l eau ou u li uide su...

Страница 25: ...e l appa eil pa la pe so e ui est espo sa le de leu s u it 33 Ce p oduit est se u usage o p ofessio el et o pas u usage o e ial i i dust iel 34 V ifiez ue l appa eil est e positio sta le La ga a tie e...

Страница 26: ...le plateau de l arbre B Mettre la courroie sur le bord interne du plateau et le tirer dans le trou C Tenir la courroie avec les doigts et la placer sur la poulie de moteur comme indiqu dans le plan EN...

Страница 27: ...plateau et le lire 2 Lever manuellement le bras et le placer sur la partie lisse la fin du disque 3 le m canisme de retour automatique s ajustera correctement et le bras retournera automatiquement sur...

Страница 28: ...es 10 m tres de ce que vous ne voulez plus appairer 6 Support de bras 7 Branche de levier de bras Pour lever et baisser le bras et le placer la bonne place sur un vinyl 8 Verrou de bras Utiliser pour...

Страница 29: ...er l adaptateur 1 sur l axe Choisir la vitesse de lecture d sir e 33 tours bouton d verrouill 45 tours bouton verrouill Rel chez la pince du bras de lecture Placez la cartouche la verticale sur la pre...

Страница 30: ...e e t de ot e o figu atio sp ifi ue Tous les a ti les d its da s e guide so t fou is u i ue e t des fi s d illust atio et peu e t e pas s appli ue u e o figu atio sp ifi ue Au u d oit l gal e peut t...

Страница 31: ...te os Po el is o oti o o de a e agua o l uidos e el p odu to No lo utili e e zo as h edas o o ua tos de a o o i as e las ue se fo e apo i e a de pis i as No use este dispositi o ua do se pueda p odu...

Страница 32: ...e de ue la u idad est fijada e u a posi i esta le Los da os p o o ados po utiliza este p odu to e u a posi i i esta le o po o segui ual uie ot a ad e te ia o p e au i i luida e este a ual de usua io o...

Страница 33: ...Coloque la correa en el borde interno del plato del tocadiscos y tire de ella hacia el agujero C Sujete la correa con los dedos y coloque la correa en la polea del motor tal y como se muestra en el di...

Страница 34: ...lato y reprod zcalo 2 Baje manualmente el brazo y col quelo sobre la parte vac a del final del disco 3 El mecanismo de la funci n de vuelta autom tica se ajustar debidamente y el brazo volver autom ti...

Страница 35: ...situados a 10 metros y que no desee emparejar 6 Soporte del brazo del tocadiscos 7 Palanca de levantamiento del brazo del tocadiscos Para subir o bajar el brazo del tocadiscos y colocarlo en el lugar...

Страница 36: ...sco de 45 rpm no olvide colocar el adaptador 1 en el eje del disco Elija la velocidad de reproducci n que desee 33 rpm bot n desbloqueado 45 rpm bot n bloqueado Libere la sujeci n del brazo del tocadi...

Страница 37: ...ige a e te espe to a su situa i pa ti ula Todos los ele e tos des itos e esta gu a tie e u o jeti o de e a ilust a i puede o se de apli a i e su situa i pa ti ula No se puede o te e i g de e ho i de e...

Отзывы: