background image

- 35 - 

 
USB and SD/MS/MMC Card Function                 
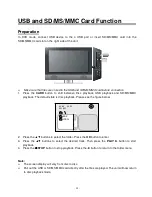
 

Preparation 

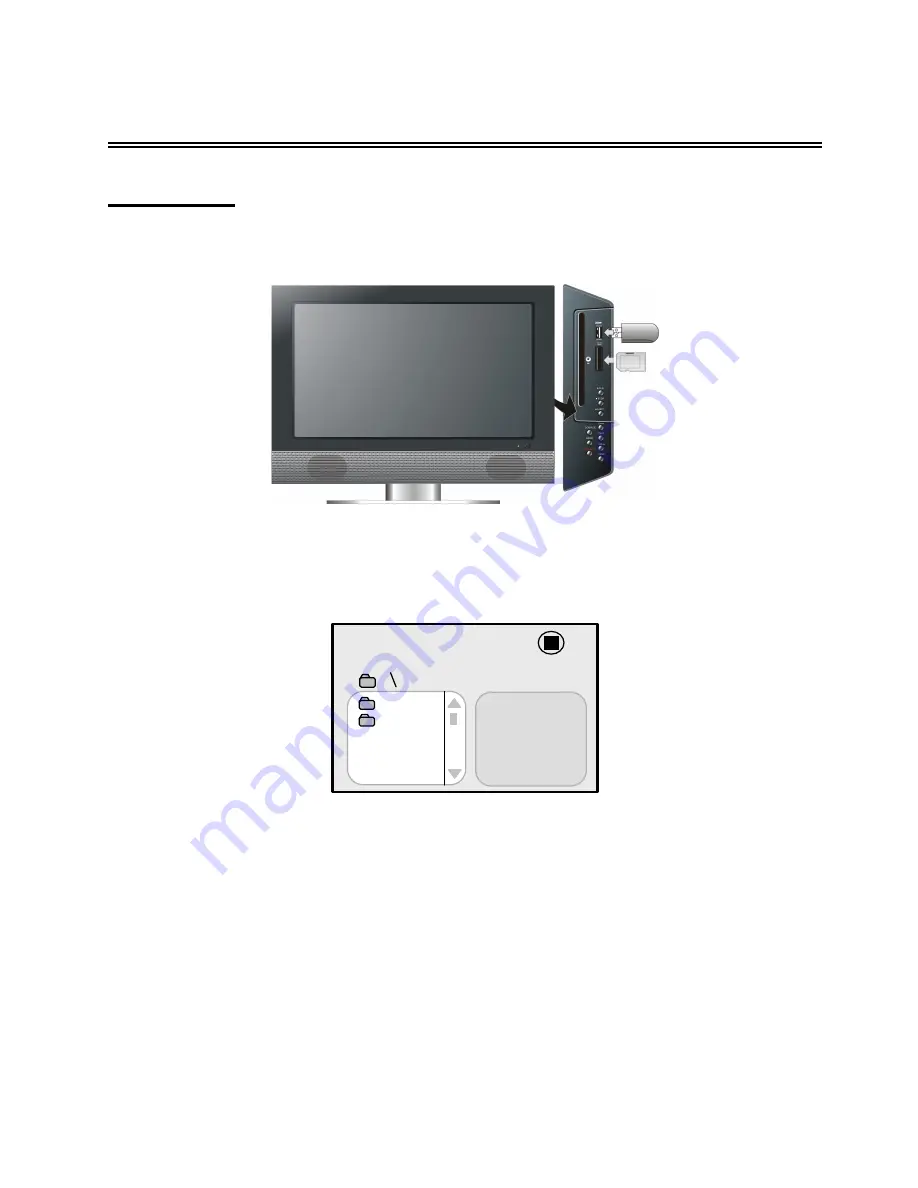
In  DVD  mode,  connect  USB  device  to  the 

a

  USB  port  or  insert  SD/MS/MMC  card  into  the 

SD/MS/MMC card slot on the right side of the unit. 


Make sure that files are stored in the USB and SD/MS/MMC card before connection. 

1.  Press  the 

CARD

  button  to  shift  between  Disc  playback,  USB  playback  and  SD/MS/MMC 

playback. The default state is disc playback. Please see the figure below: 


2.  Press the 

▲▼

 buttons to select the folder. Press the

 OK 

button to enter.   

3.  Press  the 

▲▼

  buttons  to  select  the  desired  track.  Then  press  the

  PLAY 

  button  to  start 

playback. 

4.  Press the 

STOP

 button to stop playback. Press the 

 button to return to the folder menu.   


Note: 


The screen display will vary from disc to disc. 


Pull out the USB or SD/MS/MMC card directly after the files are played. The unit will now return 
to disc playback mode. 


00

:

00      00:00       


001

/

002   


BAK 
JPEG 

Содержание DVT-2201

Страница 1: ...xternal AV Signal Source YPbPr 14 Connecting to an HDMI Signal Source 14 Connecting to a PC 15 Connecting to a SCART signal source 16 Connecting to TV Signal 16 Source Selecting 17 TV Function 18 Prep...

Страница 2: ...ions and modification of the product without authorisation from the manufacturer s or authorised service agent WARNING The apparatus shall not be exposed to dripping or splashing and that no objects f...

Страница 3: ...ower sockets and the point where they exit from the apparatus 13 Only use attachments accessories specified by the manufacturer 14 Use only with stand tripod bracket or table specified by the manufact...

Страница 4: ...d into this slot 5 PLAY button In DVD mode press this button to play the disc 6 STOP button In DVD mode press this button once to stop playback and then press the PLAY button to resume normal playback...

Страница 5: ...mode 11 MENU button Press this button to enter or exit system setup menu 12 SOURCE button Press this button repeatedly to select the input mode choose from TV SCART Composite S Video YpbPr VGA HDMI an...

Страница 6: ...posite S Video mode Video and S Video share L R audio jacks and S Video has the priority 2 SCART Jack To connect a SCART signal source 3 Y Pr Cr Pb Cb and L R audio Input Jacks To connect a Y Pr Cr Pb...

Страница 7: ...ed from the wall socket DVD module removal Refer to the illustration below and follow the procedures below to remove the DVD module from the unit 1 Loosen the screw on the DVD module 2 Carefully slide...

Страница 8: ...ified by the software maker Please refer to the instructions accompanying the disc About Disc Terms Titles A DVD disc is often divided into TITLES A title can be a separate item or a segment of a film...

Страница 9: ...en the remote is not in use for a long time Using of the Remote control Point the remote control unit from no more than about 7m from the remote control sensor and within about 60 degrees of the front...

Страница 10: ...mode choose from User Cinema Normal Vivid and Hi Bright 9 VOL button Press to increase or decrease the volume 10 MUTE button Press to turn on or off the speaker output 11 INPUT button Press repeatedly...

Страница 11: ...wers from the display 22 SET CALL button In TV mode press to select your favorite channels 23 SET FAV button In TV mode press to set the current channel as your favourite channel 24 INFO button Press...

Страница 12: ...back In teletext mode press to hold the current page and press again to resume 36 REPEAT button In DVD mode press to repeat a chapter track title or all content In teletext mode press the button first...

Страница 13: ...AV Signal Source Composite S Video Use audio cables to connect an external signal source to the audio input jacks on the jack panel of the unit Use either composite video or S Video cables for the vi...

Страница 14: ...n the remote control or the SOURCE button on the TV set to select YPbPr mode Connecting an HDMI Signal Source Follow the figure below to connect an HDMI signal source to the HDMI jack on the rear pane...

Страница 15: ...e right side of the unit s rear panel and the other end to the PC 2 Connect one end of the audio cables to the PC audio input jack on the right side of the unit s rear panel and the other end to the P...

Страница 16: ...o select SCART mode Note When there is a SCART signal provided the TV will enter SCART mode automatically when the SCART cable is pulled out or the external AV signal source is turned off the TV will...

Страница 17: ...the removable DVD module and press the INPUT button on the remote control or the SOURCE button on the right side panel of the TV repeatedly then you can select the video mode in the following order TV...

Страница 18: ...o the previous menu Brightness Press the button to select Brightness and press the button to adjust the value Press the MENU button to return to the previous menu Saturation Press the button to select...

Страница 19: ...o select On or Off Press the MENU button to return to the previous menu CTI Color Transient Intensity Press the button to select CTI and press the button to select On or Off Press the MENU button to r...

Страница 20: ...tton to adjust the level Press the MENU button to return to the previous menu Surround Press the button to select Surround and press the button to select On or Off Press the MENU button to return to t...

Страница 21: ...Use the number buttons to enter the password Press the direction buttons to highlight OK and press the OK button to enter the menu as shown below highlight Cancel and press the OK button to cancel th...

Страница 22: ...o source or cancel Press the MENU button to return to the previous menu NOTE The current source cannot be locked Clear All Press the button to select Clear All Press the button to clear all lock setti...

Страница 23: ...he button to select Manual Scan Press the OK or button to enter the manual scan menu as shown on the right Press the button to select PR Start or Start From Press the button to set the start program n...

Страница 24: ...buttons on the remote control to swap insert copy or delete a program Use the buttons to select a program you want to swap insert copy or delete Press a colour button you want and use the button to s...

Страница 25: ...on to select the desired item Frequency In the program Edit Menu press the button to select Frequency Press the button to select frequency forward or backward and press the OK button to confirm Fine T...

Страница 26: ...he value Manual Clock Press the button to select Manual Clock and press the button to adjust the value Press the MENU button once to enter the main setup menu Press the button to select Geometric and...

Страница 27: ...to adjust the value Color Temp B Press the button to select Color Temp B and press the button to adjust the value Load From Press the button to select Load From and press the button to select Middle...

Страница 28: ...audio signals press the STEREO button on the remote control repeatedly to shift the sound tracks between Nicam Mono and Mono and the screen will show the corresponding display as shown below Under A2...

Страница 29: ...utton on the remote control 1 Red Green button Press to select the red green option 2 button Press this button to enter or exit teletext 3 button Press this button to enter or exit the teletext displa...

Страница 30: ...the disc is in the tray and then the disc can be drew into the disc tray again automatically Warning Use of poor quality discs could result in damage to the television DVD Playback Region Code DVD pl...

Страница 31: ...an item Then press the OK button to confirm Title Chapter Normally there are several titles in a DVD disc and several chapters sections in a title You can select any title or chapter quickly by enter...

Страница 32: ...o exit repeat mode Some discs do not support the repeat function Audio During playback press the AUDIO button to toggle audio output between Mono Left Mono Right Mix Mono or Stereo JPEG Playback JPEG...

Страница 33: ...tton to rotate the currently displayed picture This function will only activate for the current picture once another picture is displayed rotation will be cancelled automatically Note Some JPEG discs...

Страница 34: ...the OK button to play Stop During playback press the STOP button to stop playback and return to root menu and press the PLAY button to play the file from the beginning Pause During playback press the...

Страница 35: ...SD MS MMC playback The default state is disc playback Please see the figure below 2 Press the buttons to select the folder Press the OK button to enter 3 Press the buttons to select the desired track...

Страница 36: ...menu use the direction buttons to select the desired item Press the OK button to enter the item Press the button to return 1 Press the direction buttons to select TV Display 2 Press the OK button to...

Страница 37: ...2 Press the OK button to enter the setup 3 Use the direction buttons to select On or Off 4 Press the OK button again to confirm the selection and to return 1 Press the direction buttons to select Last...

Страница 38: ...ons to select Dolby Digital 2 Press the OK button to enter the setup 3 Use the direction buttons to select items 4 Press the OK button to enter the setup Press the button to return 1 Press the directi...

Страница 39: ...1 Press the direction buttons to select Dynamic 2 Press the OK button to enter 3 Use the direction buttons to adjust 4 Press the OK button again to confirm the setting and return 5 Press the button to...

Страница 40: ...or Low 4 Press the OK button again to confirm the selection and return 1 Press the direction buttons to select Brightness 2 Press the OK button to enter the setup 3 Use the direction buttons to adjus...

Страница 41: ...the OK button to enter the item Press the button to return 1 Press the direction buttons to select Audio 2 Press the OK button to enter the setup 3 Press the direction buttons to select audio language...

Страница 42: ...he settings will return to the default status DVD discs equipped with the child lock function are rated according to their contents and settings vary from disc to disc Depending on the disc you can lo...

Страница 43: ...tup see the left figure 3 Press the direction buttons to select On or Off 4 Press the OK button again to confirm the setting and return You can change the password by yourself 1 Press the direction bu...

Страница 44: ...ay discs Make sure the disc is loaded in correctly Make sure the disc is not dirty or warped Make sure the region code is the same as the region code of the DVD disc Make sure water condensation has n...

Страница 45: ...er license from Dolby Laboratories Dolby and the double D symbol are trademarks of Dolby Laboratories Confidential unpublished works 1992 1997 Dolby Laboratories Inc All rights reserved If at any time...

Отзывы: