background image


15 


8.


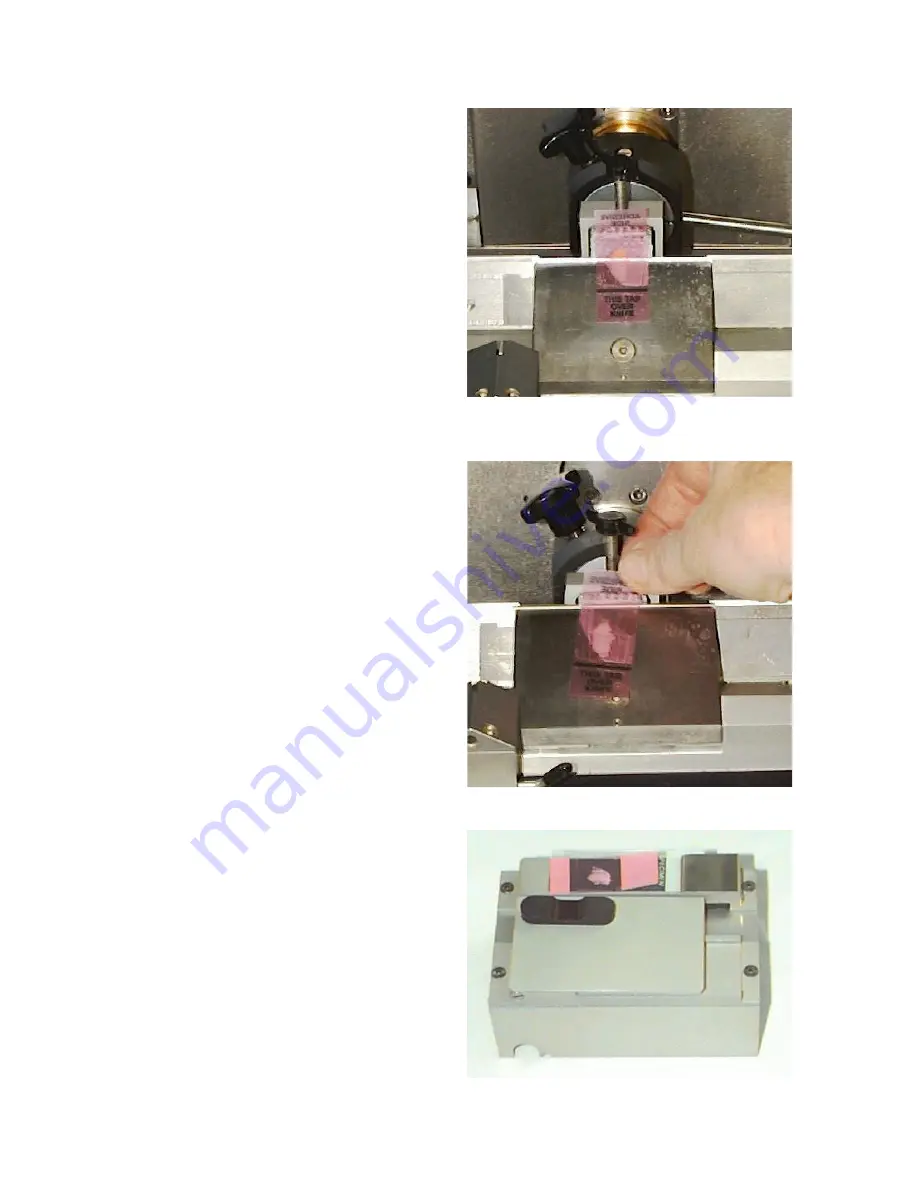
Turn the flywheel slowly and evenly to 
cut a section.  If a 

sharp

 knife is used, 

the section captured on the Tape will be 
flat, intact, uncompressed and as thin as 
two microns.  

No need for a brush or 

an anti-roll device!


Figure 12

.  Cutting the section. 


9.


Pick up the Tape at either tab and 
transfer it to the Slide on the Blue Pad 
making sure to keep it down inside the 
cryostat to avoid melting the section. 


Figure 13

.  Handling the cut section. 


10.


Position the Tape, section-side-down,  
on the Adhesive Coated Slide. For 
multiple sections refer to the 

Steps for 

Multiple Sections

Содержание CryoJane

Страница 1: ...CryoJane User Manual Customer Service 1 800 237 2772 In continental US only Customer Service 1 201 343 1313 International...

Страница 2: ...2 Instrumedics grants the purchaser of the CryoJane system the rights to use the patented CryoJane CFSA materials and process Patent 4 545 831...

Страница 3: ...lcohol and gauze clean chamber wall 04 Heat left wall for Mech Oil Bath placement 05 Place Oil Bath towards the rear of the left chamber wall 06 Route Oil Bath Mech Cables underneath Mech 07 Place Mec...

Страница 4: ...Cryo Vac Shown The standard CryoJane Mech installation is shown in Fig 07 The Hacker Bright OTF and Microm HM 560 cryostats require an S Plate Mech and separate mounting plate for installation S Plate...

Страница 5: ...nts 8 CryoJane ECU 9 CryoJane Mech Components 10 CryoJane Operating Procedure 11 Background 11 Preparation 11 Use 12 Steps for a Single Section 12 Steps for Multiple Sections 18 Summary of the Instrum...

Страница 6: ...s Troubleshooting 25 Troubleshooting Finished Slides 27 Oil Bath Accessories Kit Components 29 Oil Bath Accessory Kit Operating Procedure 30 Background 30 Preparation 30 Use 31 Storing a Tissue Block...

Страница 7: ...ature at which the tissue is frozen should be 60 C or colder NOTE Gentle Jane Snap Freezing methods are described in a separate Snap Freezing User Manual CryoJane Process The CryoJane process is built...

Страница 8: ...it ECU See CRYOJANE ECU for details 3 inch diameter Mech Cable connected to the Mech 4 Door Channel 5 3 Shelf Unit 6 Hand Roller 7 Adhesive Coated Slides 8 Tape Windows 9 Knife Facet Wipers 10 AC Powe...

Страница 9: ...yoJane ECU back Figure 3 CryoJane ECU front and right side 1 On Off Switch 2 Pad LED 3 Power LED or Bath LED if optional Oil Bath Accessory Kit is installed 4 Flash Pad Connector 5 Optional Oil Bath C...

Страница 10: ...10 CryoJane Mech Components FIGURE 4 CryoJane Mech Components 1 Blue Pad 2 Stainless Steel Spring Clip 3 Black Knob 4 Flash Tray 5 Lid...

Страница 11: ...en the melted section is then dried during which step surface tension forces further distort displace and collapse tissue structure Pathologists and clinicians have been trained to recognize normal an...

Страница 12: ...o automatically remove debris during the trimming sequence If the Cryo Vac Away is not installed trim the block to the desired depth to obtain a full block face and remove the debris from the knife Se...

Страница 13: ...ed slide 4 Place the Coated Slide adhesive side up on the Blue Pad of the Mech by slipping the frosted end of the slide under the stainless steel Spring Clip Figure 8 Adhesive Coated Slide on Blue Pad...

Страница 14: ...N OF THE ADHESIVE WINDOW SHOULD OVERHANG THE BLOCK FACE TO AVOID MELTING THE SURFACE OF THE TISSUE DO NOT TOUCH THE PORTION OF THE TAPE THAT COVERS THE BLOCK FACE Figure 10 Placing Tape on block face...

Страница 15: ...or a brush or an anti roll device Figure 12 Cutting the section 9 Pick up the Tape at either tab and transfer it to the Slide on the Blue Pad making sure to keep it down inside the cryostat to avoid m...

Страница 16: ...ng the frosted end of the Slide remove it from the Blue Pad and transfer it into the Flash Tray Gently push the Slide in as far as it will go against the stop To check lift the Lid Close before actuat...

Страница 17: ...g the cured Slide 15 Keeping the Slide deep inside the cryostat chamber carefully remove the pink Tape to expose the frozen section on the Slide Figure 19 Removing Tape from cured Slide 16 Peel off th...

Страница 18: ...the fixative of choice for your protocol Figure 20 Technique for removing Tape from Slide Steps for Multiple Sections 17 Multiple sections can be positioned on one Slide by placing the Tapes perpendi...

Страница 19: ...ased When the heat extractor contacts the specimen the tissue and embedding medium is snap frozen into a flat block The plane of the flat block face minimizes trimming When specimen shape or orientati...

Страница 20: ...air dried and fixed with the fixative of your choice Special Fixation Protocols Aqueous Fixative THIS FIXATION SHOULD BE USED FOR ALL HISTOLOGICAL STAINING OF CRYOJANE PREPARED SECTIONS This fixative...

Страница 21: ...ar components and is highly recommended for routine stains Note Not recommended when ice crystal size is large and widespread poor freezing In such cases the aqueous fixative protocol should be follow...

Страница 22: ...e ECU wipe the surfaces with either a dry rag or if necessary an alcohol wipe ACETONE OR OTHER SOLVENTS WILL DAMAGE THE PLASTIC SURFACES Fuses can be replaced by unscrewing the two small fuse holders...

Страница 23: ...EDs lights on the ECU are not on Cause Solution The ECU is not turned on Make sure the ECU is properly connected to an electrical source Make sure the On Off Switch on the ECU is in the On position pu...

Страница 24: ...he ECU is not turned on Make sure the ECU is properly connected to an electrical source Make sure the On Off Switch on the ECU is in the On position pushed in If the LED s on the front of the ECU are...

Страница 25: ...facturer dealer The Tape does not adhere to the block face Cause Solution The protective film covering the adhesive is not removed Peel away the protective film covering the adhesive window The block...

Страница 26: ...steel or tungsten carbide knife sharpen the knife There is dirt on the Tape Use a fresh clean and cold Tape Bubbles form while laminating the Tape to the block face Apply the Tape like wallpaper to th...

Страница 27: ...picks up excessive red stain after H E Cause Solution Eosin may be too acidic or too alcoholic This may cause background staining Stain a shorter time or use an aqueous eosin Y at pH 5 0 5 2 There ar...

Страница 28: ...r between the Tape and the coated Slide Always remove all trimming debris from the block face and both the front and rear surfaces of the knife s cutting edge before sectioning The section did not tra...

Страница 29: ...dics Power Jane or Stand Alone Gentle Jane or Dewar Jane snap freezers with liquid nitrogen produces the best results Snap freeze the thinnest practical specimen The sections uppermost in the block wi...

Страница 30: ...30 Oil Bath Accessory Kit Components FIGURE 28 Oil Bath Accessory Kit Components 1 Oil Bath 2 Oil 3 Oil Brush 4 Oil Bath Power Cable not shown...

Страница 31: ...lock face The frozen Oil coating prevents tissue and medium dehydration for up to one year if stored in a 70 C freezer The Oil can also be used to repair a damaged block A deformation or hole in the b...

Страница 32: ...ssue block follow the procedure outlined below For Short Term Storage in the Cryostat With the block in the cryostat use the Oil Brush to coat the block face with the Oil from the Oil Bath For Long Te...

Страница 33: ...f the ECU and replace as needed Use only 1AMP SLO BLO Ceramic Core Wound fuses available from Instrumedics The cryostat temperature is too cold Raise the cryostat temperature The ECU is malfunctioning...

Страница 34: ...ght Cause Solution The temperature of the Oil inside the Oil bath is too warm Lower the cryostat temperature The ECU is malfunctioning Call Instrumedics 800 customer service number and arrange for ser...

Отзывы: