background image

EN

EN

36

37

Ch

an

gin

g th

e fi

lm

Ch

an

gi

ng

 th

e fi

lm

CHANGING THE FILM

First of all, always check that a film is not already loaded by turning 

the pull-out rewind button in the direction of the arrow. If you feel 

resistance, continue as described in the “Rewinding and removing 

the film” section.

Take the camera in your left hand, so that the bottom cover is 

facing upwards.

OPENING THE CAMERA

1.

2.

3.

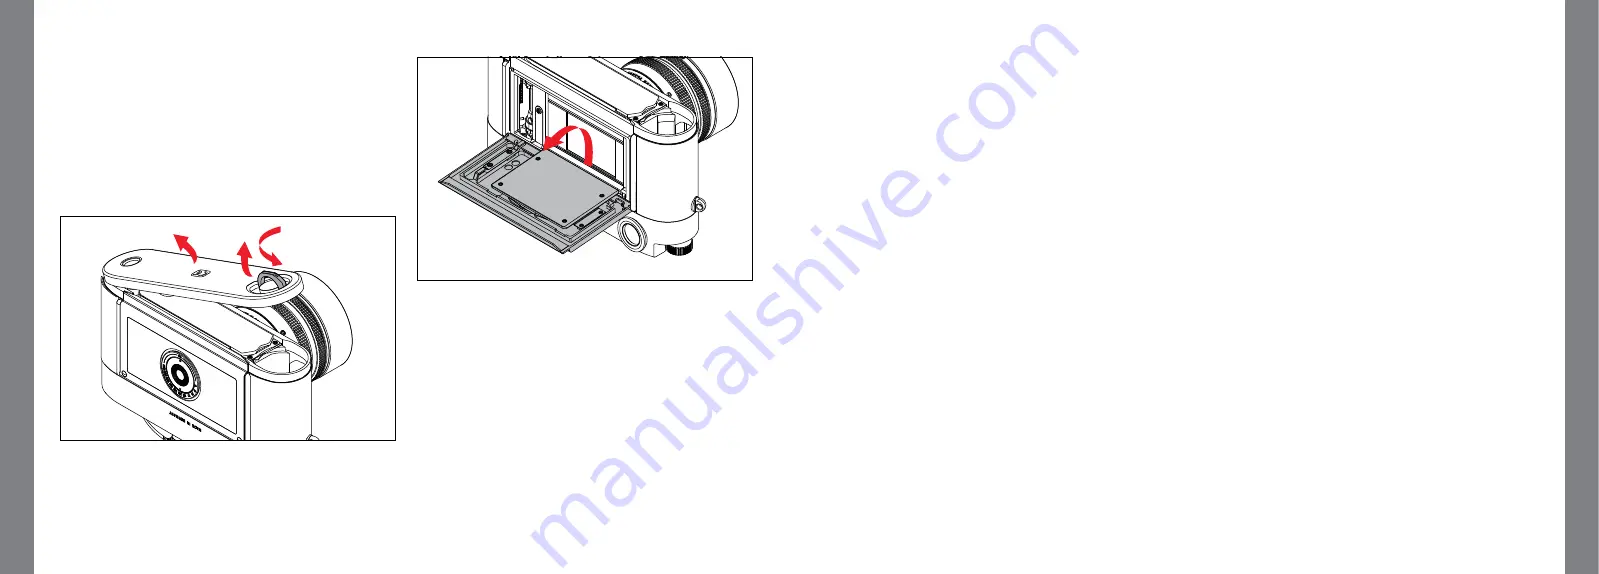
1.  Fold up the toggle on the bottom cover.

2.  Turn it to the left.

3.  Lift off the bottom cover, and

4.  Open the rear panel backwards.

LOADING A FILM

5.  Take the film cartridge in the right hand and insert it around 

halfway into the appropriate cavity in the camera.

6.   Take hold of the film leader and, as shown in the schematic 

diagram inside the housing, insert it into the take up spool.

7.  Then carefully press the film cartridge and film leader into the 

camera with the fingertips.

Notes:

• As with any ready to use film, the leader must be trimmed.

• If the leader is pulled out so far that it extends a little way out of 

one of the slits on the opposite side of the take-up spool, this 

does not interfere with the camera’s function. It is only in 

conditions of frost that the film has to be loaded exactly in 

accordance with the schematic diagram, i.e. the leader may only 

be held by one slit on the take-up spool, so that the protruding 

end of the films cannot snap off.

Important:

The winding of the film should not be checked with the camera 
open, as the bottom cover is designed in such a way that replacing 
it on the camera brings the film into the correct position.

CLOSING THE CAMERA

8.   Close the rear panel.

9.    Lower the bottom cover onto the locking pin on the side of the 

camera.

10.  Close it, ensuring that the rear panel is completely pressed in 

so that the bottom cover holds it in place. 

11.  Lock with the toggle.

WINDING TO THE 1ST PICTURE

12. Wind the film forward one frame using the quick wind lever and 

release the shutter.

13.  Then tension the film by carefully turning the pull-out rewind 

button in the direction of the arrow. The film is properly wound 

if the rewind button turns in the opposite direction to the arrow 

when the quick wind lever is operated again.

14.  Finally, release the shutter again and cock the shutter a third 

time. The frame counter now shows 

1

 and the camera is ready 

to take a picture.

Содержание 127

Страница 1: ...LEICA M A Instructions ...

Страница 2: ...ructions CONTENTS Viewfinder displays 33 Attaching the carrying strap 34 Shutter release button 35 Shutter speed dial 35 Quick wind lever 35 Changing the film 36 Film sensitivity indicator 40 Fitting and removing a lens 41 Bright line view and range finder 42 Image field selector 42 Distance metering 44 Exposure control 45 Flash mode 46 Compatible flash units 46 Attaching and connecting the flash ...

Страница 3: ...ter 16 Shutter release a Thread for cable release 17 Rapid action lever for cocking the shutter and advancing the film 18 Shutter speed dial with locking settings for Manually adjustable shutter speeds from 1s to 1 1000s Sync time 1 50s for flash mode B for long exposures 19 Accessory flash shoe with a Center contact b Hole for retaining pin Rear view 20 Viewfinder window 21 Threaded flash sync so...

Страница 4: ...ON 18 17 16 16a 15 The shutter release button has a pressure point Pressing past the pressure point releases the shutter The shutter release button should be pressed gently not jerkily until the shutter is released with a soft click The shutter release button has a standard thread for a cable release SHUTTER SPEED DIAL The shutter speed dial on the Leica M A can be used to select shutter speeds fr...

Страница 5: ... take up spool this does not interfere with the camera s function It is only in conditions of frost that the film has to be loaded exactly in accordance with the schematic diagram i e the leader may only be held by one slit on the take up spool so that the protruding end of the films cannot snap off Important The winding of the film should not be checked with the camera open as the bottom cover is...

Страница 6: ... resistance 4 Open the bottom cover 5 Open the rear panel 6 Remove the film cartridge If a film is not correctly attached to the cartridge spool e g when using film sold by length it can happen that the end of the film will be torn off and will have to be removed from the take up spool To do this 1 Remove the camera s bottom cover in a completely dark room 2 Hold the camera so that the open bottom...

Страница 7: ...REMOVING THE LENS FITTING 1 Hold the lens by the fixed ring 2 Align the red index button on the lens with the release button on the camera body 3 Then push the lens straight on in this position 4 Turn the lens slightly to the right and you will hear and feel it click into place REMOVING 1 Hold the lens by the fixed ring 2 Press down the release button on the camera body 3 Turn the lens to the left...

Страница 8: ...ield which is brighter than the surrounding image field All lenses with focal lengths from 16 to 135mm connect with the range finder when used on the LEICA M A IMAGE FIELD SELECTOR The image field selector extends the possibilities of the Leica M A viewfinder This built in universal viewfinder allows you to display the image frames that do not belong to the lens currently being used at any time Yo...

Страница 9: ... lens until the contours in the metering field are brought into line Then choose the subject detail Out of focus In focus SPLIT IMAGE METHOD When taking photographs of architecture for example aim the range finder metering field at the vertical edge or another clearly defined vertical line and turn the distance setting ring on the lens until the contours of the edge or line can be seen at the limi...

Страница 10: ... camera the Leica SF26 is particularly well suited Thanks to its computer controlled automatic flash exposure it is very easy to operate and furthermore offers a range of interesting additional functions Other commercially available flash attachments with standard flash foot and positive center contact and fired by the center contact can also be used We recommend the use of modern thyristor contro...

Страница 11: ...re used to select the trimming Order no 18mm 12 022 black 12 023 silver 21mm 12 024 black 12 025 silver 24mm 12 026 black 12 027 silver Leica Viewfinder magnifier M 1 25x and M 1 4x The Leica M 1 25x and M 1 4x viewfinder magnifiers significantly simplify picture composition when using focal lengths above 35mm They can be used on all Leica M models and magnify the central area of the viewfinder im...

Страница 12: ...ind for winding the film and cocking the shutter and is attached to the bottom of the camera instead of the bottom cover Without having to take the camera away from your eye you can wind the film by moving a swing out winding lever to the left partial steps are also possible The shutter is released using the camera s shutter release button The camera s quick wind lever can also be used The Leicavi...

Страница 13: ...reeding ground for micro organisms the equipment should be carefully kept clean All mechanically operated bearings and sliding surfaces on your Leica are lubricated Please remember this if you will not be using the camera for a long period of time To prevent the lubrication points from becoming gummy the camera should be wound on several times and released with every shutter speed with no film loa...

Страница 14: ... readings from external exposure meter or operator assessment Flash exposure control Flash unit connection Using accessory shoe with center contact Synchronization With 1st shutter curtain Flash sync speed 1 50s slower shutter speeds can be used Flash exposure control Computer control of flash unit or guide number calculation and manual setting of required aperture Viewfinder Viewfinder principle ...

Страница 15: ...he Leica Camera AG homepage Leica Camera AG Product Support Software Support Am Leitz Park 5 D 35578 Wetzlar Telephone 49 0 6441 2080 111 108 Fax 49 0 6441 2080 490 info leica camera com software support leica camera com LEICA CUSTOMER CARE For servicing your Leica equipment or in the event of damage the Leica Camera AG Customer Care department or the repair service provided by authorized Leica ag...

Отзывы: