background image

24 


Hidden Antenna Installation– Fairing models  

Note:  Antenna may be installed during EZ-Steer 

installation if applicable.  

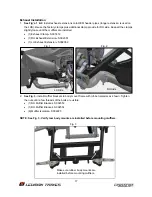
1. 

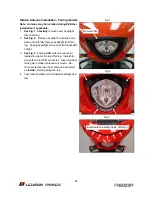
See Fig. 1

Carefully 

remove outer headlight 

trim on fairing. 

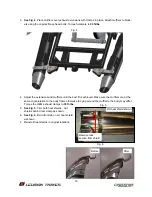
2. 

See Fig. 2

.  Remove headlight mounting hard-

ware and carefully remove headlight from fair-

ing.  Unplug headlight connectors from backside 

of light.   

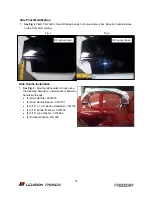
3. 

See Fig. 3

. Unplug OEM antenna connector 

located in upper LH side of fairing.  Install hid-

den antenna to OEM connector.  Clean inside of 

fairing were hidden antenna will mount.  Re-

move protective tape from antenna and install 

on 

inside 

of fairing along the top.  

4.  Test radio operation and reinstall headlight and 

trim.  

Remove trim 

Fig. 1 

Fig. 2 

Fig. 3 

Install antenna along inside of fairing  

Содержание CROSSFIRE

Страница 1: ...2010 Victory Cross Country Cross Roads Installation Guide Nov 2014 125 Industrial Drive Spearfish SD 57783 Toll Free 888 3WHEELS w w w l e h m a n t r i k e s c o m ...

Страница 2: ...y is involved SAFETY ALERT WARNING indicates a potential hazard that may result in severe injury or death to the operator by stander or person s inspecting or servicing the vehicle WARNING Indicates a potential hazard that may result in minor per sonal injury or damage to the vehicle CAUTION CAUTION indicates special precautions that must be taken to avoid vehicle damage or property damage CAUTION...

Страница 3: ...Make sure you have all the proper tools parts and skill set to perform the installation safely and completely Verify that you have all components before assembly Before installing your new Lehman kit we recommend that your motorcycle be inspected and ser viced by a qualified technician Replace any worn or damaged parts before installing the trike kit If the motorcycle has more than 12 000 miles Le...

Страница 4: ...ront fairing Can be removed during EZ Steer installation if applicable 10 Remove mufflers and rear heat shields 11 Remove rear wheel 12 Disconnect rear brake line at caliper and remove caliper 13 Remove rear fender 14 Remove passenger floorboard assemblies save hardware NOTE See Fig 1 for steps 15 17 15 Remove shock linkage from swingarm 16 Remove swingarm pivot shaft and remove swingarm Save pivo...

Страница 5: ...t from pump Remove grommets and spacers from bracket 3 See Fig 1 Remove entire rear brake line assembly from motorcycle Disconnect line at master cylinder and ABS pump 4 See Fig 2 Install original grommets and spacers to new ABS pump bracket as shown Fig 1 Front brake line assembly ABS Pump Install grommets and spacers to Lehman ABS pump bracket Fig 2 ...

Страница 6: ... and washers to block off rear brake line ports on pump Torque banjo bolts to 16 ft lbs 2 Banjo Bolts CB6001 4 Banjo Washers CGC6002 2 Spacer S001067 7 Set pump assembly above frame until differ ential assembly is installed 8 Apply ABS Disabled sticker over ABS light on instrument cluster Block off ports for rear lines Fig 3 Fig 4 ...

Страница 7: ...2 Reattach both floorboards supports with OEM hardware in lower holes For the LH side Torque the lower 8mm screw to 19 ft lbs For the RH side attach the floor board and torque the lower 10MM screw to 35 ft lbs Place the OEM washers and nuts onto the pivot bolt Hand tighten pivot hardware 1 2 2 3 4 3 1 2 Item Description Part QTY 1 OEM Nut OEM 2 2 OEM Washer OEM 4 3 Sleeve S002349 2 4 Bushing S0023...

Страница 8: ...indicated below Torque hardware to 19 ft lbs evenly across all screws 2 M8x35 Hex Bolt CB1622 2 M8x40 Socket Head Bolt CB1975 4 M8x45 CB1986 8 M8 Lock Washers CW2168 8 M8 Flat Washers CW2167 M8x35 Hex Bolt w Flat and Lock Washer M8x45 SHCS w Flat and Lock Washer M8x40 SHCS w Flat and Lock Washer Fig 1 ...

Страница 9: ...he 3 4 x 2 1 2 hex head screws to 150 ft lbs Torque the 1 2 x 2 1 4 hex head cap screw to 50 ft lbs 4 Guide differential under rear motorcycle frame while reinstalling belt past swingarm and onto front drive pulley 5 See Fig 2 Attach body mounts to top frame using the 3 8 x 1 1 4 hex head cap screws Torque to 45 ft lbs Front Body mount 3 8 x 1 1 4 Hex Bolts w Flat Washers and Lock Nuts Leave front...

Страница 10: ... 3 8 Lock Nuts CN3051 3 See Fig 3 Leave approximately a 1 16 gap be tween the top of the stud and the face of the nut for both sides on swingarm pivot shaft It is critical to have correct spacing Torque pivot shaft nuts to 85 ft lbs 4 The floorboards need to be swapped with the op posite side such that the LH floorboard will be in the reversed position on the RH Torque the re place RHS to 18 ft lb...

Страница 11: ...the pulley If the pulley runs on the right side plate of the pulley use the right hand adjuster bolts to move the right wheel rearward until the belt runs in the center If the belt runs on the left side plate of the pulley use the left adjuster bolts to move the left wheel rearward Make small adjustments and recheck the alignment 3 Once the belt is aligned torque the four front 1 2 fasteners to 70...

Страница 12: ...ide on the LH side of trike as shown below 2 See Fig 2 Install hardware through anti roll bar housing onto swingarm Position the anti roll bar on the frame so that the rod ends will be close to vertical when attached to the control arms Torque hardware to 45 ft lbs 4 3 8 x 1 1 4 Hex Head Bolts CB2018 8 3 8 Flat Washers CW2180 4 3 8 Lock Nuts CN3051 Fig 1 ...

Страница 13: ...y 6 Attach rod end to left control arm just as was done to right control arm Torque to 45 ft lbs Brakes 1 See Fig 1 Assemble the new brake lines and residual valve and install as shown using the fol lowing hardware Route front of new brake line to master cylinder in original location 1 Rear Brake Line 29 S002367 1 Front Brake Line 23 5 S002368 1 Residual Valve GB1146 2 Clamps S001654 2 See Fig 2 A...

Страница 14: ...1 4 Lock Nut CN3040 5 See Fig 4 Route the rear brake line around the LHS passenger floorboard as shown be low Attach the rear line to the brass block on swingarm Torque banjo bolt to 16 ft lbs 1 Banjo Bolt CB6001 2 Banjo Washers GC6002 6 See Fig 5 Verify new brake reservoir hous ing is assembled as shown 1 Reservoir Bracket S002356 1 Reservoir Tank S002357 1 Cap S002358 1 Tank Mount S002359 2 M6 x...

Страница 15: ...ber hose between reservoir and master cylinder Secure with clamps on each end 5 5 16 Brake Hose CH2016 2 Clamps CC2016 5 See Fig 7 ABS Models Only Finish mount ing ABS pump to the top frame using the origi nal hardware Secure lines and wiring to frame 7 Use the specified brake fluid in the owner s manual and bleed the rear brake system Thoroughly bleed the system of any air using the upper bleeder...

Страница 16: ...ark Brake 1 See Fig 1 Verify park brake cables are routed in front of rubber body mounts and se cured to upper A arms on both sides 2 See Fig 2 Verify cables are secured to bal ance bar as shown Fig 1 Fig 2 ...

Страница 17: ...412 1 RH Exhaust Extension S002351 1 LH Exhaust Extension S002352 2 See Fig 3 Install muffler brackets to body mount frame with rubber isolators as shown Tighten the nuts until a few threads of the bolts are visible 1 RH Muffler Bracket S002353 1 RH Muffler Bracket S002354 6 Muffler Isolators S002225 NOTE See Fig 3 Verify rear body mounts are installed before mounting mufflers Make sure rubber bod...

Страница 18: ...ed Make sure the mufflers are at the same angle relative to the body frame otherwise the gap around the muffler to the body may differ Torque the OEM exhaust clamps to 35 ft lbs 5 See Fig 5 Trim both heat shields Cut shields behind rear clamp as shown 6 See Fig 6 Bend front tab on LH heat shield as shown 7 Reinstall heat shields in original locations Fig 4 Remove rear section from shield RH heat s...

Страница 19: ...ing Fig 1 Fig 2 RH panel shown RH panel shown Grab Handle Installation 1 See Fig 3 Mount grab handles to body using the following hardware Install spacers between handles and body 2 Grab Handle S001035 4 Grab Handle Spacer S001701 4 5 16 x 1 1 4 Button Head Bolt CB1163 4 5 16 Fender Washer CW2109 4 5 16 Lock Washer CW2046 4 Rubber Washer FG1002 ...

Страница 20: ...cables are secured to bal ance as shown 3 See Fig 3 Verify all the rubber body mounts are in place before installing body The three rear mounts should be loose 7 Body Mounts S002156 4 Verify wire harness and taillights are installed and secure Taillights are mounted with the following hardware 8 M4 x 8 Socket Head Screws CB1704 8 6 Stainless Flat Washers CW2086 2 Taillights S002335 2 Taillight Gro...

Страница 21: ...parts 1 Park Brake Bracket S002355 7 See Fig 6 Adjust park brake calipers as needed Verify the hand lever is in the down position On each caliper hand tighten the adjuster bolt until it contacts the pivot arm then back off half a turn Tighten the jam nut to lock the adjuster bolt in place 8 Test the park brake operation and adjust the balance bar and calipers as needed Verify that the wheels are a...

Страница 22: ...5 See Fig 2 Install license plate to door using the following hardware Install Spacers between rubber insert and license plate 2 10 32 Rubber Inserts CN2103 2 1 4 Spacers S001369 2 10 32 x 1 Button Head Screws CB2016 2 10 Flat Washers CW2002 6 See Fig 2 Install trunk lock to door 1 Trunk Lock S001593 7 See Fig 3 Install badges to body below trunk door as shown 1 Lehman Badge S001532 1 Crossfire Ba...

Страница 23: ...are 3 See Fig 3 Plug trike body harness into main OEM harness Verify wiring is routed on RH side of motorcycle frame Secure harness to frame as needed with cable ties 4 See Fig 3 Route ground wire from harness module to RH gas tank mounting bolt as shown 5 Route power wire under RH side of gas tank with OEM wiring Continue down LH front frame rail and install to positive battery termi nal Secure p...

Страница 24: ...dlight from fair ing Unplug headlight connectors from backside of light 3 See Fig 3 Unplug OEM antenna connector located in upper LH side of fairing Install hid den antenna to OEM connector Clean inside of fairing were hidden antenna will mount Re move protective tape from antenna and install on inside of fairing along the top 4 Test radio operation and reinstall headlight and trim Remove trim Fig...

Отзывы: