


Appendix F: LDAP Configuration Illustration
589
Step C. Configure LDAP Authentication on the SRC
You must enable and set up LDAP authentication properly on the SRC to
use external authentication.
In the illustration, we assume:
The DNS server settings have been configured properly. See
Wired
Network Settings
(on page 170) and
Role of a DNS Server
(on page
The AD server's domain name is
techadssl.com, and its IP address is
192.168.56.3.
The AD protocol is NOT encrypted over TLS.
The AD server uses the default TCP port
389.
Anonymous bind is used.
To configure LDAP authentication:
1.
Choose Device Settings > Security > Authentication.
2.
In the LDAP Servers section, click New to add an LDAP/LDAPS
server.
3.
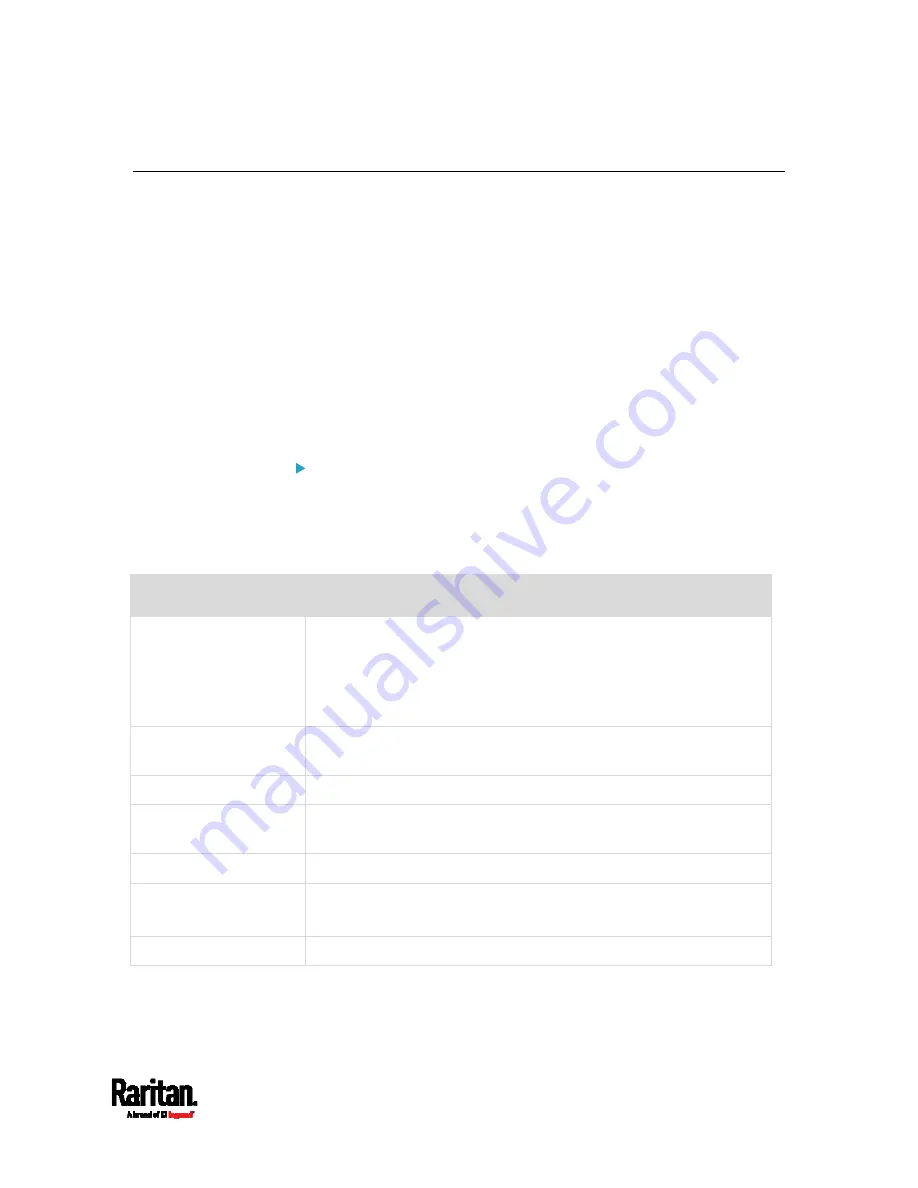
Provide the SRC with the information about the AD server.
Field/setting
Do this...
IP address / hostname
Type the domain name
techadssl.com
or IP address
192.168.56.3
.
Without the encryption enabled, you can type either the domain
name or IP address in this field, but you must type the fully
qualified domain name if the encryption is enabled.
Copy settings from
existing LDAP server
Leave the checkbox deselected unless the new LDAP server's
settings are similar to any existing LDAP settings.
Type of LDAP server
Select "Microsoft Active Directory."
Security
Select "None" since the TLS encryption is not applied in this
example.
Port (None/StartTLS)
Ensure the field is set to
389
.
Port (TLS),
CA certificate
Skip the two fields since the TLS encryption is not enabled.
Anonymous bind
Select this checkbox because anonymous bind is used.
Содержание Raritan SRC-0100
Страница 42: ...Chapter 3 Initial Installation and Configuration 30 Number Device role Master device Slave 1 Slave 2 Slave 3...
Страница 113: ...Chapter 6 Using the Web Interface 101 4 To return to the main menu and the Dashboard page click on the top left corner...
Страница 114: ...Chapter 6 Using the Web Interface 102...
Страница 128: ...Chapter 6 Using the Web Interface 116 Go to an individual sensor s or actuator s data setup page by clicking its name...
Страница 290: ...Chapter 6 Using the Web Interface 278 If wanted you can customize the subject and content of this email in this action...
Страница 291: ...Chapter 6 Using the Web Interface 279...
Страница 301: ...Chapter 6 Using the Web Interface 289 6 Click Create to finish the creation...
Страница 311: ...Chapter 6 Using the Web Interface 299...
Страница 312: ...Chapter 6 Using the Web Interface 300 Continued...
Страница 625: ...Appendix H RADIUS Configuration Illustration 613 Note If your SRC uses PAP then select PAP...
Страница 626: ...Appendix H RADIUS Configuration Illustration 614 10 Select Standard to the left of the dialog and then click Add...
Страница 627: ...Appendix H RADIUS Configuration Illustration 615 11 Select Filter Id from the list of attributes and click Add...
Страница 630: ...Appendix H RADIUS Configuration Illustration 618 14 The new attribute is added Click OK...
Страница 631: ...Appendix H RADIUS Configuration Illustration 619 15 Click Next to continue...
Страница 661: ...Appendix I Additional SRC Information 649...


