


Chapter 6: Using the Web Interface
363
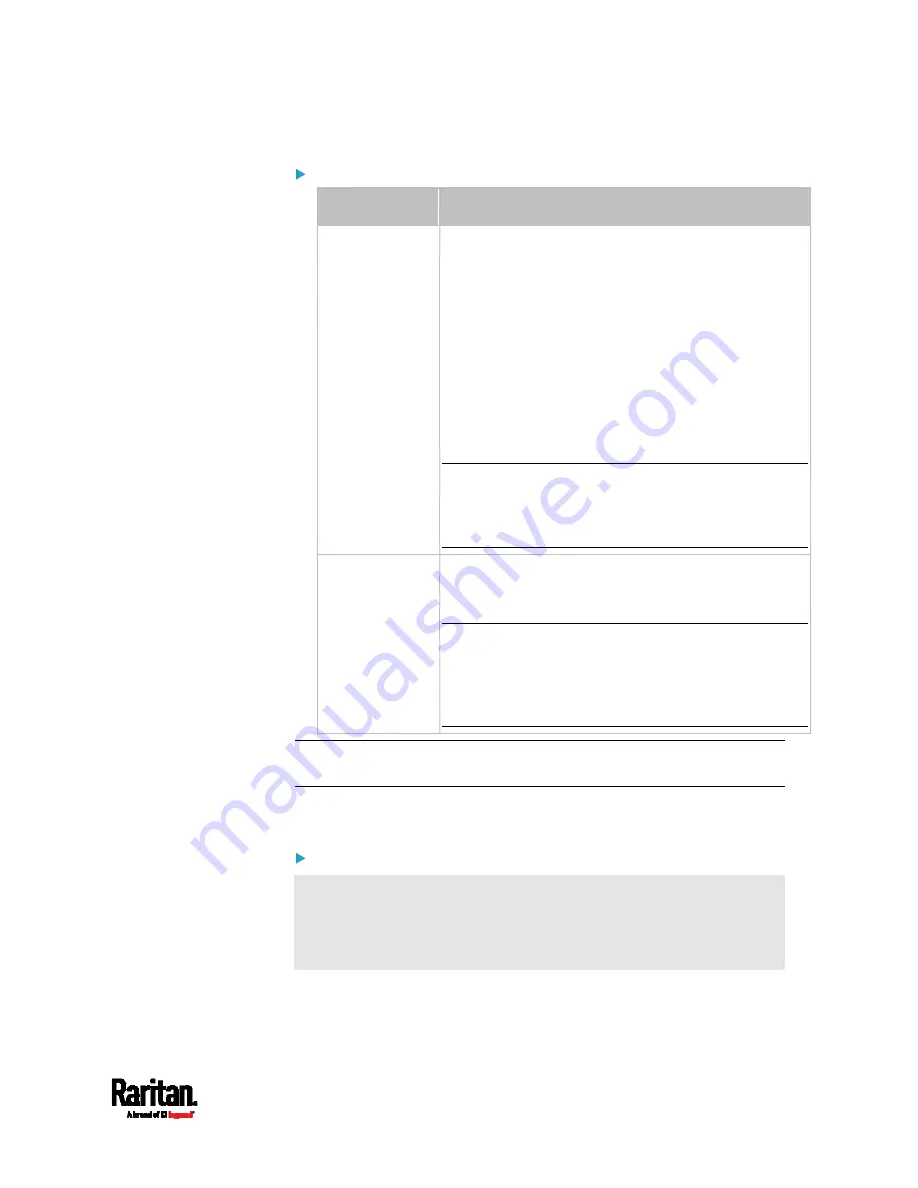
To view the status of the door and card reader:
Section
Description
Door State
Shows all sensor states detected by DX2-DH2C2,
including:
Door: States of contact closure sensors connected
to DX2-DH2C2. Contact closure sensors detect
whether the door is physically opened or closed.
Door Lock: States of door locks integrated with the
door handles.
Door Handle Lock: States of the door handle locks.
Door locks and door handle locks are interrelated so
their states are changed one after another. The door
handle lock is opened first and then the door lock.
Exception: If you manually open the door lock with the
key shipped with your door handle, the Door Lock
state will enter the open state while the Door Handle
Lock state remains closed.
Card Reader
Shows the data of the smart card scanned by the
internal or external card reader accompanying each
door handle connected to DX2-DH2C2.
Note: It is not necessary to use the internal card
reader unless you are using a third-party application,
such as Power IQ, for access control. Refer to the user
documentation of your third-party application for
more information.
Tip: All sensors of the connected door handles are also listed on the
page of
Peripherals
(on page 115).
Note that the same Card Reader information is also available on the
page of
Card Readers
(on page 363).
To control the door handles:
Per default, only one door handle can be opened at the same time so
you must close one door handle before opening another door handle
connected to the same SRC. To increase the upper limit of
concurrently opened door handles, see
Peripherals
(on page 115).
1.
Make sure you have configured the door handle type properly in the
above procedure.
Содержание Raritan SRC-0100
Страница 42: ...Chapter 3 Initial Installation and Configuration 30 Number Device role Master device Slave 1 Slave 2 Slave 3...
Страница 113: ...Chapter 6 Using the Web Interface 101 4 To return to the main menu and the Dashboard page click on the top left corner...
Страница 114: ...Chapter 6 Using the Web Interface 102...
Страница 128: ...Chapter 6 Using the Web Interface 116 Go to an individual sensor s or actuator s data setup page by clicking its name...
Страница 290: ...Chapter 6 Using the Web Interface 278 If wanted you can customize the subject and content of this email in this action...
Страница 291: ...Chapter 6 Using the Web Interface 279...
Страница 301: ...Chapter 6 Using the Web Interface 289 6 Click Create to finish the creation...
Страница 311: ...Chapter 6 Using the Web Interface 299...
Страница 312: ...Chapter 6 Using the Web Interface 300 Continued...
Страница 625: ...Appendix H RADIUS Configuration Illustration 613 Note If your SRC uses PAP then select PAP...
Страница 626: ...Appendix H RADIUS Configuration Illustration 614 10 Select Standard to the left of the dialog and then click Add...
Страница 627: ...Appendix H RADIUS Configuration Illustration 615 11 Select Filter Id from the list of attributes and click Add...
Страница 630: ...Appendix H RADIUS Configuration Illustration 618 14 The new attribute is added Click OK...
Страница 631: ...Appendix H RADIUS Configuration Illustration 619 15 Click Next to continue...
Страница 661: ...Appendix I Additional SRC Information 649...


