Chapter 6: Using the Web Interface
125
They do
not have an ID number.
They show the "unmanaged" state.
Sensor/Actuator States
An environmental sensor or actuator shows its real-time state after
being managed.
Available sensor states depend on the sensor type -- numeric or state
sensors. For example, a contact closure sensor is a state sensor so it
switches between three states only --
unavailable, alarmed and normal.
Sensors will be highlighted in yellow or red when they enter abnormal
states. See
Yellow- or Red-Highlighted Sensors
(on page 123).
An actuator's state is marked in red when it is turned on.
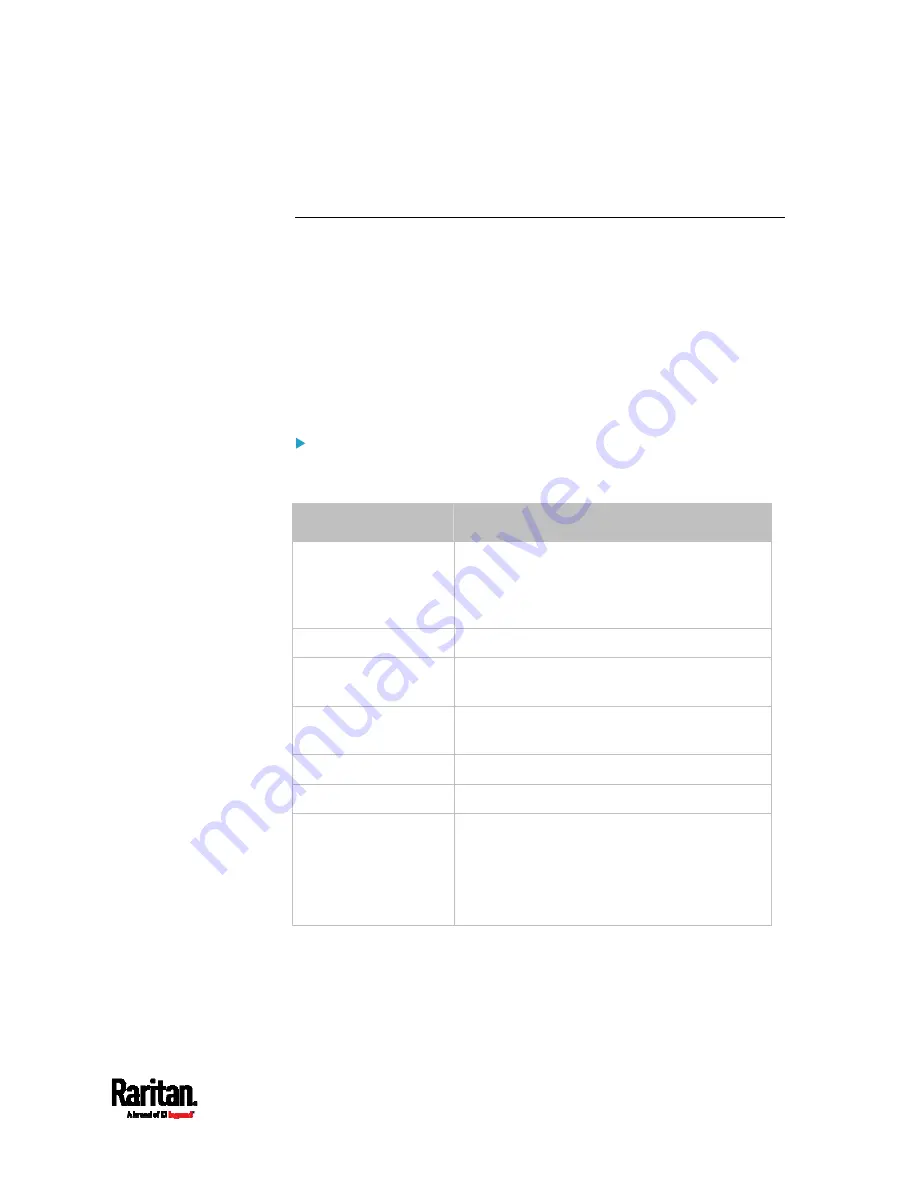
Managed sensor states:
In the following table, "R" represents any numeric sensor's reading. The
symbol <= means "smaller than" or "equal to."
State
Description
normal
For numeric sensors, it means the
readings are within the normal range.
For state sensors, it means they enter the
normal state.
below lower critical
"R" < Lower Critical threshold
below lower warning
Lower Critical threshold <= "R" < Lower
Warning threshold
above upper warning
Upper Warning threshold < "R" <= Upper
Critical threshold
above upper critical
Upper Critical threshold < "R"
alarmed
The state sensor enters the abnormal state.
unavailable
Communication with the managed sensor
is lost.
-- OR --
DX2 and DX sensor packages are
upgrading their sensor firmware.
Содержание Raritan SRC-0100
Страница 42: ...Chapter 3 Initial Installation and Configuration 30 Number Device role Master device Slave 1 Slave 2 Slave 3...
Страница 113: ...Chapter 6 Using the Web Interface 101 4 To return to the main menu and the Dashboard page click on the top left corner...
Страница 114: ...Chapter 6 Using the Web Interface 102...
Страница 128: ...Chapter 6 Using the Web Interface 116 Go to an individual sensor s or actuator s data setup page by clicking its name...
Страница 290: ...Chapter 6 Using the Web Interface 278 If wanted you can customize the subject and content of this email in this action...
Страница 291: ...Chapter 6 Using the Web Interface 279...
Страница 301: ...Chapter 6 Using the Web Interface 289 6 Click Create to finish the creation...
Страница 311: ...Chapter 6 Using the Web Interface 299...
Страница 312: ...Chapter 6 Using the Web Interface 300 Continued...
Страница 625: ...Appendix H RADIUS Configuration Illustration 613 Note If your SRC uses PAP then select PAP...
Страница 626: ...Appendix H RADIUS Configuration Illustration 614 10 Select Standard to the left of the dialog and then click Add...
Страница 627: ...Appendix H RADIUS Configuration Illustration 615 11 Select Filter Id from the list of attributes and click Add...
Страница 630: ...Appendix H RADIUS Configuration Illustration 618 14 The new attribute is added Click OK...
Страница 631: ...Appendix H RADIUS Configuration Illustration 619 15 Click Next to continue...
Страница 661: ...Appendix I Additional SRC Information 649...


