


Chapter 4: Connecting External Equipment (Optional)
50
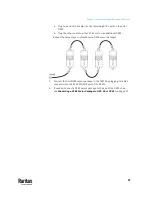
OR you can directly connect the DPX2 sensor package to a DX sensor chain
without using any RJ-12 to RJ-45 adapter. See
Connecting a DPX2 Sensor
Package to DX2, DX or DPX3
(on page 50).
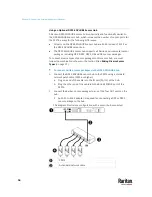
Connecting a DPX2 Sensor Package to DX2, DX or DPX3
You can connect one DPX2 sensor package to the "end" of a DX2, DX or DPX3
sensor chain. It is strongly recommended to use an RJ-12 to RJ-45 adapter for
connecting DPX2 to the final DX2, DX or DPX3 in the chain.
The maximum number of DX2, DX or DPX3 sensor packages in the chain must
be less than 12 when a DPX2 sensor package is involved.
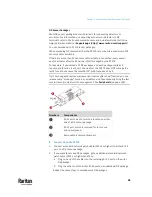
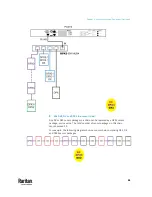
The following diagrams illustrate DX sensor chain only, but the same principles
also apply to DX2 and DPX3 sensor chains if connecting DPX2 to the end of DX2
or DPX3 sensor chains.
When connecting a DPX2 sensor package containing "three" DPX2
sensors:
A maximum of nine DX sensor packages can be cascaded because 12-3=9.
When connecting a DPX2 sensor package containing "two" DPX2 sensors:
A maximum of ten DX sensor packages can be cascaded because 12-2=10.
When connecting a DPX2 sensor package containing "one" DPX2 sensor:
A maximum of eleven DX sensor packages can be cascaded because
12-1=11.
Содержание Raritan PX3TS
Страница 4: ......
Страница 6: ......
Страница 20: ......
Страница 52: ...Chapter 3 Initial Installation and Configuration 32 Number Device role Master device Slave 1 Slave 2 Slave 3...
Страница 80: ...Chapter 4 Connecting External Equipment Optional 60...
Страница 109: ...Chapter 5 PDU Linking 89...
Страница 117: ...Chapter 5 PDU Linking 97...
Страница 440: ...Chapter 7 Using the Web Interface 420 If wanted you can customize the subject and content of this email in this action...
Страница 441: ...Chapter 7 Using the Web Interface 421...
Страница 464: ...Chapter 7 Using the Web Interface 444...
Страница 465: ...Chapter 7 Using the Web Interface 445 Continued...
Страница 746: ...Appendix A Specifications 726...
Страница 823: ...Appendix I RADIUS Configuration Illustration 803 Note If your PX3TS uses PAP then select PAP...
Страница 824: ...Appendix I RADIUS Configuration Illustration 804 10 Select Standard to the left of the dialog and then click Add...
Страница 825: ...Appendix I RADIUS Configuration Illustration 805 11 Select Filter Id from the list of attributes and click Add...
Страница 828: ...Appendix I RADIUS Configuration Illustration 808 14 The new attribute is added Click OK...
Страница 829: ...Appendix I RADIUS Configuration Illustration 809 15 Click Next to continue...
Страница 860: ...Appendix J Additional PX3TS Information 840...
Страница 890: ...Appendix K Integration 870 3 Click OK...
Страница 900: ......


