301 Fulling Mill Road, Suite G
Middletown, PA 17057
Phone (800) 321-2343 / Fax (717) 702-2546
www.onqlegrand.com
Page 2 of 5
INSTRUCTION/INSTALLATION SHEET
IP VIDEO SERVER
IS-0402 REV. A
©Copyright 2008 by On-Q/Legrand All Rights Reserved.
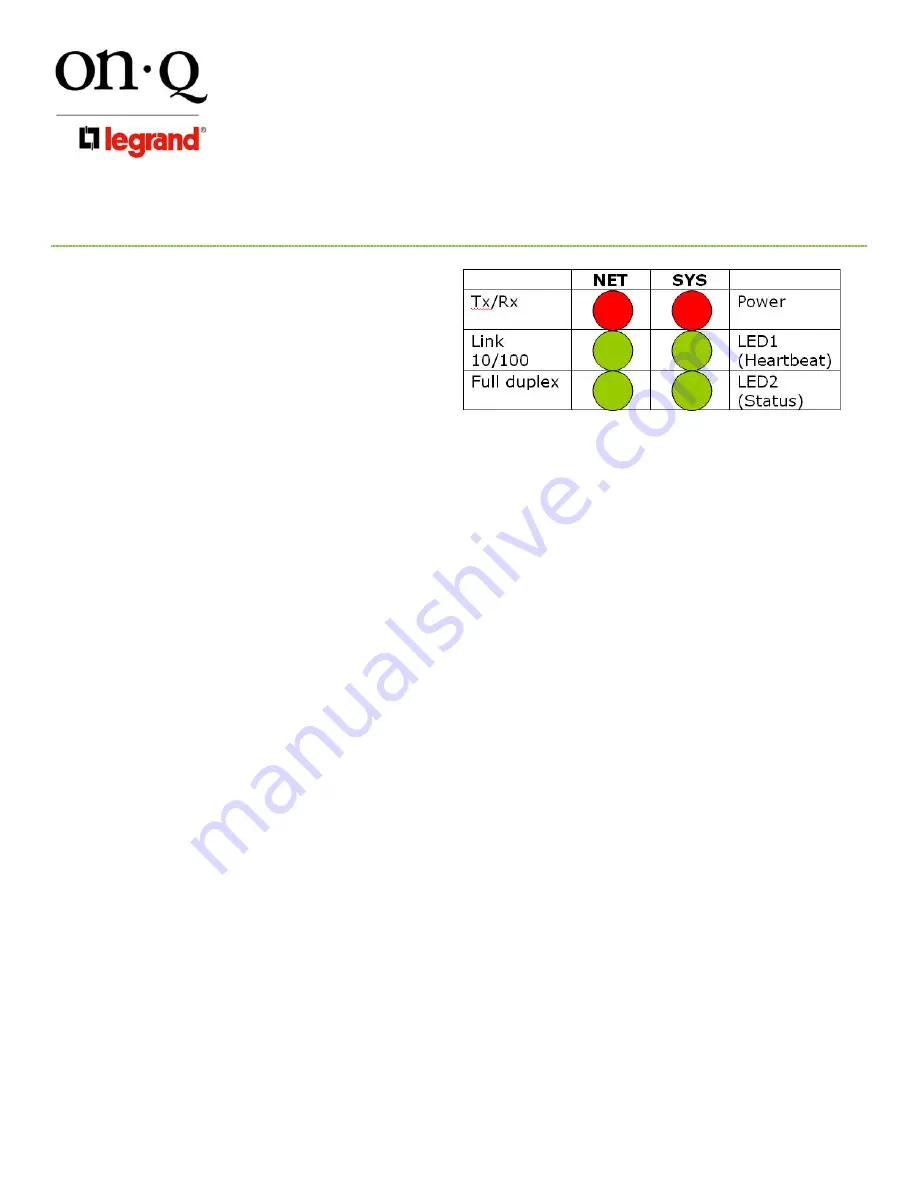
C. Status LEDs (see
Figure 4
):
There are six LEDs on the front panel, three
under the letters “NET” and three under the
letters “SYS”. The top LED under “SYS” is the
power LED and should be on any time the IP
Video Server power supply is plugged into an
AC outlet. The middle LED under “SYS” is a
heartbeat indication and should blink every half
second under normal operation.
The top LED under “NET” blinks to indicate data is being sent from or received by the IP Video Server. The
middle LED under “NET” indicates the speed of the link attached to the Ethernet jack on the rear of the IP
Video Server. If the light is off it is a 10Mbps link, while if it is on, it is a 100Mbps link. The bottom LED under
“NET” indicates half (LED off) or full (LED on) duplex operation.
When power is first applied to the IP Video Server, the LEDs below the power LED will flash while power up
diagnostics are being run, then they will go out, and then the heartbeat LED will begin blinking every half
second to indicate the IP Video Server internal software is working correctly. Any other indications presented
by the two bottom LEDs under “SYS” may be related to an error condition, and On-Q Tech Support should be
notified.
D. Initial IP Video Server Setup:
NOTE: The following steps will only normally need to be completed one time to initially configure the
IP Video Server.
1) Note the serial number printed on the bottom of the video server (it is also the MAC address of the unit
and you may need it later).
2) If not already done, connect all components together (with power off). Once all components are
connected, power on the IP Video Server by plugging in its 12VDC 1.5A power supply.
3) The On-Q IP Video Server has an RJ45 jack on the rear panel labeled “10/100 Ethernet”. This is the
network connection port, and can be attached to your network switch or spare router port. You could
also directly attach a PC to the port to verify installation, configuration and operation.
4) The On-Q IP Video Server will work in a DHCP environment, but if it is not assigned an address by a
DHCP server, it will try to find a free IP address starting at 192.168.0.99 and going up to 192.168.0.254
(subnet mask 255.255.255.0). If it doesn’t find a free IP address in that range it will try 192.168.0.2 up
to 192.168.0.98. After it finds an address to use, the Status LED blinks. If you are directly attaching a
PC, remember to change the PC’s TCP/IP address to one in the 192.168.0.xxx subnet, like
192.168.0.10 for instance. Log on to the video server using a web browser such as Internet Explorer.
Enter the following address to connect to your video server:
http://192.168.0.99
(assuming no DHCP
server was used, and the .99 address is not used by another device.
NOTE:
If this is the initial installation or the reset button has been pushed to reset the unit to factory
default condition, no authentication screen is presented. You will be shown the screen as indicated
in Figure 5.
Figure 4


