background image

7

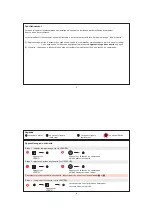
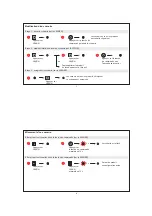
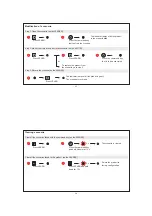
Modification díun scénario

Appu

y

er sur 

LEARN

Appu

y

er sur la touche de 

commande qui pilote le scénario

Les vo

y

ants de tous les produits

du scénario clignotent

Appu

y

er sur la touche

de commande que
l'on souhaite associer

Etape 1 : ouvrir le scénario (sur le LEADER)

Appu

y

er sur 

LEARN

ou

Appu

y

er sur 

LEARN

Pour supprimer le produit
du scénario passer à l'étape 3

Etape 2 : modifier l'état d'un acteur du scénario (sur l'ACTEUR)

Appu

y

er sur 

LEARN

Les vo

y

ants de tous les produits s'éteignent

Le scénario est enregistré

Etape 3 : enregistrer le scénario (sur le LEADER)

8

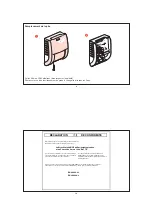
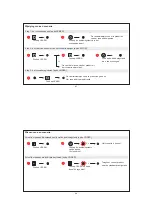
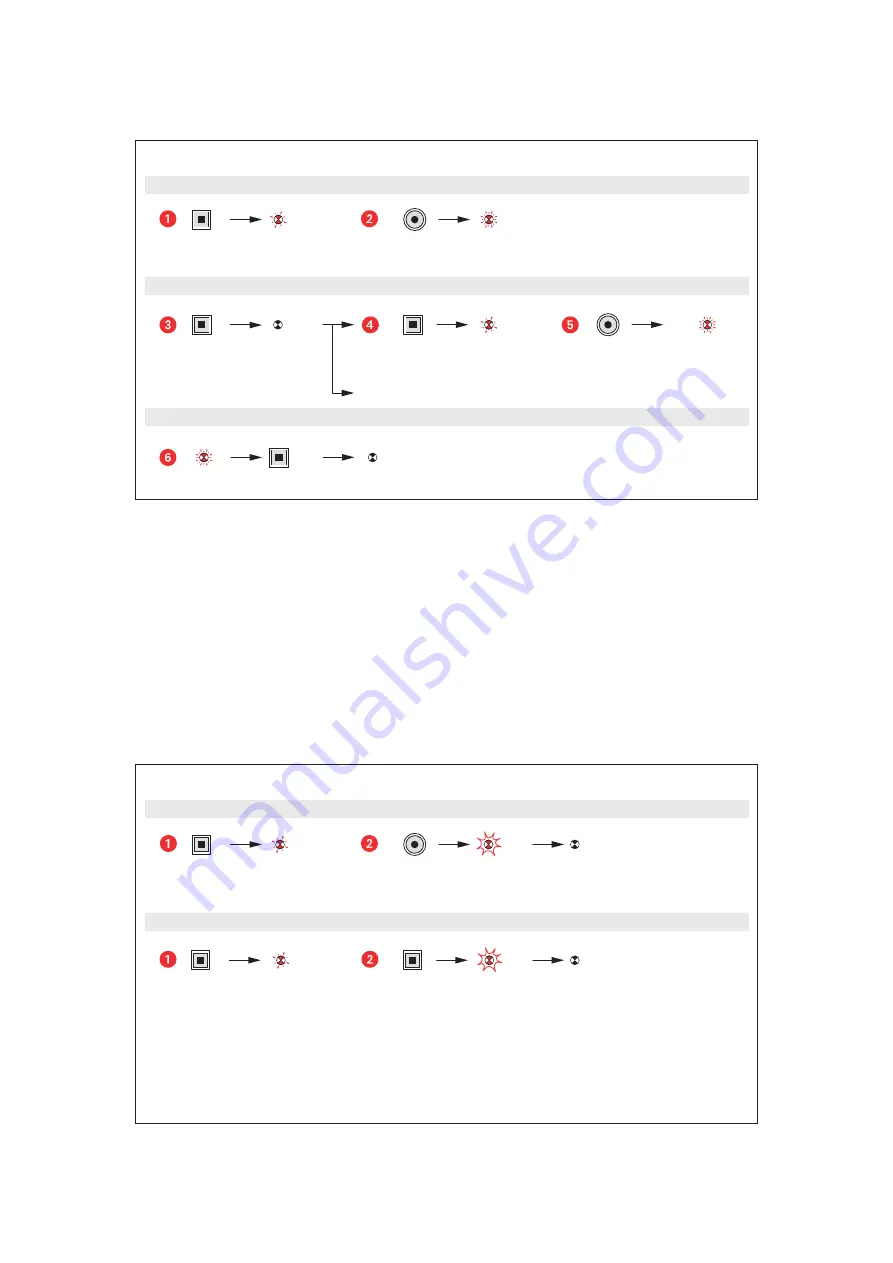
Effacement d’un scénario

App

u

yer s

u

LEARN

Le scénario est effacé

App

u

yer s

u

r

la to

u

che 

d

e comman

d

e

et maintenir 10 s

Effacer to

u

s les scénarios liés à la to

u

che 

d

e comman

d

e (s

u

r le LEADER)

App

u

yer s

u

LEARN

Reto

u

du

 pro

du

it

en config

u

ration 

u

sine

App

u

yer s

u

r

LEARN
et maintenir 10 s

Effacer to

u

s les scénarios liés à la to

u

che 

d

e comman

d

e (s

u

r le LEADER)

5 s

5 s

Содержание 882 09

Страница 1: ... 20 C Choix de Jour et nuit fonctionnement Nuit Ajustage de mise en service nuit entre 10 et 4000 lux 5 C à 45 C Interscénario automatique radio 882 09 N0064FJ7 02 2 Montage Fenêtre de détection Logement des piles Plaque de fixation Important Ne pas appuyer sur la fenêtre de détection pendant les manipulations ...

Страница 2: ...0 4 Description Mini Détection nuit uniquement Maxi Détection jour et nuit Réglage tempo 1 seconde à 16 mn Réglage seuil de luminosité Média de communication RF Radio fréquence N d identification Touche LEARN sert au deuxième appui de touche de commande Voyant LEARN ...

Страница 3: ... ensemble des produits acteurs qui sont associés à une touche de commande 6 Appuyer sur LEARN Appuyer sur LEARN Appuyer sur LEARN Appuyer sur la touche de commande qui doit piloter le scénario Apprentissage du scénario Etape 1 débuter l apprentissage sur le LEADER Appuyer sur la touche de commande qui doit être associée au leader Etape 2 ajouter un acteur au scénario sur l ACTEUR Les voyants de to...

Страница 4: ...Etape 2 modifier l état d un acteur du scénario sur l ACTEUR Appuyer sur LEARN Les voyants de tous les produits s éteignent Le scénario est enregistré Etape 3 enregistrer le scénario sur le LEADER 8 Effacement d un scénario Appuyer sur LEARN Le scénario est effacé Appuyer sur la touche de commande et maintenir 10 s Effacer tous les scénarios liés à la touche de commande sur le LEADER Appuyer sur L...

Страница 5: ...eil du 9 mars 1999 R TTE sous réserve d une utilisation conforme à sa destination on condition that they are used in the manner et ou d une installation conforme aux normes en vigueur intended and or in accordance with the current et ou aux recommandations du constructeur installation standards and or with the manufacturer s recommandantions Ces dispositions sont assurées pour la directive 1999 5 ...

Страница 6: ...e 200 m in free field Axial range of detection 12 m at 20 C Choice of Night and day operating mode Night Adjustement of night operating mode between 10 and 4000 lux 5 C to 45 C 12 Mounting Detection area Battery housing Fixing plate Warning Do not press the detection window during handling ...

Страница 7: ...ription Minimum Night detection only Maximum Night and day detection Setting the timer function 1 s to16 min Adjustement of brightness threshold Communication media RF Radio frequency Identification No LEARN button For second appui pressure of control key LEARN indicator light ...

Страница 8: ... the products actors that are linked to a control button 16 Press LEARN Press LEARN Press LEARN Press the command key that is to control the scenario Press the command key that is to be associated with the leader Step 2 Add an actor to the scenario on the ACTOR Learn scenario The indicator lamps of all products go off The scenario is recorded Step 1 Start the learn phase on the LEADER Step 3 Recor...

Страница 9: ... to step 3 Step 2 Modify the state of an actor in the scenario on the ACTOR The indicator lamps of all the products go off The scenario is recorded Step 3 Record the scenario on the LEADER 18 Clearing a scenario Press LEARN Press LEARN The scenario is cleared Press the command key and hold it down for 10 s Clear all the scenarios linked with the command key on the LEADER Return the product to fact...

Страница 10: ... du Conseil du 9 mars 1999 R TTE sous réserve d une utilisation conforme à sa destination on condition that they are used in the manner et ou d une installation conforme aux normes en vigueur intended and or in accordance with the current et ou aux recommandations du constructeur installation standards and or with the manufacturer s recommandantions Ces dispositions sont assurées pour la directive...

Страница 11: ...l meldingsbereik 12 m bij 20 C Keuze werking Dag en nacht Nacht Aanpassing inbedrij fname nacht tussen 10 en 4000 lux 5 C tot 45 C ca 200m in geval van onbelemmerde transmissie 22 Montage Bevestigingsplaat Batterijvakje Meldvenster Belangrijk Tijdens de handelingen niet op het meldvenster steunen ...

Страница 12: ...ng Identificatienummer Communicatiemiddelen PLC Draagstroom Instelling tempo 1 seconde tot 16 min Instelling van de verlichtingsgrens Min Uitsluitend nachtmelding Max Melding dag en nacht De toets LEARN dient voor de tweede druk op de bedieningsknop Controlelampje LEARN ...

Страница 13: ...komt overeen met alle producten actoren die bij een bedieningstoets horen 26 Druk op LEARN Druk op LEARN Druk op LEARN Druk op de bedieningstoets die het scenario bestuurt Druk op de bedieningstoets die aan de leider moet zijn toegevoegd Stap 2 een actor toevoegen aan het scenario op de ACTOR Inlezen van het scenario De controlelampjes van alle producten gaan uit Het scenario is geregistreerd Stap...

Страница 14: ...R De controlelampjes van alle producten gaan uit Het scenario is geregistreerd Stap 3 het scenario registreren op de LEIDER Wijziging van een scenario Stap 1 het scenario openen op de LEIDER 28 Druk op LEARN Druk op LEARN Het scenario is gewist Druk op de bedieningstoets en houd deze 10s ingedrukt Wis alle scenario s die verbonden zijn met de bedieningstoets op de LEIDER Terugkeer van het product ...

Страница 15: ... du Conseil du 9 mars 1999 R TTE sous réserve d une utilisation conforme à sa destination on condition that they are used in the manner et ou d une installation conforme aux normes en vigueur intended and or in accordance with the current et ou aux recommandations du constructeur installation standards and or with the manufacturer s recommandantions Ces dispositions sont assurées pour la directive...

Страница 16: ... 868 3 MHz Übertragungsreichweite 200 Meter freies Feld Detektionsbereich 12 m bei 20 C Funktionsmodus Tag Nacht Nacht Helligkeitsschwellwert 10 bis 4000 lux 5 C to 45 C 32 Montage Detektions Abdeckung Batteriefach Gehäuseunterteil Achtung Detektions Abdeckung nicht eindrücken ...

Страница 17: ...34 Produktbeschreibung Minimum Nacht Detektion Maximum Nacht und Tag Detektion Ausschaltverzögerung 1 sek bis 16 min Helligkeitsschwellwert Technologie RF Funk Übertragung Identifikationsnummer LEARN Taste Bei nochmaligen drücken wird der Einlernbefehl gesendet LEARN LED ...

Страница 18: ...net werden soll Einlernen der Teilnehmer 1 Schritt Einlernmodus aktivieren auf dem Sensor Die Lerntaste LEARN drücken Bedientaste drücken die den Sensor zugeordnet werden soll 2 Schritt Einlernmodus aktivieren auf dem Aktor Die Lerntaste LEARN am Sensor drücken Lernmodus schließen Die Leuchtdiode der LEARN Taste erlischt auf allen eingelernten Aktoren Der Einlernprozess ist abgeschlossen 3 Schritt...

Страница 19: ...ücken Die Leuchtdioden der LEARN Taste erlischt auf allen Aktoren Der Prozess ist abgeschlossen 2 Schritt Aktor am Sensor hinzufügen oder löschen am AKTOR Die Leuchtdioden der LEARN Taste erlischt auf allen Aktoren Der Prozess ist abgeschlossen 3 Schritt Das Funktionszuordnung beenden 38 Löschen aller Funktionszuordnung oder Aktoren Die Lerntaste LEARN drücken Die Lerntaste LEARN drücken Die Zuord...

Страница 20: ... d une utilisation conforme à sa destination on condition that they are used in the manner et ou d une installation conforme aux normes en vigueur intended and or in accordance with the current et ou aux recommandations du constructeur installation standards and or with the manufacturer s recommandantions Ces dispositions sont assurées pour la directive 1999 5 CEE par la conformité aux normes suiv...

Страница 21: ... m en campo libre Distancia máxima de detección 12 m a 20 C Opción de Día y noche funcionamiento Noche Umbral crepuscular entre 10 y 4000 lux 5 C a 45 C 42 Montaje Célula de detección Alojamiento de las pilas Placa de fijación Importante no apoyar sobre la célula de detección durante la manipulación ...

Страница 22: ...cripción Mini Detección noche Maxi Detección día y noche Temporización regulable 1 segundo a 16 min Regulación umbral de luminosidad Medio de comunicación RF Radio frecuencia N de identificación La tecla LEARN sirve para la segunda pulsación de la tecla de mando Piloto LEARN ...

Страница 23: ...ario descrito en la página 46 2 Escenario conjunto de acciones realizadas por los actores a través de una orden enviada por el Líder 46 Pulsar LEARN Pulsar LEARN Pulsar la tecla de mando que va a controlar el escenario Pulsar la tecla de mando que va a estar asociada al líder Paso 2 añadir un actor al escenario en el ACTOR Aprendizaje del escenario Pulsar LEARN El led en todos los mecanismos se ap...

Страница 24: ...ario en el ACTOR El led de todos los mecanimos se apaga El escenario ha sido grabado Paso 3 grabar el escenario en el LÍDER Modificación de un escenario Paso 1 abrir el escenario en el LÍDER 48 Pulsar LEARN Pulsar LEARN El escenario ha sido borrado Pulsar la tecla de mando durante 10 s Borrar todos los escenarios vinculados a la tecla de mando en el LÍDER Configuracion de fabrica Pulsar LEARN dura...

Страница 25: ...éen et du Conseil du 9 mars 1999 R TTE sous réserve d une utilisation conforme à sa destination on condition that they are used in the manner et ou d une installation conforme aux normes en vigueur intended and or in accordance with the current et ou aux recommandations du constructeur installation standards and or with the manufacturer s recommandantions Ces dispositions sont assurées pour la dir...

Страница 26: ...8 3 MHz Ì ÏÂÈ ÂÚ Ô 200 m Û ÂÏ ıÂÚÔ Â Ô ÍÔÓÈÎ ÒÓË Ó Ó ÛË 12 m ÛÙÔ 20 C ÈÏÔÁ ÏÂÈÙÔ ÚÁ ËÌ Ú Ó Ù ÙÂÚÈÓ ÏÂÈÙÔ ÚÁ ƒ ıÌ ÛÂÈ Ó ÙÂÚÈÓ Ú ÛË ÌÂÙ Í 10 Î È 4000 lux 5 C ˆ 45 C 52 ÁÎ Ù ÛÙ ÛË Ú ı ÚÔ Ó Ó ÛË Ô Ôı ÙËÛË Ì Ù ÚÈÒÓ µ ÛË ÛÙ ÚÈÍË ÚÔÛÔ ªËÓ È ÂÙ ÙÔ Ú ı ÚÔ Ó Ó ÛË Î Ù ÙË È ÚÎÂÈ ÙË ÂÁÎ Ù ÛÙ ÛË ...

Страница 27: ...ÓËÛË 54 ÂÚÈÁÚ Ê Min Ó Ó ÛË ÌfiÓÔ Ó Ù Max Ó Ó ÛË Ì Ú Ó Ù ƒ ıÌÈÛË ÚÔÓÈÎ Î ı ÛÙ ÚËÛË 1  ÙÂÚfiÏ ÙÔ ˆ 16 Ï ٠ƒ ıÌÈÛË ÔÚ Ô ÊˆÙÂÈÓfiÙËÙ ª ÛÔ Â ÈÎÔÈÓˆÓ RF Û ÚÌ ÙÔ Û Ì Ú Ó ÁÓÒÚÈÛË Ï ÎÙÚÔ LEARN Ô Ï ÎÙÚÔ LEARN ÏÂÈÙÔ ÚÁ ˆ  ÙÂÚÔ Ï ÎÙÚÔ ÂÏ Á Ô ºˆÙÂÈÓ Ó ÂÈÍË LEARN ...

Страница 28: ...ÂÓ Ú ˆÓ Ô Â Ó È Û Ó ÛÌ Ó ÌÂ Ó Ï ÎÙÚÔ ÂÏ Á Ô 56 ÂÍ ÁËÛË Î Ù ÛÙ ÛË ÊˆÙÂÈÓ Ó ÂÈÍË Ù ÛÙ ÙÔ Ï ÎÙÚÔ ÂÏ Á Ô ÙÔ Ô Ô Ô ı ÂÏ Á ÂÈ ÙÔ ÛÂÓ ÚÈÔ Ù ÛÙ ÙÔ LEARN Ù ÛÙ ÙÔ LEARN Ù ÛÙ ÙÔ LEARN Ù ÛÙ ÙÔ Ï ÎÙÚÔ ÂÏ Á Ô Ô ı ÏÂÙÂ Ó Û Ó ÛÂÙ Ì ÙÔ leader È ˆÙÂÈÓ ÂÓ Â ÍÂÈ fiÏˆÓ ÙˆÓ ÚÔ fiÓÙˆÓ Û ÓÔ Ó Ô ÛÂÓ ÚÈÔ ÔıËΠÙËΠ٠ÈÔ 1 ÍÂÎ ÓËÌ ÙË ÂÎÌ ıËÛË Â Óˆ ÛÙÔ LEADER Ù ÈÔ 2 ÚÔÛı ÛÙÂ Ó Ó actor ÛÙÔ ÛÂÓ ÚÈÔ Â Óˆ ÛÙÔÓ actor Ù ÈÔ 3 ...

Страница 29: ... actor È ˆÙÂÈÓ ÂÓ Â ÍÂÈ fiÏˆÓ ÙˆÓ ÚÔ fiÓÙˆÓ Û ÓÔ Ó Ô ÛÂÓ ÚÈÔ ÔıËΠÙËΠ٠ÈÔ 3 ÔıËΠÛÙ ÙÔ ÛÂÓ ÚÈÔ Â Óˆ ÛÙÔ LEADER ÚÔ Ô Ô ËÛË ÂÓfi ÛÂÓ Ú Ô Ù ÈÔ 1 ÓÔ ÍÙ ÙÔ ÛÂÓ ÚÈÔ Â Óˆ ÛÙÔ LEADER 58 Ù ÛÙ ÙÔ LEARN Ù ÛÙ ÙÔ LEARN Ô ÛÂÓ ÚÈÔ È ÁÚ ËΠ٠ÛÙ ÙÔ Ï ÎÙÚÔ ÂÏ Á Ô Î È ÎÚ Ù ÛÙ ÙÔ ÙËÌ ÓÔ ÁÈ 10 s È ÁÚ Ù fiÏ Ù ÛÂÓ ÚÈ Ô Û Ó ÔÓÙ È Ì ÙÔ Ï ÎÙÚÔ ÂÏ Á Ô Â Óˆ ÛÙÔ LEADER Ó ÊÔÚ ÙˆÓ ÂÚÁÔÛÙ ÛÈ ÎÒÓ Ú ıÌ ÛÂˆÓ Ù ÛÙ ÙÔ Ï ÎÙÚ...

Страница 30: ...R TTE sous réserve d une utilisation conforme à sa destination on condition that they are used in the manner et ou d une installation conforme aux normes en vigueur intended and or in accordance with the current et ou aux recommandations du constructeur installation standards and or with the manufacturer s recommandantions Ces dispositions sont assurées pour la directive 1999 5 CEE par la conformi...

Страница 31: ...távolság kb 200 m szabad területen Érzékelő vízszintes hatótávolsága 12 m 20 C on Működési módok Éjjel nappali Éjszakai Éjszakai működési mód beállítása 10 és 4000 lux között 5 C tól 45 C ig 62 Felszerelés Érzékelő Elemház Rögzítőlemez Figyelem A beállítás közben az érzékelőhöz nyúlni nem szabad ...

Страница 32: ...tel iránya Minimum Csak éjszakai érzékelés Maximum Éjjel nappali érzékelés Késleltetés beállítás 1 mp 16 perc Fényerősség beállítása Kommunikációs adathordozók RF Rádiófrekvencia Azonosító szám LEARN Tanulás gomb A LEARN Tanulás gomb mint második vezérlőgomb is működik LEARN Tanulás jelzőlámpa ...

Страница 33: ...k 2 Programcsomag azon műveletek összessége melyet a végrehajtó szerelvények valósítanak meg a vezérlő által kiadott parancsra 66 Műveletsor beprogramozásaa Nyomja meg a vezérlőgombot amelynek irányítania kell a műveletsort Nyomja meg a LEARN gombot Nyomja meg a LEARN gombot Nyomja meg a LEARN gombot Nyomja meg azt a funkciógombot amelyet a vezérlőhöz kell társítani Minden termék jelzőlámpája kial...

Страница 34: ...TÓ szerelvényének állapotát Minden termék jelzőlámpája kialszik A programcsomag rögzítésre került 3 Rögzítse a programcsomagot a VEZÉRLŐ n Programcsomag módosítása 1 Kezdje a programozást a VEZÉRLŐ n 68 Nyomja meg a LEARN gombot Nyomja meg a LEARN gombot A műveletsort törölte Nyomja meg a vezérlőgombot és tartsa lenyomva 10 mp ig Töröljön ki minden programcsomagot amely a vezérlőgombhoz lett rende...

Страница 35: ...éen et du Conseil du 9 mars 1999 R TTE sous réserve d une utilisation conforme à sa destination on condition that they are used in the manner et ou d une installation conforme aux normes en vigueur intended and or in accordance with the current et ou aux recommandations du constructeur installation standards and or with the manufacturer s recommandantions Ces dispositions sont assurées pour la dir...

Страница 36: ...culos Alcance de detecção axial 12 m a 20 C Possibilidades de Día e noite funcionamento Noite Ajuste para o funcionamento de noite entre 10 e 4000 lux 5 C a 45 C 72 Montagem Lente de detecção Compartimento das pilhas Base de fixação Atenção Evitar o contacto com a lente de detec ão durante as manipulações do aparelho ...

Страница 37: ...el iránya Mín Detecção apenas à noite Máx Detecção dia e noite Regulação da temporização 1 s a 16 min Regulação do nível de intensidade luminosa Tecnologia de comunicação RF Radiofrequência Nº de identificação Botão LEARN Funciona como tecla de comando se premido duas vezes Sinalizador LEARN ...

Страница 38: ...nto de produtos actores que estão associados a uma tecla do comando central 76 Premir a tecla de comando que deve controlar o cenário Premir a tecla de comando que deve ser associada ao líder Etapa 2 associar um actor ao cenário no ACTOR Memorização do cenário Premir LEARN Premir LEARN Premir LEARN Os sinalizadores luminosos de todos os produtos apagam se O cenário fica gravado Etapa 1 iniciar a m...

Страница 39: ...no ACTOR Os sinalizadores luminosos de todos os produtos apagam se O cenário fica gravado Etapa 3 gravar o cenário no LÍDER Modificação de um cenário Etapa 1 abrir o cenário no LÍDER 78 Premir LEARN Premir LEARN O cenário é suprimido Premir a tecla de comando e manter durante 10 s Suprimir todos os cenários ligados à tecla de comando no LÍDER Retorno do produto à configuração de fábrica Premir o b...

Страница 40: ... et du Conseil du 9 mars 1999 R TTE sous réserve d une utilisation conforme à sa destination on condition that they are used in the manner et ou d une installation conforme aux normes en vigueur intended and or in accordance with the current et ou aux recommandations du constructeur installation standards and or with the manufacturer s recommandantions Ces dispositions sont assurées pour la direct...

Страница 41: ...kvence 868 3 MHz Dosah cca 200 m na volném prostranství Dosah v podélné ose 12 m při 20 C Výběr režimu Den a noc Noc Nastavení nočního režimu od 10 do 4000 lux od 5 C do 45 C 82 Montáž Okénko senzoru Umístění baterií Montážní deska Důležité Při manipulaci netlačte na okénko senzoru ...

Страница 42: ...ouze noční detekce Max Denní a noční detekce Nastavení doby sepnutí od 1 sekundy do 16 minut Nastavení prahové úrovně jasu Způsob komunikace RF Rádiová komunikace Identifikační číslo Tlačítko Programování scénářů LEARN Tlačítko Programování scénářů LEARN funguje jako druhé ovládací tlačítko ...

Страница 43: ...jí Aktory Actors po zmáčknutí příslušného tlačítka na řídícím prvku Leader 86 Stiskněte LEARN Stiskněte LEARN Stiskněte LEARN Stiskněte ovládací tlačítko které musí řídit scénář Stiskněte ovládací tlačítko které musí být spojeno s leaderem Etapa 2 přidat ke scénáři účastníka ÚČASTNÍK ACTOR Osvojování scénáře Kontrolky všech výrobků zhasnou Scénář je uložen Etapa 1 zahájení osvojování LEADER Etapa ...

Страница 44: ...e ÚČASTNÍK ACTOR Kontrolky všech výrobků zhasnou Scénář je uložen Etapa 3 uložte scénář LEADER Změna scénáře Etapa 1 otevření scénáře LEADER 88 Stiskněte LEARN Stiskněte LEARN Scénář je vymazán Stiskněte ovládací tlačítko a držte jej stisknuté po dobu 10 s Vymažte všechny scénáře spojené s ovládacím tlačítkem LEADER Návrat výrobku do továrního nastavení Stiskněte LEARN a držte stisknuté po dobu 10...

Страница 45: ... d une utilisation conforme à sa destination on condition that they are used in the manner et ou d une installation conforme aux normes en vigueur intended and or in accordance with the current et ou aux recommandations du constructeur installation standards and or with the manufacturer s recommandantions Ces dispositions sont assurées pour la directive 1999 5 CEE par la conformité aux normes suiv...

Страница 46: ... Ëfl 200 Ï Ì ÓÚÍ ÚÓÏ Ô ÓÒÚ ÌÒÚ Â Ñ Î ÌÓÒÚ Ó Ì ÛÊÂÌËfl 12 Ï Ô Ë 20ºë êÂÊËÏ ÓÚ ä Û ÎÓÒÛÚÓ Ì È çÓ ÌÓÈ ÑË Ô ÁÓÌ Â ÛÎË Ó ÌËfl Ì ÍÎ ÂÌË ÌÓ ÌÓ Ó éÚ 10 Ó 4000 ÎÍ ÂÊËÏ ÓÚ ÓÚ 5 ë Ó 45 ë ÑË Ô ÁÓÌ Ó Ëı ÚÂÏÔ ÚÛ 92 åÓÌÚ Ê ãËÌÁ éÚÒÂÍ Îfl Ú ÂÂÍ åÓÌÚ ÊÌ fl ÏÍ Ç ÊÌÓ ÇÓ ÂÏfl ÏÓÌÚ Ê ËÁ Â Ú Ì Ê ÚËfl Ì ÎËÌÁÛ Ú ËÍ ...

Страница 47: ...ÔËÒ ÌË Átvitel iránya åËÌËÏÛÏ çÓ ÌÓÈ ÂÊËÏ ÓÚ å ÍÒËÏÛÏ ä Û ÎÓÒÛÚÓ Ì È ÂÊËÏ ÓÚ ç ÒÚ ÓÈÍ ÂÏÂÌË Â ÊÍË ÓÚ 1 ÒÂÍ Ó 16 ÏËÌ ç ÒÚ ÓÈÍ Û Ó Ìfl ÓÒ Â ÂÌÌÓÒÚË è ÓÚÓÍÓÎ ÔÂ Â Ë ÌÌ ı RF ê ËÓ ÒÚÓÚ äÌÓÔÍ LEARN Ô Ë ÔÓ ÚÓ ÌÓÏ Ì Ê ÚËË ÓÚ ÂÚ Í Í ÍÌÓÔÍ ÛÔ ÎÂÌËfl àÌ ËÍ ÚÓ LEARN à ÂÌÚËÙËÍ ˆËÓÌÌ È N ...

Страница 48: ... ı Ò Ó ÌÓÈ ÍÌÓÔÍÓÈ ÛÔ ÎÂÌËfl 96 è Ó ÏÏË Ó ÌË ҈ÂÌ Ëfl aìÒÎÓ Ì Â Ó ÓÁÌ ÂÌËfl ËÌ ËÍ ÚÓ ÍÎ ÂÌ ç ÊÏËÚÂ Ì ÍÌÓÔÍÛ LEARN ç ÊÏËÚÂ Ì ÍÌÓÔÍÛ ÛÔ ÎÂÌËfl ÒˆÂÌ ËÂÏ ç ÊÏËÚÂ Ì ÍÌÓÔÍÛ LEARN ç ÊÏËÚÂ Ì ÍÌÓÔÍÛ LEARN ç ÊÏËÚÂ Ì ÍÌÓÔÍÛ ÛÔ ÎÂÌËfl ÍÓÚÓ Û ÌÂÓ xÓ ËÏÓ Ò flÁ Ú Ò ãË Â ÓÏ ÇÒ ËÌ ËÍ ÚÓ ÍÎ ÂÌ ëˆÂÌ ËÈ Á ÔËÒ Ì ùÚ Ô 1 Ì ÎÓ Ô Ó ÏÏË Ó ÌËfl Ì ãË Â Â ùÚ Ô 2 Ó ÎÂÌË ۈ ÒÚÌËÍ ÒˆÂÌ ËÈ Ì Ûˆ ÒÚÌËÍ ҈ÂÌ Ëfl ùÚ Ô 3 Á ÔËÒ ÒˆÂÌ Ëfl Ì ã...

Страница 49: ...ËÁ ÒˆÂÌ Ëfl ùÚ Ô 2 ËÁÏÂÌÂÌË ÓÚ Ûˆ ÒÚÌËÍ ÒˆÂÌ Ëfl Ì Ûˆ ÒÚÌËÍ àÌ ËÍ ÚÓ ÍÎ ÂÌ ëˆÂÌ ËÈ Á ÔËÒ Ì ùÚ Ô 3 Á ÔËÒ ÒˆÂÌ Ëfl Ì ãË Â Â ç ÊÏËÚÂ Ì ÍÌÓÔÍÛ LEARN 98 ì ÎÂÌË ҈ÂÌ Ëfl ç ÊÏËÚÂ Ì ÍÌÓÔÍÛ LEARN ëˆÂÌ ËÈ Û ÎÂÌ ç ÊÏËÚÂ Ì ÍÌÓÔÍÛ ÛÔ ÎÂÌËfl Ë Û Â ÊË ÈÚ ÂÂ Ì Ê ÚÓÈ Ú ÂÌË 10 ÒÂÍ ì ÎÂÌË ÒÂı ÒˆÂÌ ËÂ Ò flÁ ÌÌ ı Ò ÍÌÓÔÍÓÈ ÛÔ ÎÂÌËfl Ì ãË Â Â ç ÊÏËÚÂ Ì ÍÌÓÔÍÛ LEARN ÇÓÁ Ú Í Á Ó ÒÍËÏ Ì ÒÚ ÓÈÍ Ï ç ÊÏËÚÂ Ì ÍÌÓÔÍÛ LEARN Ë Û...

Страница 50: ...du Conseil du 9 mars 1999 R TTE sous réserve d une utilisation conforme à sa destination on condition that they are used in the manner et ou d une installation conforme aux normes en vigueur intended and or in accordance with the current et ou aux recommandations du constructeur installation standards and or with the manufacturer s recommandantions Ces dispositions sont assurées pour la directive ...

Страница 51: ... MHz Dosah cca 200 m v otvorenom priestore Osový dosah detekcie 12 m při 20 C Voľba fungovania Deň a Noc Noc Nastavenie pri od 10 do 4000 lux nočnom režime 5 C až 45 C 102 Inštalácia Detekčný priezor Miesto pre batérie Uchytný rámik Dôležité Netlačte na detekčný priezor počas manipulácie ...

Страница 52: ...pis Átvitel iránya Mini Detekcia počas noci Maxi Detekcia počas dňa a noci Nastavenie času 1 s až 16 min Nastavenie svetelného prahu Spôsob komunikácie RF Rádiová frekvencia Tlačidlo LEARN funguje pri druhom stlačení tlačidla ovládania Kontrolka LEARN Identifikačné číslo ...

Страница 53: ...dnotlivých účastníkov k danému tlačidlu ovládania 106 Osvojovanie scenára Stlačte LEARN Stlačte ovládacie tlačidlo ktoré musí riadiť scenár Stlačte LEARN Stlačte LEARN Stlačte ovládacie tlačidlo ktoré musí byť spojené s lídrom Kontrolky všetkých výrobkov zhasnú Scenár je uložený Etapa 1 začatie osvojovania u LÍDRA Etapa 2 pridať k scenáru účastníka u ÚČASTNÍKA Etapa 3 uložte scenár u LÍDRA Ak chce...

Страница 54: ...e 3 Etapa 2 zmeňte stav účastníka scenára u ÚČASTNÍKA Stlačte LEARN Kontrolky všetkých výrobkov zhasnú Scenár je uložený Etapa 3 uložte scenár u LÍDRA 108 Vymazanie scenára Stlačte LEARN Scenár je vymazaný Stlačte ovládacie tlačidlo a držte ho stlačené počas 10 s Vymažte všetky scenáre spojené s ovládacím tlačidlom u LÍDRA Stlačte LEARN Návrat výrobku do tová renského nastavenia Stlačte LEARN a dr...

Страница 55: ... une utilisation conforme à sa destination on condition that they are used in the manner et ou d une installation conforme aux normes en vigueur intended and or in accordance with the current et ou aux recommandations du constructeur installation standards and or with the manufacturer s recommandantions Ces dispositions sont assurées pour la directive 1999 5 CEE par la conformité aux normes suivan...

Отзывы: