background image

Multimedia Touch Screen


Installa

tion M

anual

9

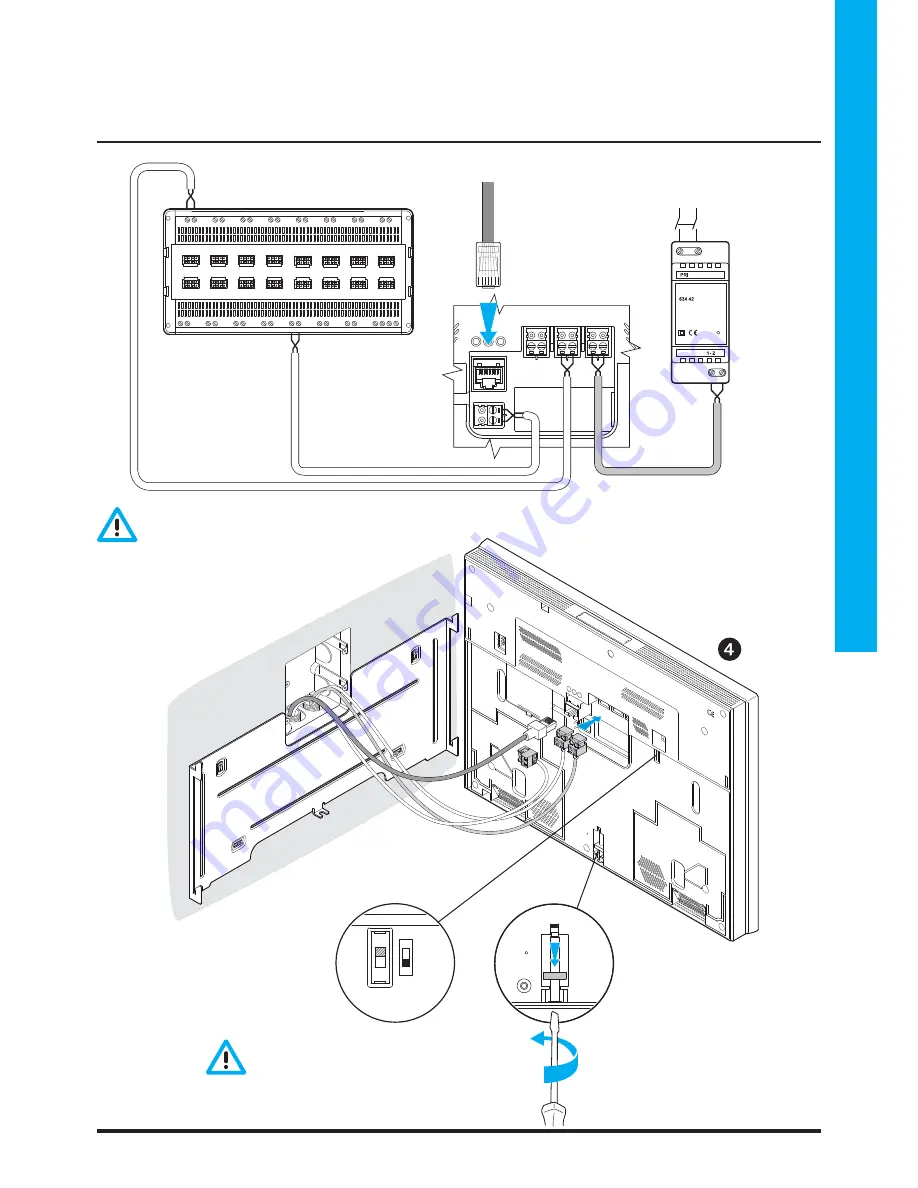
Make sure the nut is posi-

tioned at the bottom end

If the Multimedia Touch Screen 

is the last component on the 

line move the micro-switch to 

the 

ON 

position

Additional power supply via terminals 

1 – 2

 is required: take care not to invert polarity.

PSTN

BUS

2   1

ETH

SCS AUDIO OUT

PRI:  220 – 240 V~ 


175 – 165 mA


47/63 Hz

SCS:  27 Vdc


600 mA

035 84

634 42

634 35

230 Vac

ETHERNET 

cable

audio SCS/BUS

ON

OFF

Содержание 7" Video Touch Screen

Страница 1: ...5739 62 63 Multimedia Touch Screen Installation Manual Part U3571A 09 09 01 PC ...

Страница 2: ...2 ...

Страница 3: ...Box contents 4 2 Description 5 2 1 Front view 5 2 2 Rear view 6 3 Installation 7 3 1 Cover Plate Fitting 7 3 2 Wall installation with metal bracket supplied 8 3 3 Battery replacement 11 4 Configuration 12 4 1 Configuration via Software 12 4 2 PC connection 12 5 Appendix 14 5 1 Technical data 14 5 2 Dimensions 14 ...

Страница 4: ...ligence improper use or tampering by unauthorised personnel The Multimedia Touch Screen must be installed only indoors must not be exposed to dripping or splashing of water must be used exclusively on Legrand 2 wire digital systems 1 2 Box contents The box contains Multimedia Touch Screen metal bracket for wall installation installation manual user manual CD display cleaning cloth 1 x 512 MB SD ca...

Страница 5: ...al 5 2 1 Front view WebCam USB port future application 1 Microphone 2 USB ports for USB PenDrive and Dongle Wi Fi future application 3 Mini USB port for PC connection 4 Secur Digital memory card port max 2 GB no HC SD 5 1 2 3 4 5 2 Description ...

Страница 6: ...ne line port future application 4 Video 2 wire SCS BUS port 5 Power supply 1 2 port 6 End of line ON OFF micro switch 7 Stereo loudspeakers 8 Bracket fastening screw 9 Factory settings reset pushbutton 10 Battery compartment 11 RS232 port for PC connection 12 PSTN BUS 2 1 ON OFF ETH SCS AUDIO OUT 11 1 2 3 4 8 8 9 10 5 6 12 7 ...

Страница 7: ...Multimedia Touch Screen Installation Manual 7 3 1 Cover Plate Fitting 3 Installation ...

Страница 8: ...8 3 2 Wall installation with metal bracket supplied 3 Installation ...

Страница 9: ...ch Screen is the last component on the line move the micro switch to the ON position Additional power supply via terminals 1 2 is required take care not to invert polarity PSTN BUS 2 1 ETH SCS AUDIO OUT PRI 220 240 V 175 165 mA 47 63 Hz SCS 27 Vdc 600 mA 035 84 634 42 634 35 230 Vac ETHERNET cable audio SCS BUS ON OFF ...

Страница 10: ...10 To complete the installation turn the fastening screw underneath the Mul timedia Touch Screen anticlockwise 3 Installation ...

Страница 11: ...Multimedia Touch Screen Installation Manual 11 3 3 Battery replacement NiMh 7 2 V 160 mAh NiMH After removing the cover insert the battery as shown below ...

Страница 12: ...imediaTouchScreenConfig software or perform a firmware update connect the Multimedia Touch Screen to the PC using a USB miniUSB cable or the serial port 492 34 or an Ethernet cable USB Connection 4 Configuration The Multimedia Touch Screen can be configured via the MultimediaTouchScreenConfig software supplied ...

Страница 13: ...Multimedia Touch Screen Installation Manual 13 Serial connection Ethernet connection PSTN BUS 2 1 ON OFF ETH SCS AUDIO OUT 492 34 PSTN BUS 2 1 ON OFF ETH SCS AUDIO OUT 2 3 4 5 6 1 DC In ...

Страница 14: ...ical data 5 2 Dimensions 5 Appendix 309 233 30 Local power supply 1 2 18 27 Vdc BUS SCS power supply 18 27 Vdc Maximum local absorption 1 2 600 mA Maximum absorption from BUS SCS 50 mA Operating temperature 5 45 C ...

Страница 15: ...Multimedia Touch Screen Installation Manual 15 Notes ...

Страница 16: ... contents of this booklet and to communicate in any form and modality the changes brought to the same World Headquarters and International Department 87045 LIMOGES CEDEX FRANCE 33 5 55 06 87 87 Fax 33 5 55 06 74 55 www legrandelectric com Installer stamp ...

Отзывы: