background image

22

To enable the Chronothermostat:

  select the functioning Language

  set Date / Time

  the Chronothermostat automatically sets to 

Winter

 mode and 

Week-

ly PROGRAMME1 

mode.

The display shows the currently set selection.
(Italian factory setting) 

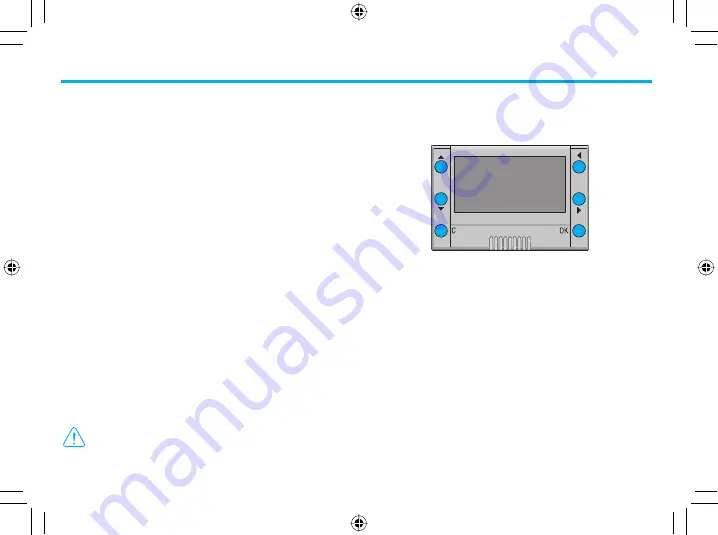
•  The 

ÅÇ

 keys can be used to scroll the list and select the language

• Press 

OK

 to confi rm

After confirming, the Chronothermostat switches to the Set DATE and 
TIME menu

•  Set time and date with keys: 

ÅÇ

 increases/decreases the selected 

digit, 

ÉÑ

 scrolls the time and date digits 

• Press 

OK

 to confi rm

•  Hold down the 

C

 key to exit the menu and return to the main page 

The Chronothermostat will automatically set up as follows:

Winter 

mode

Weekly-PROGRAMME1 

mode

To set the 

Summer 

mode

• press 

OK

 to access the menus

• select 

Setup 

with the

Ç

key 

• press 

OK

 to confi rm

Complete the setup by following the procedure described on pag. 25.

Daylight saving time

: if the default setup is kept, “Manual” must 

be updated manually; to set up the “Automatic” update mode, 
see paragraph “Set Daylight saving time” on pag. 25.

When the main screen is displayed, the following operations can be 
executed with the navigation keys:

OK 

Key


accesses the Main menu - confi rm

Key


cancels and returns to the previous mode

ÅÇ

Keys


depending on the preset mode:


Weekly – Manual – Timed

: increase / decrease in the current 

temperature;


Holidays – Antifreeze – OFF

: no eff ect

ÉÑ

Keys


cycle through the functioning modes

  Your Chronothermostat: use it now!


First activation


Navigation keys

When the Chronothermostat display shows the Screen saver (or when 
it is off ), the preset functioning mode will be displayed if any key is 
pressed.


View the functioning modes

Introduction and standard functions

Содержание 6830 31

Страница 1: ...Part U2719A 05 08 01 PC Cronotermostatodaincasso Flushmountingchronothermostat Manuale Utente User manual Manual de Uso Manual de Uso 6830 31 6873 31 6878 31 ...

Страница 2: ...Português 51 P Español 35 E English 19 GB Italiano 3 I ...

Страница 3: ...funzionamento Estate Inverno 9 Imposta i livelli delle Temperature 9 Imposta Data e Ora 9 Imposta l Ora legale 9 Imposta l unità di misura della temperatura 10 Abilita disabilita il Controllo remoto 10 Regola il Contrasto del display 10 Seleziona lo Screen Saver 10 Seleziona la Lingua 10 Seleziona la Regolazione della temperatura 11 Taratura della sonda termica 11 Seleziona la funzione della Sonda...

Страница 4: ...elenco delle voci presenti IlCronotermostato4451èundispositivodaincassoutilizzabileperimpianti diriscaldamentoedicondizionamento consentetramitediversepossibilità diprogrammazionedieffettuarelaregolazionedellatemperaturaperogni ora del giorno e in modo differenziato per tutti i giorni della settimana Èpossibilesceglierel impiegodiunprogrammastandard giàmemorizzato ma modificabile in base alle esig...

Страница 5: ...lizzata la relativa icona di segnalazione in qualsiasi modalità anche con screen saver attivo Se lampeggia il dispositivo non funziona e si devono cambiare le batterie Se al Cronotermostato è collegata una sonda esterna e la funzione im postata è Temp esterna sul display viene visualizzata la relativa icona Ogni 2 secondi si alterna nella stessa posizione la visualizzazione della temperatura ester...

Страница 6: ...K per accedere ai menù con il tastoÇseleziona Impostazioni premi OK per confermare Completa l impostazione seguendo la procedura descritta a pag 9 Oralegale mantenendo l impostazione predefinita Manuale deveessereaggiornatamanualmente perimpostarelamodalità di aggiornamento Automatica vedere il paragrafo Imposta l Ora legale a pag 9 Quando sul display è visualizzata la schermata principale tramite...

Страница 7: ...eggiare è possibile modificare il livello della temperatura corrente Utilizza i tasti ÅÇ per selezionare il livello di temperatura desidera to Ilprofilovisualizzato partendodalquadratolampeggiantevienemodificato con il nuovo livello di temperatura fino al cambio di livello successivo Conferma con il tasto OK Modifica la modalità Settimanale Utilizza i tasti ÉÑ per selezionare la modalità Manuale U...

Страница 8: ... Utilizza i tasti ÉÑ per selezionare la modalità Off Conferma con il tasto OK Suldisplayviene visualizzata l icona della modalità Off Il Cronotermostato funziona ora secondo la nuova modalità impostata Modifica la modalità Off Inserimento batterie Estrarre il Cronotermostato dalla base Inserire le 2 batterie alcaline da 1 5V di tipo LR6 AA a lunga durata consigliate per applicazioni fotografiche r...

Страница 9: ...ture Peruncorrettofunzionamentodeltuoimpiantoèimportantecheladata e l ora impostate siano corrette Con i tasti ÅÇ seleziona la voce Data e Ora Premi il tasto OK per confermare Imposta ora e data con i tasti ÅÇ aumenta diminuisce la cifra selezionata ÉÑ scorre le cifre di ora e data Premi il tasto OK per confermare e tornare alla pagina precedente oppure il tasto C per uscire dal menù e tornare all...

Страница 10: ...confermare e tornare alla pagina precedente oppure il tasto C per uscire dal menù e tornare alla pagina precedente annullando la modifica Regola il Contrasto del display Seleziona cosa visualizzare sul display del Cronotermostato in condizioni di riposo predefinito Temp data ora Puoi selezionare 1 Solo Temp temperatura misurata 2 Temp data ora temperatura misurata e data ora 3 Principale schermata...

Страница 11: ...rmette di tarare la misurazione sia della sonda interna che di quella esterna Con i tasti ÅÇ seleziona la voce Taratura Premi il tasto OK per confermare Selasondaesternaèimpostatacomesondaapavimentoopertemperatura esterna viene proposta la selezione della sonda Con i tasti ÅÇ seleziona la sonda Premi il tasto OK per confermare Se la sonda esterna non è attiva viene visualizzato direttamente il men...

Страница 12: ... per uscire dal menù e tornare alla pagina precedente annullando la modifica Seleziona la funzione della Sonda esterna Con questa funzione puoi visualizzare azzerare le ore di funzionamento dell impianto Con i tasti ÅÇ seleziona la voce Ore accensione Premi il tasto OK per confermare Sul display vengono visualizzate le ore di funzionamento dell impianto Premi il tasto OK per confermare e tornare a...

Страница 13: ...eri e speciali nel seguente ordine A B C D E F G H I J K L M N O P Q R S T U V Z 0 1 2 3 4 5 6 7 8 9 spazio punto trattino apice Selezionando questa funzione puoi personalizzare il nome del programma max 13 caratteri Con i tasti ÅÇ seleziona il Programma da rinominare Premi il tasto OK per confermare Componi il nuovo nome da assegnare al Programma utilizzando i tasti ÉÑ per spostare il cursore ÅÇ ...

Страница 14: ...a un giorno ad un altro Con i tasti ÅÇ seleziona il giorno in cui copiare il profilo Seleziona ÉÑ la funzione Copia da Premi il tasto OK per confermare Con i tasti ÅÇ seleziona il giorno da copiare Premi il tasto OK per confermare Copia un profilo giornaliero Visualizza il profilo del giorno selezionato Con i tasti ÅÇ seleziona il giorno Seleziona ÉÑ la funzione Visualizza Con i tasti ÅÇ puoi scor...

Страница 15: ... passo la procedura descritta in questo esempio come utile strumento per familiarizzare con le modalità di lavoro Modifica e Scorrimento e l utilizzo dei tasti di navigazione Esempio creazionedelseguenteprofiloditemperaturagiornalieroperilgiorno Lunedì del programma SETT INVERNO 1 dalle ore 00 00 alle ore 06 00 18 C T1 2 dalle ore 06 00 alle ore 09 00 22 C T3 3 dalle ore 09 00 alle ore 16 30 20 C ...

Страница 16: ...06 00 T1 18 0 C 0 6 12 18 24 LUNEDI 00 00 T1 18 0 C LUNEDI 00 00 T 7 0 C 0 6 12 18 24 0 6 12 18 24 LUNEDI 06 00 T3 22 0 C 0 6 12 18 24 LUNEDI 09 00 T3 22 0 C 0 6 12 18 24 LUNEDI 09 00 T2 20 0 C Procedura 1 2 3 Programmazione ...

Страница 17: ...16 30 T3 22 0 C 6 12 18 24 0 LUNEDI 22 00 T3 22 0 C 0 6 12 18 24 LUNEDI 22 00 T2 20 0 C 0 0 6 12 18 24 LUNEDI 23 45 T2 20 0 C LUNEDI 23 45 T2 20 0 C 6 12 18 24 4 5 OK conferma e passa alla modalità SCORRIMENTO C annulla e torna all elenco giorni Programmazione ...

Страница 18: ...Con i tasti ÉÑ seleziona la funzione Visualizza Premi il tasto OK per confermare Con i tasti ÅÇ seleziona il giorno Premi il tasto OK per confermare Sul display viene visualizzato il profilo associato al giorno selezionato Con i tasti ÅÇ è possibile scorrere i profili giornalieri di tutta la setti mana Visualizza un programma Settimanale Questa funzione ti permette di eliminare un programma person...

Страница 19: ... Set the Summer Winter functioning mode 25 Set the Temperature levels 25 Set the Date and Time 25 Set the Daylight saving time 25 Set the measurement unit of the temperature 26 Enable Disable the Remote control 26 Adjust the Display contrast 26 Select the Screen Saver 26 Select the Language 26 Select the Temperature adjustment 27 Calibrating the thermal probe 27 Select the function of the external...

Страница 20: ...51Chronothermostatisaflush mountingdevicewhichcanbeused for heating and air conditioning systems it is possible through several programming possibilities to adjust the temperature at any time of the day and in a differentiated manner every day of the week It is possible to choose how to use a standard program already stored but can be changed according to the specific needs of the user or to creat...

Страница 21: ...tifreeze Antifreeze winter or Thermal protection summer mode Icon OFF OFF mode Icon Holidays Antifreeze orThermal protection Icon time and date of Holidays programme end When the battery is flat its signaling icon will be displayed in any mode even when the screen saver is functioning If flashing the device will not work thus the batteries need to be replaced If an external probe is connected to t...

Страница 22: ...ccess the menus select Setup with theÇkey press OK to confirm Complete the setup by following the procedure described on pag 25 Daylightsavingtime ifthedefaultsetupiskept Manual must be updated manually to set up the Automatic update mode see paragraph Set Daylight saving time on pag 25 When the main screen is displayed the following operations can be executed with the navigation keys OK Key acces...

Страница 23: ...the level of the current temperature Use the ÅÇ keys to select the level of the required temperature Theprofiledisplayed startingfromtheflashingsquare willbemodifiedwith the new temperature level until the next level is changed Use the OK key to confirm Change the Weekly mode Use the ÉÑ keys to select the Manual mode Use the ÅÇ keys to increase or decrease the value of the preset tem perature Use ...

Страница 24: ... Chronothermostat is now working under the new preset mode Change the Antifreeze mode Use the ÉÑ keys to select the Off mode Use the OK key to confirm The Off mode Icon will be displayed The Chronothermostat is now working under the new preset mode Change the Off mode Replacing the batteries Putting in the batteries Remove the Chronothermostat from the base Put in the two long lasting LR6 AA recom...

Страница 25: ...rature levels For proper operation of your system make sure that the date and time are set correctly Use the ÅÇ keys to select the option Date and Time Press OK to confirm Set time and date with keys ÅÇ increases decreases the selected digit ÉÑ scrolls the time and date digits Press OK to confirm and to go back to the previous page or press C to exit the menu and to return to the previous page hen...

Страница 26: ...o the previous page or press C to exit the menu and to return to the previous page hence cancelling the change Adjust the Display contrast Selects what you want to show on the Chronothermostat display when in idle condition default is Temp date time You can select the following 1 Only Temp temperature measured 2 Temp date time temperature measured and date time 3 Main complete main screen 4 Off di...

Страница 27: ...t of the internal and external probe Use the ÅÇ keys to select the option Calibration Press OK to confirm Iftheexternalprobeissetasafloorprobeorusedfortheoutsidetemperature the selection of the probe will be given Use the ÅÇ keys to select the probe Press OK to confirm If the external probe is not operative the calibration menu of the internal probe will be displayed directly If the external probe...

Страница 28: ...nfirm and to go back to the previous page or press C to exit the menu and to return to the previous page hence cancelling the change Select the function of the external Probe This function enables you to display reset the functioning hours of the system Use the ÅÇ to select the option Operation time Press OK to confirm The display will show the functioning hours of the system Press OK to confirm a...

Страница 29: ...rsandspecial characters in the following order A B C D E F G H I J K L M N O P Q R S T U V Z 0 1 2 3 4 5 6 7 8 9 space dot hyphen prime When you select this function you can customize the name of the pro gramme maximum 13 characters Use the ÅÇ keys to select the Programme to be renamed Press OK to confirm Use the following keys to enter the new name for the Programme ÉÑ to move the cursor ÅÇ to sc...

Страница 30: ...y the programme from one day to another Use the ÅÇ keys to select the day you want to copy the profile in Select ÉÑ the function Copy from Press OK to confirm Use the ÅÇ keys to select the day you want to copy Press OK to confirm Copy a daily profile Displays the profile of the selected day Use the ÅÇ keys to select the day Select ÉÑ the function Display Use the ÅÇ keys to scroll all the days of t...

Страница 31: ...dure described in this example stepbystep Itwillbeusefultogetyouacquaintedwiththe Modifying and Scrolling modes and with the navigation keys Example creation of the following daily temperature profile for Monday of the WEEK WINTER programme 1 from h 00 00 to h 06 00 18 C T1 2 from h 06 00 to h 09 00 22 C T3 3 from h 09 00 to h 16 30 20 C T2 4 from h 16 30 to h 22 00 22 C T3 5 from h 22 00 to h 24 ...

Страница 32: ...Y 06 00 T1 18 0 C 0 6 12 18 24 MONDAY 00 00 T1 18 0 C MONDAY 00 00 T 7 0 C 0 6 12 18 24 0 6 12 18 24 MONDAY 06 00 T3 22 0 C 0 6 12 18 24 MONDAY 09 00 T3 22 0 C 0 6 12 18 24 MONDAY 09 00 T2 20 0 C Procedure 1 2 3 Programming ...

Страница 33: ... 16 30 T3 22 0 C 0 6 12 18 24 MONDAY 23 45 T2 20 0 C 0 MONDAY 23 45 T2 20 0 C 6 12 18 24 0 6 12 18 24 MONDAY 22 00 T2 20 0 C 6 12 18 24 0 MONDAY 22 00 T3 22 0 C 4 5 OK confirms and goes to the SCROLLING mode C cancels and goes back to the days list Programming ...

Страница 34: ...to select the programme Use the ÉÑ keys to select the function View Press OK to confirm Use the ÅÇ keys to select the day Press OK to confirm The display shows the profile associated with the selected day Use the ÅÇ keys let you scroll the daily profiles of the whole week View a Weekly programme This function lets you to eliminate a customized programme and restore the default settings Use the ÅÇ ...

Страница 35: ...blecer el funcionamiento Verano Invierno 41 Establecer los niveles de temperaturas 41 Establecer fecha y hora 41 Establecer la hora legal 41 Establecer la unidad de medida de la temperatura 42 Habilitar deshabilitar el control remoto 42 Regular el contraste de la pantalla 42 Seleccionar el salvapantalla 42 Seleccionar el idioma 42 Seleccionar la regulación de la temperatura 43 Calibrado de la sond...

Страница 36: ...pciones presentes El Cronotermostato Art L4451 es un instrumento empotrable utilizable en sistemas de calefacción y acondicionamiento que permite mediante distintasopcionesdeprogramación regularlatemperaturadecadahora del día y de manera diferenciada de todos los días de la semana Es posible seleccionar un programa estándar ya memorizado pero que se puede modificar de acuerdo con las exigencias de...

Страница 37: ...ión batería agotada Manual Icono mano de la modalidad Manual Antihielo Icono de la modalidad Antihielo invierno o Protección térmica verano OFF Icono de la modalidad OFF Vacaciones IconomodalidadAntihielooProteccióntérmica hora y fecha de fin programa Vacaciones En caso de batería agotada en la pantalla se visualiza el relativo icono de señalización en cualquier modalidad inclusive con el salvapan...

Страница 38: ...cceder a los menús con la teclaÇseleccione Ajustes Pulse OK para confirmar Completelaprogramaciónsiguiendoelprocedimientodescritoenlapág 41 Horalegal manteniendolaconfiguraciónpredefinida Manual se debe actualizar manualmente para establecer la modalidad de actualización Automático véase el párrafo Establecer la hora legal en la pág 41 Cuandoenlapáginaprincipalsevisualizalapáginaprincipalmediantel...

Страница 39: ...es posible modificar el nivel de la temperatura corriente Utilice las teclas ÅÇ para seleccionar el nivel de temperatura desea do Elperfilvisualizado comenzandoporelcuadradoparpadeante semodifica con el nuevo nivel de temperatura hasta cambiar sucesivamente el nivel Confirme con la tecla OK Modificar la modalidad Semanal Utilice las teclas ÉÑ para seleccionar la modalidad Manual Utilice las teclas...

Страница 40: ...lice las teclas ÉÑ para seleccionar la modalidad OFF Confirme con la tecla OK En la pantalla se visualiza el icono de la modalidad OFF El Cronotermostato funciona ahora de acuerdo con la nueva modalidad establecida Modificar la modalidad OFF Introducción de las baterías Extraiga el Cronotermostato de la base Introduzca las 2 baterías alcalinas de 1 5V de tipo LR6 AA de larga duración reco mendadas...

Страница 41: ...la tecla C para salir del menú y regresar a la página anterior cancelando la modificación Establecer Fecha y Hora Para un correcto funcionamiento de su instalación es importante que la fecha y la hora se hayan establecido correctamente Con las teclas ÅÇ seleccione la opción Hora legal Pulse la tecla OK para confirmar En la pantalla se visualiza la página con la indicación del estado Pulse la tecla...

Страница 42: ...firmar y regresar a la página anterior o la tecla C para salir del menú y regresar a la página anterior cancelando la modificación Regular el contraste de la pantalla Seleccione lo que desea visualizar en la pantalla del Cronotermostato en condiciones de reposo predefinido Temp Fecha Hora Puede seleccionar 1 Sólo Temp temperatura medida 2 Temp Fecha Hora temperatura medida y fecha hora 3 Principal...

Страница 43: ...e permite calibrar la medida de la sonda interna y externa Con las teclas ÅÇ seleccione la opción Calibrado Pulse la tecla OK para confirmar Si la sonda externa se ha establecido como sonda de suelo o para tempera tura exterior se propone la selección de la sonda Con las teclas ÅÇ seleccione la sonda Pulse la tecla OK para confirmar Si la sonda externa no está activada se visualiza directamente el...

Страница 44: ...enú y regresar a la página anterior cancelando la modificación Seleccionar la función de la sonda externa Conestafunciónpuedesvisualizar restaurarlashorasdefuncionamiento de la instalación Con las teclas ÅÇ seleccione la opción Horas de encendido Pulse la tecla OK para confirmar En la pantalla se visualizan las horas de funcionamiento de la instalación Pulse la tecla OK para confirmar y regresar a...

Страница 45: ...eros y especiales en el siguiente orden A B C D E F G H I J K L M N O P Q R S T U V Z 0 1 2 3 4 5 6 7 8 9 espacio punto raya ápice Al seleccionar esta función es posible personalizar el nombre del pro grama máx 13 caracteres Con las teclas ÅÇ seleccione el programa al cual desea cambiar de nombre Pulse la tecla OK para confirmar Introduzca el nombre nuevo que asignará al programa utilizando las te...

Страница 46: ... un día a otro Con las teclas ÅÇ seleccione el día en que copiar el perfil Seleccione con ÉÑ la función Copiar de Pulse la tecla OK para confirmar Con las teclas ÅÇ seleccione el día que desea copiar Pulse la tecla OK para confirmar Copiar un Perfil diario Visualizar el perfil del día seleccionado Con las teclas ÅÇ seleccione el día Seleccione con ÉÑ la función Visualizar Con las teclas ÅÇ es posi...

Страница 47: ...crito en este ejemplo yaquerepresentaunaherramientaútil parafamiliarizarcon las modalidades de trabajo Modificación Desplazamiento y el uso de las teclas de navegación Ejemplo creación del siguiente perfil de temperatura diario para el día Lunes del programa SEM INVIERNO 1 de la hora 00 00 a las horas 06 00 18 C T1 2 de la hora 06 00 a las horas 09 00 22 C T3 3 de la hora 09 00 a las horas 16 30 2...

Страница 48: ... 06 00 T1 18 0 C 0 6 12 18 24 LUNES 00 00 T1 18 0 C LUNES 00 00 T 7 0 C 0 6 12 18 24 0 6 12 18 24 LUNES 06 00 T3 22 0 C 0 6 12 18 24 LUNES 09 00 T3 22 0 C 0 6 12 18 24 LUNES 09 00 T2 20 0 C Procedimiento 1 2 3 Programación ...

Страница 49: ...6 30 T3 22 0 C 0 6 12 18 24 LUNES 23 45 T2 20 0 C 6 12 18 24 0 LUNES 22 00 T3 22 0 C 0 6 12 18 24 LUNES 22 00 T2 20 0 C LUNES 23 45 T2 20 0 C 6 12 18 24 0 4 5 OK confirma y pasa a la modalidad DESPLA ZAMIENTO C Cancela y regresa a la lista de días Programación ...

Страница 50: ...a Con las teclas ÉÑ seleccione la función Visualizar Pulse la tecla OK para confirmar Con las teclas ÅÇ seleccione el día Pulse la tecla OK para confirmar En la pantalla se visualiza el perfil asociado al día seleccionado Con las teclas ÅÇ es posible correr los perfiles diarios de toda la semana Visualizar un programa Semanal Esta función le permite eliminar un programa personalizado y restablecer...

Страница 51: ...ento Verão Inverno 57 Configurar os níveis das Temperaturas 57 Configurar a Data e a Hora 57 Configurar a Hora Standard 57 Configurar a unidade de medida da temperatura 58 Activar desactivar o Controlo remoto 58 Regular o Contraste do ecrã 58 Seleccionar o Screen Saver 58 Seleccionar a Língua 58 Seleccionar a Regulação da temperatura 59 Ajuste da sonda térmica 59 Seleccionar a função da Sonda Exte...

Страница 52: ...notermostato 4451 é um dispositivo para encaixar que pode ser uti lizadoeminstalaçõesdeaquecimentoedecondicionamento permitepor intermédiodeváriaspossibilidadesdeprogramaçãoefectuararegulação da temperatura para cada hora do dia e de maneira diferenciada para todos os dias da semana Épossívelescolherautilizaçãodeumprogramastandard jámemorizado mas que pode ser modificado com base nas exigências do...

Страница 53: ...e sinalização em qualquer modo também com o screen saver activado Se lampejar o dispositivo não está a funcionar e as pilhas devem ser trocadas Pilha Ícone de sinalização de pilha descarregada Manual Ícone mão do modo Manual Antigelo Ícone do modo Antigelo Inverno ou Protecção térmica Verão OFF Ícone do modo OFF Férias Ícone do modo Antigelo ou Protecção térmica hora e data do fim do programa das ...

Страница 54: ...ressione a tecla OK para aceder ao menu Seleccione Configurações com a teclaÇ Pressione a tecla OK para confirmar Completeaconfiguraçãoseguindoométodoqueestádescritonapágina57 Horastandard mantendoaconfiguraçãopredefinida Manual deve ser actualizada manualmente para configurar o modo de actualização Automática veja o parágrafo Configurar a Hora standard à página 57 Quando fica visualizada a página...

Страница 55: ...r é possível modificar o nível da temperatura actual Utilize as teclas ÅÇ para seleccionar o nível da temperatura deseja da O perfil visualizado iniciando do quadrado lampejante se modifica com o novo nível de temperatura até mudar para o nível sucessivo Confirme com a tecla OK Modificar o modo Semanal Utilize as teclas ÉÑ para seleccionar o modo Manual Utilize as teclas ÅÇpara aumentar ou diminui...

Страница 56: ...ar o modo Antigelo Utilize as teclas ÉÑ para seleccionar o modo Off Confirme com a tecla OK O ícone do modo Off fica visualizado no ecrã O Cronotermostato agora funciona segundo o novo modo configurado Modificar o modo Off Introdução das pilhas Extrair o Cronotermostato da sua base Inserir as 2 pilhas alcalinas de 1 5V de tipo LR6 AA de longa duração recomendadas para aplicações fotográficas respe...

Страница 57: ... que a sua instalação funcione correctamente é importante que a data e a hora programadas estejam certas Seleccione o item Data e Hora com as teclas ÅÇ Pressione a tecla OK para confirmar Programe a hora e a data com as teclas ÅÇ aumenta diminui o algarismo seleccionado ÉÑ desloca os algarismos da hora e da data Pressione a tecla OK para confirmar e voltar para a página anterior ou então a tecla C...

Страница 58: ...ssione a tecla OK para confirmar e voltar para a página anterior ou então a tecla C para sair do menu e voltar para a página anterior eliminando a modificação Regular o Contraste do ecrã Seleccione o que visualizar no ecrã do Cronotermostato em condições de pausa predefinido Temp data hora Pode seleccionar 1 Só Temp temperatura medida 2 Temp data hora temperatura medida e data hora 3 Principal pág...

Страница 59: ...ura Esta configuração permite lhe ajustar a medida quer da sonda interna quer da sonda externa Seleccione o item Ajuste com as teclas ÅÇ Pressione a tecla OK para confirmar Se a sonda externa estiver configurada como sonda de piso ou para tempe ratura externa será proposta a selecção da sonda Seleccione a sonda com as teclas ÅÇ Pressione a tecla OK para confirmar Se a sonda externa não estiver act...

Страница 60: ...ra a página anterior eliminando a modificação Seleccionar a função da Sonda Externa Comestafunçãopodevisualizar restabelecerashorasdefuncionamento da instalação Seleccione o item Horas de acendimento com as teclas ÅÇ Pressione a tecla OK para confirmar Ficarão evidenciadas as horas de funcionamento da instalação no ecrã Pressione a tecla OK para confirmar e voltar para a página anterior ou então r...

Страница 61: ...speciais na seguinte ordem A B C D E F G H I J K L M N O P Q R S T U V Z 0 1 2 3 4 5 6 7 8 9 espaço ponto hífen ápice Com esta função pode personalizar o nome do programa 13 caracteres ao máximo Seleccione o programa a ser mudado de nome com as teclas ÅÇ Pressione a tecla OK para confirmar Digite o novo nome a ser dado ao Programa utilizando as teclas ÉÑ para movimentar o cursor ÅÇ para deslocar o...

Страница 62: ...para o outro ÅÇ Seleccione o dia em que copiar o perfil com as teclas Seleccione a função Copiar de com as teclas ÉÑ Pressione a tecla OK para confirmar Seleccione o dia a ser copiado com as teclas ÅÇ Pressione a tecla OK para confirmar Copiar um perfil diário Visualize o perfil do dia seleccionado Seleccione o dia com as teclas ÅÇ Seleccione a função Visualizar com as teclas ÉÑ Pode deslocar todo...

Страница 63: ...este exemplo como instrumento útil para familiarizar com os modos de funcionamento Modificar e Deslocar e a utilização das teclas de navegação Exemplo criação do seguinte perfil de temperatura diária para o dia Segunda feira do programa SEMANAL INVERNO 1 das 00 00 horas às 06 00 horas 18 C T1 2 das 06 00 horas às 09 00 horas 22 C T3 3 das 09 00 horas às 16 30 horas 20 C T2 4 das 16 30 horas às 22 ...

Страница 64: ... 0 C 0 6 12 18 24 SEGUNDA FEIRA 00 00 T1 18 0 C SEGUNDA FEIRA 00 00 T 7 0 C 0 6 12 18 24 0 6 12 18 24 SEGUNDA FEIRA 06 00 T3 22 0 C 0 6 12 18 24 SEGUNDA FEIRA 09 00 T3 22 0 C 0 6 12 18 24 SEGUNDA FEIRA 09 00 T2 20 0 C Método 1 2 3 Programação ...

Страница 65: ...2 0 C 0 6 12 18 24 SEGUNDA FEIRA 23 45 T2 20 0 C 0 SEGUNDA FEIRA 23 45 T2 20 0 C 6 12 18 24 6 12 18 24 0 SEGUNDA FEIRA 22 00 T3 22 0 C 0 6 12 18 24 SEGUNDA FEIRA 22 00 T2 20 0 C 4 5 OK confirma e passa para a modalidade DESLOCAMENTO C elimina e volta para a lista dos dias Programação ...

Страница 66: ...as ÅÇ Seleccione a função Visualizar com as teclas ÉÑ Pressione a tecla OK para confirmar Seleccione o dia com as teclas ÅÇ Pressione a tecla OK para confirmar Ficará evidenciada o perfil associado ao dia seleccionado no ecrã Com as teclas ÅÇ é possível deslocar os perfis diários da semana inteira Visualizar um programa Semanal Estafunçãopermite lheeliminarumprogramapersonalizadoerestabelecer as c...

Страница 67: ......

Страница 68: ... e modalità i cambiamenti apportati BTicino SpA reserves at any time the right to modify the contents of this booklet and to communicate in any form and modality the changes brought to the same Timbro installatore Installer stamp Distributed by BTicino SpA Via Messina 38 20154 Milano Italy www legrand it Servizio Clienti Numero Verde 800 837035 ...

Отзывы: