LEGRAND 0 490 38 Скачать руководство пользователя страница 81

81

80

Smarther 

User and installation manual

Add a set point 

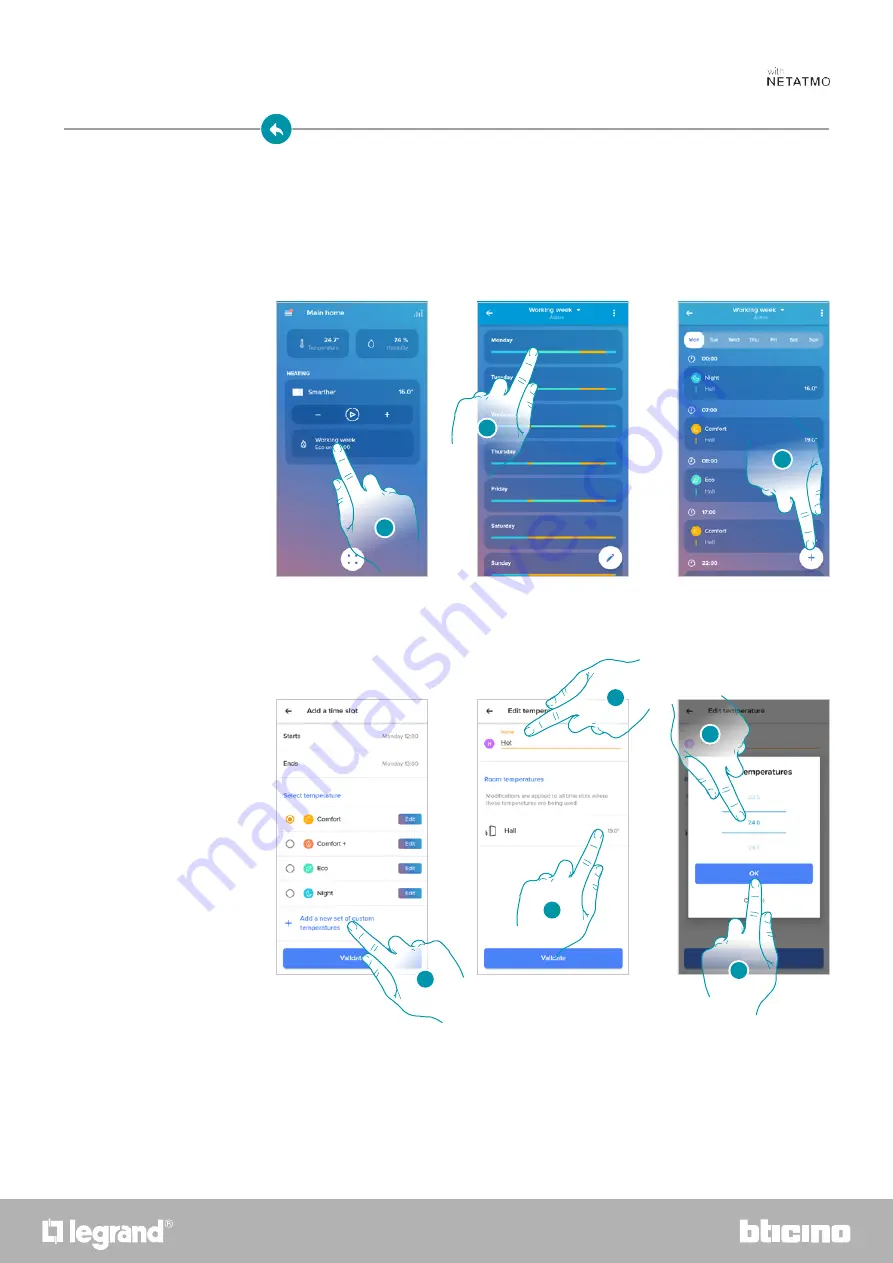
1.  Touch to enter the Programs section

2.  Enter the day in which you want to insert the custom set point

3.  Touch to enter the customised set point

4.  Touch to add a set point

5.  Customise the name

6.  Touch to select the set point temperature

7.  Scroll to select the temperature

8.  Touch to confirm

1

2

This function gives the possibility of adding set points, customising the temperature and name 

based on personal needs. The set point is only added to the current program.

It is possible to add or delete custom set points, for a better management of the programs on your 

Smarther, in addition to changing the default set point temperature.

6

5

7

8

3

4

Set point

Содержание 0 490 38

Страница 1: ...www homesystems legrandgroup com Smarther SXG SXM SXW8002 XW SXW8002W XW XM XG8002 0 490 38 0 490 39 0 490 40 User and installation manual...

Страница 2: ...2 Smarther User and installation manual...

Страница 3: ...20 Room humidity display 23 Control the Smarther with Home Control app 24 Introduction 24 Download the Home Control app 25 Account registration 26 Preliminary operations for the use of a smartphone wi...

Страница 4: ...80 Set point 81 Example of creation of a new program from an existing one 85 Thermal comfort 91 Chart 92 Manage my guests 93 Invite a user 94 Delete a user 94 Add a product to this home 95 Add valves...

Страница 5: ...tely Boost You can switch your system on quickly with the BOOST function ACTIVATION FROM DEVICE or FROM APP 1 1 1 Touch to activate the function 2 2 2 Select the switching on period from 30 60 90 minu...

Страница 6: ...lay the temperature setting page or from the App touch the icon 2 2 2 From the Smarther touch the keys to increase or decrease the temperature or from the App touch to increase or decrease the tempera...

Страница 7: ...7 Smarther User and installation manual Installation Flush mounted installation SXG8002 SXM8002 SXW8002 With 503E boxes 1 2 3 4 5 160 cm Recommended height unless different regulations are specified...

Страница 8: ...the screws too much in order to prevent any base distortion that may compromise the correct installation of the device The front must be tightly fixed to the base and the fastening clip should lock i...

Страница 9: ...n order to prevent any base distortion that may compromise the correct installation of the device The front must be tightly fixed to the base and the fastening clip should lock into place Once the ins...

Страница 10: ...ual Front view 1 Touch screen display 2 Temperature humidity display 3 Boost mode indicator 4 Wi Fi connection key 5 Reset Key Note the icons are only on when the device is on If the device is in stan...

Страница 11: ...trol App you can also set the length of this mode When this time has elapsed operation will start again as in the program Boost mode activation The Boost forces the switching on of the system for a li...

Страница 12: ...0 240 Vac 50 60 HZ TOTHEHEATINGSYSTEM CLEANCONTACT ON OFF BTICINO V le Borri 231 21100 VA ITALY System only for heating with clean contact e g boiler activation System only for heating with load to be...

Страница 13: ...0 240 Vac 50 60 HZ TOTHEHEATINGANDCOOLINGSYSTEM WITHFLOORSYSTEM BTICINO V le Borri 231 21100 VA ITALY C NC NO L N 5 2 A 110 240 V 50 60 Hz 2 W max 110 240 Vac 50 60 HZ TOTHEHEATINGSYSTEM TOTHECOOLINGS...

Страница 14: ...ct output 5 2 A Heating and cooling with floor system Heating and cooling with different systems C NC L N NC NO C NO 110 240 Vac 50 60 HZ TOTHEHEATINGSYSTEM CLEANCONTACT ON OFF C NC L N NC NO C NO 110...

Страница 15: ...forbidden Blocking the ventilation openings is forbidden Modifying the devices is forbidden Removing protective parts from the devices is forbidden Installing the units near liquids and powders is for...

Страница 16: ...etween newly installed Smarther and Smarther connected with App Functions Smarther just installed not connected Smarther connected with the App By Smarther By App Boost At the end of the set period th...

Страница 17: ...ttheremoteuseviatheAppinvolvestheuseofdata ThecostlinkedtodatausagedependsonthetypeofcontractwhichthecustomerhaswithhisISP InternetService Provider andissolelythecustomer sresponsibility Functions ava...

Страница 18: ...psed Smarther will resume operation according to the previous program Basic functions Boost functions After setting the desired duration 30 60 or 90 minutes wait until the digits stop flashing after w...

Страница 19: ...ation manual The display shows the measured temperature the LED gradually switches off while the set time passes by 3 To end the setting early touch the symbol Smarther will continue operation accordi...

Страница 20: ...temperature level that can be locally set refers only to the manual mode operation Set the temperature 1 Touch the display 2 Scroll on the display to go to the next page 3 The current setting is disp...

Страница 21: ...21 Smarther User and installation manual Once the setting is complete wait for a few seconds The display will show the measured temperature...

Страница 22: ...22 Smarther User and installation manual Note when the thermal 7 C protection temperatures are set the display will show the switching off symbol...

Страница 23: ...e in the room follow the procedure described below to display the measured value Room humidity display 1 Touch the display 2 Scroll twice on the display to go to the dedicated page The measured humidi...

Страница 24: ...an program the Smarther with the free Home Control App To do this you must 1 Download the App from the Stores 2 Register and create an account 3 Associate the account to your Smarther via the App Cont...

Страница 25: ...Smartphone run the app to read the QR codes and then frame the QR Code or search for the Home Control app in the stores In order to remotely control your Smart system first of all download the app fro...

Страница 26: ...ch to register and create an account otherwise use your credentials if you are already registered 2 Enter the email address that you want to use for the registration 3 Touch to continue 4 Enter a pass...

Страница 27: ...nidos y en otros pa ses IOS es u y en otros pa ses y se utiliza con licencia Otros nombres de documento pueden ser marcas registradas de las sociedad Android Google Google Play y el logotipo Google Pl...

Страница 28: ...ther User and installation manual on the back of the Smarther on the protective film of the Smarther Download HOME CONTROL App Download HOME CONTROL HOMEKIT CODE 1 2 3 4 5 6 7 8 HOMEKIT CODE 1 2 3 4 5...

Страница 29: ...help you associate to your Smarther the configuration procedure differs based on the smartphone operating system if you use a smartphone with Android operating system if you use a smartphone with iOS...

Страница 30: ...4 Touch to enable the device location 5 Touch to allow Home Control to access the Smartphone position if you use a smartphone with Android operating system 6 Keep the upper Smarther pushbutton pressed...

Страница 31: ...and installation manual 7 Press to continue 8 The Smarther shows the blue Wi Fi symbol Touch it to continue the configuration 8 7 A A Indicates that you are trying to complete the association using a...

Страница 32: ...otherwise touch A to select a different one 10 Enter the home Wi Fi password 11 Touch to continue 12 Select the Smarther 13 Touch if this is the first Smarther installation 14 Touch to confirm that th...

Страница 33: ...m 18 Select the type of room where the Smarther has been installed 19 If necessary touch to rename the room 20 Touch to confirm 15 17 20 19 18 16 21 Customise the Smarther name 22 Touch to confirm 23...

Страница 34: ...se a smartphone with iOS operating system 3 Touch to start the configuration 4 Select to complete a new installation A Touch if you have been invited to manage the home by a user 3 A 4 5 Keep the uppe...

Страница 35: ...and installation manual 6 Press to continue 7 The Smarther shows the blue Wi Fi symbol Touch it to continue the configuration A Indicates that you are trying to complete the association using an inco...

Страница 36: ...r the home 9 Press to continue 10 Press to scan the HOMEKIT code 11 Scan the HOMEKIT code Prepare the HOMEKIT code see Preliminary operations for the use of a smartphone with iOS operating system 9 8...

Страница 37: ...ected nearby 14 Touch to allow the Smarther to access the Wi Fi network 15 Manually enter the HOMEKIT code A Rename the Smarther for the heating function B Rename the Smarther for the humidity detecti...

Страница 38: ...to include the Smarther 18 Touch to continue 19 Touch to end the configuration of the HOMEKIT App 20 Touch if this is the first Smarther installation 21 Touch to confirm that this is the first install...

Страница 39: ...ssary touch to rename the room 24 Touch to confirm 25 Customise the Smarther name 26 Touch to confirm 27 The Smarther is configured correctly touch to create a program using the guided procedure the s...

Страница 40: ...roposes to create a program to adjust the temperature It is possible to learn more about the program operation in the Schedules chapter Create a program using the guided procedure 2 3 4 4 5 7 7 8 6 4...

Страница 41: ...nch or not 10 Touch to confirm 11 Set the time interval time limits when you get up and when you go to bed during the weekend 12 Touch to continue 9 10 13 Select if you are normally home on Saturday o...

Страница 42: ...42 Smarther User and installation manual 17 Select a temperature that you consider comfortable when you are at home during the day 18 Touch to continue 19 Touch to end the Home Page appears 18 17 19...

Страница 43: ...k in the email received from the system following an invitation 2 Enter your registration details 3 Touch to access You can access the Smart system created by your installer or one of your family memb...

Страница 44: ...e following requirements at least 8 characters at least one lower case letter e g a at least one upper case letter e g A at least one number e g 1 at least one special character e g 7 Touch to confirm...

Страница 45: ...mail and password 3 Touch to access B Touch to start the password recovery procedure Authentication After registering with the portal you can authenticate by entering email and password A B A message...

Страница 46: ...controls Home controls The sample Home Page below shows one single device in a single room Home Page A Home name display homes B It opens the Graphic section where it is possible to view your heating...

Страница 47: ...s Open the section where you can display those users which can interact with your Smarther invite new ones or if necessary delete them Add a product to this home It opens the section where it is possi...

Страница 48: ...e to set the temperature and activate boost operation The settings will only affect the device inside the room The temperature is now set 1 Touch to set the temperature 2 Scroll to set for how long it...

Страница 49: ...cause the activation of the Frost guard function which on a heating system only allows to keep a minimum safety temperature The function is now set 1 Touch until the indication of the set temperature...

Страница 50: ...ime set has elapsed the Smarther will resume operation according to the previous program The function is now set 1 Touch to set the function 2 Scroll until reaching the desired time among 30 60 and 90...

Страница 51: ...number and the types of devices in the room D Temperature set in the room E Set the Boost function for the whole room F Set the Temperature in the room G It opens the Programs section where it is poss...

Страница 52: ...devices 1 Touch to access the Schedules section 2 Touch to set the Absent function 1 2 Using the home page central button it is possible to adjust the temperature of the home sending commands that wil...

Страница 53: ...ost guard function should remain active 5 Touch to confirm 3 4 5 The Frost guard function is now active on all the home devices This setting allows to enable the Frost guard function temperature 7 C T...

Страница 54: ...ll the home devices The selected program function is now active on all the home devices To create or manage new programs see Schedules chapter 1 Touch to access the Schedules section 2 Touch to select...

Страница 55: ...m settings and device settings section Smarther Valves 1 Touch to access the home parameters A A Touch to change the home description B Set advanced parameters as Location Time zone Energy source Home...

Страница 56: ...nes 1 Touch to set the reference time zone 2 Scroll the zone list 3 Touch to enable the automatic geolocation 3 Enter the zone 4 Touch to select Or Or Location Time zone 1 1 2 3 4 In this section it i...

Страница 57: ...source Home type 1 1 1 Touch to select the energy source to use for your home 2 Select the energy source among Electric boiler Gas Oil Heating pump Wood 1 Select the type of home in which you live 2...

Страница 58: ...r and installation manual Home dimension 1 Enter your home dimension 1 Room settings 1 2 1 Touch to access the room 2 Touch to open the room setting modification section A Change the room name B Delet...

Страница 59: ...manual Delete the room In this section it is possible to delete a room Note in order to remove a room it will first be necessary to remove all the products installed inside the same 1 Touch to delete...

Страница 60: ...2 Touch to access the device management page A Display the Smarther available options B Advanced C Display the device serial number D Display the firmware version E Display the Wi Fi signal F Configu...

Страница 61: ...oduct Move 1 1 2 2 3 1 Touch to rename the Smarther 2 Rename the Smarther with an identification name 3 Touch to confirm 1 Touch to move the Smarther into another room 2 Touch to select the room where...

Страница 62: ...62 Smarther User and installation manual Delete 1 2 1 Touch to remove the Smarther from your home 2 Touch to confirm...

Страница 63: ...he Smarther physical interface but only to display the information This function can be useful if you don t want the settings to be modified from the Smarther but only from the App e g children s bedr...

Страница 64: ...1 Touch to select the algorithm to use based on the type of system 2 Touch to select the hysteresis algorithm the capacity of a structure to change its temperature more or less slowly depending on the...

Страница 65: ...onds the display switches off goes to stand by mode and performs the selected operating logic It switches off Depending on the room brightness it adjusts the display and in case of low brightness adju...

Страница 66: ...ouch to change the Wi Fi network to which the Smarther is connected 2 Touch to start Configure the network In this section it is possible to set to which Wi Fi network the Smarther is connected This f...

Страница 67: ...and installation manual 4 Press to continue 4 5 The Smarther shows the blue Wi Fi symbol Touch it to continue the configuration 5 A A Indicates that you are trying to complete the association using a...

Страница 68: ...uch to confirm the suggested home Wi Fi network otherwise touch A to select a different one 7 Enter the home Wi Fi password 8 Touch to continue 9 Select the Smarther 9 10 The Smarther is configured co...

Страница 69: ...the Netatmo thermostat valve available options B Display the device serial number C Display the firmware version D Display the radio signal E Display the battery level F When pressed the valve shows a...

Страница 70: ...Touch to manage the device A Rename the product B Move C Delete A B C Manage Valves 1 Rename the product 1 2 3 1 Touch to rename the Netatmo thermostat valve 2 Rename the Netatmo thermostat valve with...

Страница 71: ...ouch to move the Netatmo thermostat valve into another room 2 Touch to select the room where you want to insert the Netatmo thermostat valve 3 Touch to confirm 3 Delete 1 2 1 Touch to remove the Netat...

Страница 72: ...he real temperature measured Depending on the position of the thermostat or the valve it is possible to note differences between the temperature displayed on the thermostat and the temperature display...

Страница 73: ...our needs The created program sets different temperatures based on time and week day available preset temperatures are It is possible to change the set points or create new ones see Set point Now crea...

Страница 74: ...e program 5 Select to duplicate the program 6 Enter a description for the program 7 Touch to confirm 1 4 6 7 Via this function you can copy and if necessary modify an existing program Now the program...

Страница 75: ...ation manual 1 Touch to access the Programs section 2 Touch to display the program options 3 Touch to rename the program 4 Rename the program 5 Touch to confirm Rename a program 1 2 3 4 5 This functio...

Страница 76: ...al 1 2 1 Touch to access the Programs section 2 Touch to select one of the available programs 3 Touch to select the time interval to modify 4 Touch to select the interval end date and time 5 Select th...

Страница 77: ...77 Smarther User and installation manual 7 Touch to confirm the selected hours and minutes 8 Touch to confirm the modification 7 8...

Страница 78: ...tion manual Activate a program After creating the programs you must activate the one you want 1 Touch to open the Schedules menu 2 Select the program to activate 3 Touch to close the Schedules menu Th...

Страница 79: ...Touch to select on of the available programs 3 Select the program to delete 4 Touch to delete the program 5 Delete the program 6 Touch to confirm the program deletion 1 This function gives the possibi...

Страница 80: ...o display the available functions for the program 3 Touch to select the function that will allow you to copy paste the days 4 Select the day with the profile to copy 5 Select the day or the days on wh...

Страница 81: ...uch to select the set point temperature 7 Scroll to select the temperature 8 Touch to confirm 1 2 This function gives the possibility of adding set points customising the temperature and name based on...

Страница 82: ...point 1 Touch to enter the Programs section 2 Touch to change the set point temperature 3 Select the set point for which you want to change the temperature 1 This function allows to change the temper...

Страница 83: ...llation manual 4 Touch to select the set point temperature 5 Scroll to select the desired temperature 6 Touch to confirm 7 Touch to confirm the modified set point 4 5 6 7 8 Touch to confirm the modifi...

Страница 84: ...int to delete 4 Touch to permanently delete the set point 5 Touch to confirm 1 This function allows to delete the created set point 5 4 2 3 Note set points cannot be changed by default Comfort Comfort...

Страница 85: ...Wednesday the temperature must be set to the Comfort setpoint 19 C 3 from 18 00 on Wednesday to 23 45 on Friday the temperature must be set to the eco setpoint 16 C 4 Saturday follows the same tempera...

Страница 86: ...5 Touch to enter the start and end times for the first interval 6 Touch to select the interval start time 5 1 From 00 00 on Sunday to 14 00 on Wednesday set the temperature to the Eco setpoint 16 C In...

Страница 87: ...al start minutes 9 Touch to confirm 10 Touch to select the interval end date and time 11 Select the interval end day 12 Select the interval end hour and minutes and confirm 13 Select the temperature s...

Страница 88: ...for the second interval 17 Touch to select the interval start time 18 Select the interval start hour and minutes and confirm 19 Touch to select the interval end time 20 Select the interval end hour a...

Страница 89: ...s just created 22 Touch to confirm 23 Touch to enter the start and end times for the third interval 24 Touch to select the interval start time 25 Select the interval start hour and minutes and confirm...

Страница 90: ...terval end date and time 27 Select the interval end day 28 Select the interval end hour and minutes and confirm 29 Select the temperature set point to use for the days and times just created 30 Touch...

Страница 91: ...rt page 3 Scroll to set the default time during which the temperature manual setting function will remain active 4 Scroll to set the default time for the duration of the boost function 5 Touch to acce...

Страница 92: ...l 1 Touch to access the graphic page A Day B Time C Set point D Select room and temperature humidity 1 Chart In this section it is possible to display the Smarther and Netatmo thermostat valve switchi...

Страница 93: ...y delete them the user will not be deleted just the possibility of interacting with this Smarther Note if Home Control includes several connected devices the invited users will have the possibility of...

Страница 94: ...te one or more people to control your home devices 2 Touch to add the contact using the address book of your smartphone or enter the email address Once the guests accept the invitation register and ac...

Страница 95: ...acing and existing one 1 Touch to open the Settings menu 2 Touch to add a product into the home 3 Touch to select the brand of the product to install 4 Touch to select the Smarther 5 Touch to start se...

Страница 96: ...nstall 4 Touch to select the Netatmo thermostat valves associated with the Smarther 5 Insert the batteries in the Netatmo thermostat valve and touch to continue 6 Touch to confirm that all the Netatmo...

Страница 97: ...elect the room where the Netatmo thermostat valve is located 9 Give the Netatmo thermostat valve a custom name and touch to continue 10 Install the valve on the radiator following the Netatmo manual a...

Страница 98: ...tion or wait a few minutes for the automatic calibration B Measured temperature C Set temperature D Set the Boost function E Set the Temperature F It opens the Programs section where it is possible to...

Страница 99: ...be possible to select which home to display and control 1 Touch to open the Settings menu 2 Touch to install a new home 3 Touch to select the brand of the product to install 4 Touch to select the Sma...

Страница 100: ...e of quick selection to add to your smartphone Home page 4 Touch to add the quick selection to the Home page 5 Touch to activate the quick selection A A notification confirms that the quick selection...

Страница 101: ...n this section it is possible to display FAQ and their answers regarding the use of the Home Control app 1 Touch to enter FAQ section 2 Touch to select the product for which you need help 3 Select the...

Страница 102: ...onnection from all devices D Manage your communication authorisations and other aspects of your personal details E Display contract terms and conditions regarding the Legrand apps that you are using F...

Страница 103: ...uch the link in the email received from the system 3 The screen confirming the validation of your email address appears 1 Enter the login details email and password of the new registered Legrand accou...

Страница 104: ...ation of the email address appears 3 4 Safety This section can be used to change the password of your account and to disconnect it from all devices The disconnection of your account from all devices i...

Страница 105: ...least 8 characters at least one lower case letter e g a at least one upper case letter e g A at least one number e g 1 at least one special character e g 5 Touch to confirm Disconnect from all devices...

Страница 106: ...Legrand and the sharing of the App usage data 1 Touch to enable data sharing 2 1 Legal information Using this section you will be able to view terms and conditions of use and privacy information for...

Страница 107: ...n display all the third parties to whom you granted rights to operate on your connected devices E g HOMEKIT Google home etc 1 Touch to remove the access of sites or Apps to some of your account data A...

Страница 108: ...pen the Settings menu 2 Click to rate the App 3 Touch the stars to rate the App from 1 to 5 1 2 3 Logout In this section it is possible to log out from the Home Control App 1 Touch to open the Setting...

Страница 109: ...i Fi configuration and the HOMEKIT settings Resetting the Wi Fi configuration and the HOMEKIT settings Reset 1 Keep pressed the reset pushbutton on the side of the Smarther A countdown will start abou...

Страница 110: ...splay of the Smarther switches off After a few seconds the Smarther comes back on It is now possible to complete the association with Home Control using the procedure described in the Associate your S...

Страница 111: ...he Smarther factory settings and all programs and associations will be deleted Reset to the factory settings 1 Keep pressed the reset pushbutton on the side of the Smarther A countdown will start abou...

Страница 112: ...stallation manual 0 0 flashes on the Smarther display until a confirmation beep is heard The display of the Smarther switches off 3 Release the reset pushbutton 3 Note in some cases the device reset c...

Страница 113: ...r User and installation manual After a few seconds the Smarther comes back on It is now possible to complete the association with Home Control using the procedure described in the Associate your Smart...

Страница 114: ...dy many functionalities of your Smarther 1 you can increase decrease the Smarther temperature set it manually or automatically you can request the Smarther set temperature you can switch it on or off...

Страница 115: ...EKIT App and touch to start the association with the Smart system 2 Touch to start the association procedure Note to take advantage of the Home Control integration it will be necessary to first allow...

Страница 116: ...denzijngeregistreer inanderelandenenwordtmetlicentiegebrui kunnengeregistreerdehandelsmerkenvande Android Google GooglePlayenhetlogoGoo 2019 Apple Inc V echna pr va vyhrazena Siri jsou ochrann zn mky...

Страница 117: ...7 Smarther User and installation manual Frame the code on the Smarther the code will be detected automatically Download HOME CONTROL App on the protective film of the Smarther Download HOME CONTROL Ap...

Страница 118: ...nearby 5 Manually enter the HOMEKIT code Make sure that the smartphone is being charged and within the range of the Gateway A Rename the Smarther for the heating function B Rename the Smarther for th...

Страница 119: ...the Smarther 8 Touch to continue 9 Touch to end the configuration of the HOMEKIT App 7 8 9 From the Home Page of the HOMEKIT app it is possible to safely control the devices organised into room and in...

Страница 120: ...e contents of this booklet and to communicate in any form and modality the changes brought to the same Legrand SNC 128 av du Mar chal de Lattre de Tassigny 87045 Limoges Cedex France www legrand com B...

Отзывы: