background image

5

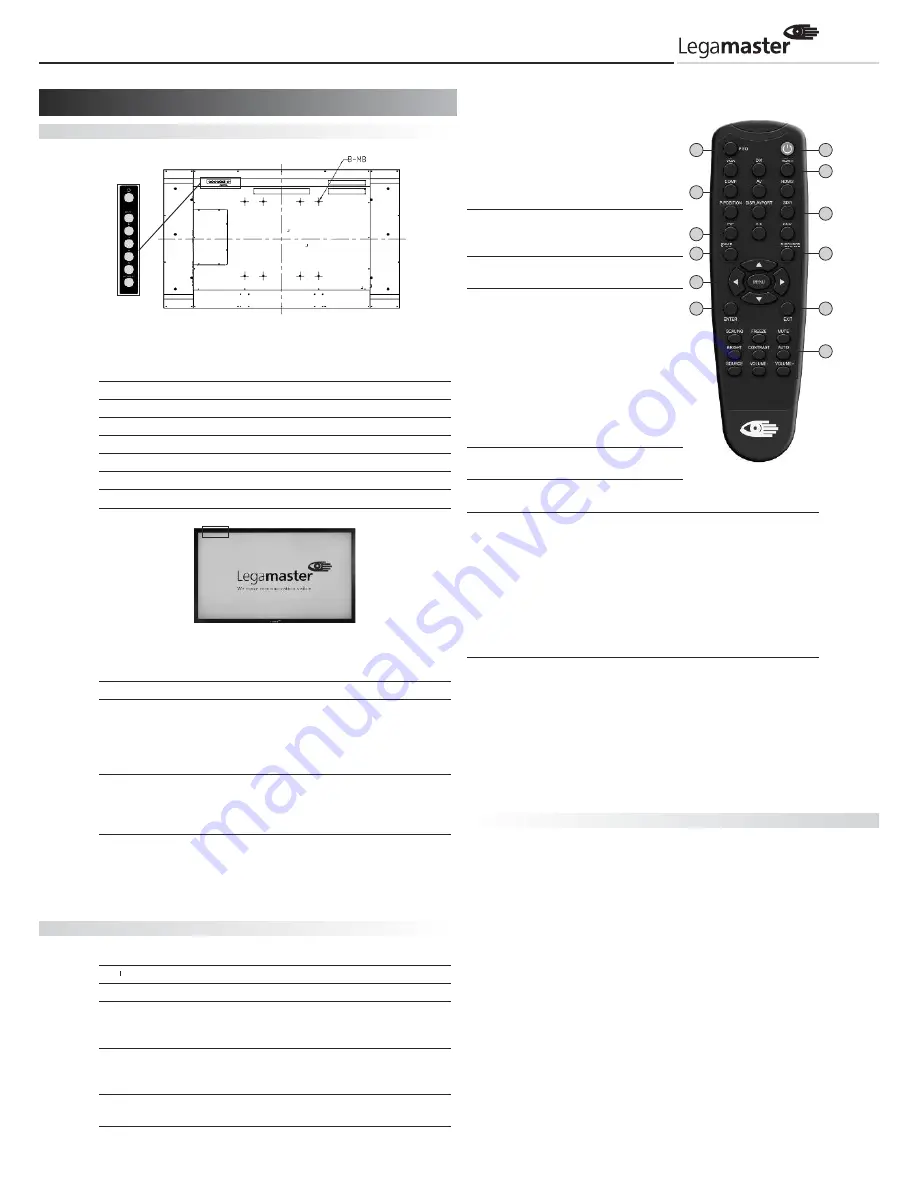
The side controller of the monitor 

OSD Key Pad function List

Key

Description

Power

Power on/Power off

Source

Source selection (toggle)

Menu Right/

Menu Left/Volume -

Menu Up

Menu Down

Menu/Exit

Menu/Exit selection

LED ON: 

Power Status

Condition

Green

Power on

Orange

Power off
Power saving mode
Select LED on via menu
(Front LED: On)

Flashing orange No signal

Off

AC off
Power on
Select LED on via menu
(Front LED: Off)

LED OFF:

The LED turns completely off when in the "off" mode 
regardless of the monitor being on or off.

The Remote Control (RCU) Instructions       

No Function

Description

1

Turns the monitor on and off

2

INFO

Provides source and resolution information

3

VGA

Selects the PC RGB source

DVI

Selects the PC DVI source 

HDMI 1

Selects the HDMI source 1

4

COMP

Selects the Component source 

AV (Video)

Selects the Composite Video source 

HDMI 2

Selects the HDMI source 2

5

PIP position

Selects the PIP position

DisplayPort

Select the DisplayPort source

6

PIP

Turns the PIP feature 
on and off

S-V

Selects the S-Video 
source 

HD-SDI 2

Not available in this 
model 

7

SWAP

Swaps the main 
source & sub source
picture

8

P-SOURCE

Selects the secondary 
sub-source

9

MENU

Opens the monitor’s 
on-screen menu
system. 
If the menu
system is already
open, pressing this
button will select the 
previous submenu

Navigates through 
submenus and 
settings

10 EXIT

Closes the menu
system

11 ENTER

Selects highlighted 
menu choices

12 SCALING

Toggles between different aspect ratios 
(Auto, Native, 4x3, 16x9, 16x10 and Letterbox)

FREEZE

Freezes the current source image

MUTE

Turns off the sound 

BRIGHT

Adjusts the brightness

CONTRAST

Adjusts the contrast

AUTO

Synchronizes the monitor with the source

SOURCE

Allows selection of the different sources

VOLUME-

Decreases the sound volume 

Increases the sound volume 

Hot Key: OSD Menu Lock/Unlock Control

Lock: 

Press 

Enter, Enter, Exit, Exit, Enter

and 

Exit

on the controller in sequence to lock OSD 

Unlock: 

Press

Enter, Enter, Exit, Exit, Enter and Exit

on the controller in sequence to unlock OSD 

Display Mode

Turning the monitor on

1. Correctly insert the power cord into the monitor and 

into the power socket

2. Ensure the AC switch is set to “—“.
3. Press the power button on the remote or side control panel.

Turning the monitor off

With the power on, press the power button on the remote or
side control panel to place the monitor in a standby mode. To turn
off power completely, turn the AC switch to “

” or disconnect

the AC power cord from the power outlet.

NOTE:

If there is no signal input for a period of time, the monitor will 
automatically revert to standby mode.

Power ON-Stand 
by Indicator

Remote Control
Receiver

Operating the monitor

2

4

6

7

9

11

12

10

8

5

3

1

Содержание PROFESSIONAL e-Screen 55 inch ETD

Страница 1: ...Full HD LED touchscreen monitor QUICK SETUP GUIDE PROFESSIONAL e Screen 55 ETD E N G L I S H D E U T S C H F R A N Ç A I S NEDERLANDS T U R K I S H ...

Страница 2: ...n the remote control To turn on off the monitor by the remote control press the main power switch again and the power standby on indicator light will come on again When turning off the monitor by pressing the POWER button on the remote control the main power of the monitor is not turned off completely To disconnect the monitor completely from the power supply remove the plug from the socket Press ...

Страница 3: ...cket is fixed to a solid wall 2 After assembling please don t pull or shake violently 3 Please don t install the bracket in direct sunslight or areas of humidity high temperature for fear that the quality is affected 4 Install the bracket at a minimum distance of 10 cm from other objects walls on either side Only attach to vertical walls Unpacking The e Screen is packed in a cardboard box and may b...

Страница 4: ...the chapter Operating the monitor Signal Source Input Input Interface 55 Connector 1 DisplayPort 2 HDMI 1 3 HDMI 2 4 DVI D D Sub 24 pin 5 VGA D Sub 15 pin 6 PC Audio In Mini Jack 7 IR Extender Mini Jack 8 Line Out Mini Jack 9 RS232C D Sub 9 pin 10 LAN 11 Component RCA G B R 12 Audio in Component RCA W R 13 S Video Mini Din 4 pin 14 Video Type B female 15 Audio In S Video Video RCA W R 16 Touch USB...

Страница 5: ... pressing this button will select the previous submenu Navigates through submenus and settings 10 EXIT Closes the menu system 11 ENTER Selects highlighted menu choices 12 SCALING Toggles between different aspect ratios Auto Native 4x3 16x9 16x10 and Letterbox FREEZE Freezes the current source image MUTE Turns off the sound BRIGHT Adjusts the brightness CONTRAST Adjusts the contrast AUTO Synchroniz...

Страница 6: ...efore the touch function is ready to go It can be achieved by using a pen finger or any other pointer Touch function is plug play no driver is required Please do not use landscape type touch monitor in portrait mode and vice versa Windows 7 16 Point Calibration Procedure 1 Start USB configuration program on the computer 2 Press Calibrate 3 Wait for the beep The cursor will move to the upper left han...

Страница 7: ... can radiate radio frequency energy and if not installed and used in accordance with the quick setup guide and user manual may cause harmful interference to radio communications Operation of this equipment in a residential area is likely to cause harmful interference in which case the user will be required to correct the interference at their own expense Warning This is a Class A product In a dome...

Страница 8: ...scht Der Monitor kann dann nicht mehr über die POWER Taste der Fernbedienung ein oder ausgeschaltet werden Um den Monitor per Fernbedienung ein und auszuschalten drücken Sie noch einmal den Netzschalter so dass die Anzeigeleuchte für Standby Ein wieder leuchtet Wenn der Monitor durch Drücken der POWER Taste auf der Fernbedienung ausgeschaltet wird ist der Monitor nicht voll ständig vom Netz getren...

Страница 9: ...heitshinweise für die Wandmontage 1 Vergewissern Sie sich dass die Halterung an einer soliden Wand angebracht ist 2 Nach der Montage nicht stark am Monitor rütteln oder ziehen 3 Montieren Sie den Monitor nicht an Plätzen mit direkter Sonneneinstrahlung direkt über Wärmequellen oder in feuchter Umgebung um Fehlfunktionen zu vermeiden 4 Montieren Sie den Monitor mit einem Mindestabstand von 10 cm zu...

Страница 10: ...l Betrieb des Monitors Signal Eingänge Input Interface 55 Connector 1 DisplayPort x 1 2 HDMI 1 Eingang x 1 3 HDMI 2 Eingang x 1 4 DVI D Eingang D Sub 24 pin 5 VGA D Sub 15 pin 6 PC Audio ein Mini Jack 7 IR Extender Mini Jack 8 Line Out Mini Jack 9 RS232C D Sub 9 pin 10 LAN 11 Komponente RCA G B R 12 Audio für Komponente Eingang RCA L R 13 S Video Eingang Mini Din 4 pin 14 Video RCA 15 Audio Eingan...

Страница 11: ...ngen 10 EXIT Schließt das Menü system 11 ENTER Auswahl der markier ten Menüoption 12 SCALING Hin und her schalten zwischen verschie denen Bildformaten Auto Nativ 4x3 16x9 16x10 und Briefkasten quer FREEZE Standbild des aktuellen Bildes MUTE Schaltet den Ton ab BRIGHT Helligkeitsreglung CONTRAST Kontrastreglung AUTO Synchronisierung des Monitors mit der Quelle SOURCE Auswahl aus verschiedenen Bildq...

Страница 12: ...des USB Kabels bis die Touch Funktion betriebsbereit ist Sie kann mit dem Finger einem Stift oder einem anderen Zeiger aktiviert werden Die Touch Funktion funktioniert über Plug Play und benötigt keinen zusätzlichen Treiber Verwenden Sie einen Querformat Monitor nicht im Hochformat Modus oder umgekehrt 16 Punkt Kalibrierung für Windows 7 1 Starten Sie das USB Konfigurationsprogramm Ihres Computers ...

Страница 13: ...in kommer ziellen Umgebungen bieten Dieses Gerät erzeugt und verwendet Energie in Form von Funkwellen und kann diese eventuell ab strahlen Wenn das Gerät nicht gemäß der Anleitung installiert und eingesetzt wird kann es den Funkverkehr stören Beim Be trieb des Geräts in Wohngebieten können Störungen auftreten Die Beseitigung solcher Störungen gehen zu Lasten des Benutzers Warnhinweis Dies ist ein ...

Страница 14: ... Adressez vous à votre revendeur pour vérifier l appareil Pour éteindre le moniteur mettez l interrupteur situé sur le côté de l appareil dans la position O Le voyant lumineux Veille Marche s éteint Le moniteur ne peut dès lors plus être allumé ou éteint par la touche POWER de la télécommande pour allumer et éteindre le moniteur avec la télécommande appuyez à nouveau sur l interrupteur pour que le ...

Страница 15: ...position droite Ne pas poser le moniteur côté écran vers le haut ou le bas Manipuler le moniteur avec précaution Ne pas le faire tomber Consignes de sécurité pour le montage mural 1 Assurez vous que le support est solidement fixé au mur 2 Après le montage ne pas secouer ou tirer fortement sur l écran 3 Pour éviter les dysfonctionnements ne montez pas l écran dans un endroit directement exposé aux r...

Страница 16: ...s au chapitre Fonctionnement de l écran Entrées du signal Interface déntrée 55 Fiche 1 DisplayPort 2 HDMI 1 entrée x 1 3 HDMI 2 entrée x 1 4 DVI D entrée x 1 D sub 24 broches 5 VGA D Sub 15 broches 6 PC entrée audio Mini jack 7 Entrée audio PC Mini jack 8 Rallonge IR Mini jack 9 RS232C D Sub 9 broches 10 LAN 11 Sortie de ligne RCA G B R 12 Composant RCA G D 13 Entrée s Video Mini Din 4 broches 14 ...

Страница 17: ...e permet de sélectionner le sous menu précédent Navigation sous menus et paramètres 10 EXIT Fermeture sortie du menu 11 ENTER Sélection de l option de menu marquée 12 SCALING Basculement formats d image Auto Nativ 4x3 16x9 16x10 et boîte aux lettres transversale FREEZE Arrêt sur image en cours MUTE Coupure du son BRIGHT Réglage luminosité CONTRAST Réglage contraste AUTO Synchronisation du moniteur...

Страница 18: ...être activée avec un stylet le doigt ou un autre pointeur La fonction tactile est de type plug play aucun pilote n est requis N utilisez pas de moniteur tactile de type paysage en mode portrait et vice versa Windows 7 Procédure d étalonnage 16 points 1 Démarrez le programme de configuration sur l ordinateur 2 Appuyez sur Calibrate Étalonner 3 Attendez le signal sonore Le curseur se déplace ensuite ...

Страница 19: ... et consomme de l énergie sous forme d ondes radioélectriques et peut donc éventuellement entraîner une exposition à ces ondes Lorsque l appareil n est pas installé et utilisé conformément aux consignes données il peut perturber les radiocommunications Lorsqu il est utilisé dans des zones rési dentielles il peut y avoir des dysfonctionnements Il revient à l utilisateur de remédier à ces dysfonctio...

Страница 20: ...tspanning uit te schakelen Het lampje voor netspanning stand by aan gaat uit en de monitor kan dan niet met de POWER toets op de afstandsbediening worden in of uitgeschakeld Druk de netschakelaar weer in om de monitor met de afstandsbediening in of uit te schakelen het lampje voor stand by aan gaat dan weer branden Als u de monitor uitschakelt via de POWER toets op de afstandsbediening is de netsp...

Страница 21: ...et de monitor Niet laten vallen Veiligheidsmaatregelen voor wandbevestiging 1 Overtuig u ervan dat het bevestigingsmateriaal stevig aan de wand is aangebracht 2 Niet hard trekken of schudden na installatie van de monitor 3 Monteer de beugel niet in direct zonlicht of in een omgeving met een hoge luchtvochtigheid temperatuur zodat een deugdelijke montage is gewaarborgd 4 Monteer de beugel op een af...

Страница 22: ...ing Zie hoofdstuk Bediening van de monitor Ingang signaalbron Ingang Interface 55 Connector 1 Displayport x 1 2 HDMI 1 input x 1 3 HDMI 2 input x 1 4 Ingang DVI x 1 D Sub 24 pin 5 VGA D Sub 15 pin 6 PC Audio in Mini Jack 7 IR Extender Mini Jack 8 Line Out Mini Jack 9 RS232C D Sub 9 pin 10 LAN 11 Component RCA G B R 12 Audio in Component RCA L R 13 S Video Mini Din 4 pin 14 Video RCA 15 Audio in s ...

Страница 23: ... submenu via deze toets geselecteerd Navigatie door sub menu s en instellingen 10 EXIT Sluit het menusysteem af 11 ENTER Selecteert gemarkeerde menukeuzes 12 SCALING Schakelt tussen verschillende beeldverhoudingen Auto Native 4x3 16x9 16x10 en Letterbox FREEZE Bevriest het huidige bronbeeld MUTE Schakelt het geluid uit BRIGHT Stelt de helderheid af CONTRAST Stelt het contrast af AUTO Synchroniseer...

Страница 24: ... USB kabel is aangesloten 5 seconden daarna is de aanraakfunctie gereed Deze kan worden geactiveerd met een pen vinger of ander aanwijsmiddel De aanraakfunctie is plug play er is geen stuurprogramma nodig Gebruik een Liggende touch monitor niet in Staande modus en omgekeerd Windows 7 16 punts kalibratie procedure 1 Start het USB ijkingsprogramma op de computer 2 Druk op Calibrate kalibratie 3 Wach...

Страница 25: ...apparaat niet is geïnstalleerd en wordt gebruikt volgens de installatiegids en gebruikershandleiding kan het schadelijke interferentie voor radiocommunicatie veroorzaken Bij gebruik van dit apparaat in een woonomgeving is het aannemelijk dat er schadelijke interferentie ontstaat in dat geval dient de gebruiker die interferentie voor eigen rekening te corrigeren Waarschuwing Dit product valt in Kla...

Страница 26: ...apayabilmek için ana elektrik anahtarına tekrar basın ve beklemede açık gösterge ışığının yeniden yanmasını sağlayın Uzaktan kumandanın AÇ KAPA du ğmesine basarak ekranï kapattığınızda ekranın ana elektrik bağlantısı tam olarak kesilmez Ekranın ana elektrik kaynağına olan bağlantısını tam olarak kesmek için fişi prizden çıkarın Ekranï tam olarak kapatmak için O ya basın Elektrik kablosu ya da fişini...

Страница 27: ... çekmeyin ya da sallamayın 3 Göru ntu kalitesinin olumsuz etkilenmemesi için lu tfen montaj kelepçesini doğrudan ışık alan ya da ya da nemli çok sıcak alanlara monte etmeyin 4 Montaj kelepçesini ekranın her iki tarafından da diğer nesnelerle duvarlarla arasında en azından 10 cm kalacak şekilde monte edin Yalnız dikey duvarlara monte edin Paketinden çıkarma e Screen ekran karton bir kutu içerisine ...

Страница 28: ... adlı bölu me bakın Sinyal Kaynağı Girişi Giriş Arabirimi 55 Konektör 1 Ekran girişi x 1 2 HDMI 1 girişi x 1 3 HDMI 2 girişi x 2 4 DVI girişi x 1 D Sub 24 iğneli 5 VGA D sub 15 iğneli 6 PC Ses girişi Mini Jak 7 Kızılötesi Dağıtıcı Mini Jak 8 Hat Çıkışı Mini Jak 9 RS232C D Sub 9 iğneli 10 LAN 11 Komponent RCA G B R 12 Komponent için ses RCA W R 13 S Video Mini Din 4 iğneli 14 Video RCA 15 Ses giriş...

Страница 29: ...lt menu ler ve ayarlar arasında gezinmek için 10 ÇIKIŞ Menu sistemini kapatır 11 ENTER Koyu renkle vurgulu menu tercihlerini seçer 12 SCALING Farklı en boy oranları arasında geçiş yapar Oto Doğal 4x3 19x9 16x10 ve Mektup kutusu FREEZE Mevcut kaynak göru ntu su nu dondurur MUTE Sesi kapatır BRIGHT Parlaklığı ayarlar CONTRAST Kontrastı ayarlar AUTO Ekranı kaynakla senkronize eder SOURCE Farklı kayna...

Страница 30: ...bekleyin Dokunmatik ekran kalem parmak ya da herhangi başka bir işaretleyiciyle çalıştırılabilir Dokunmatik işlev tak ve kullan tiptir Hiçbir su ru cu gerekmez Lu tfen portre modundayken manzara tipinde dokunmatik ekran ya da tam tersini kullanmayın Windows 7 16 Noktalı Kalibrasyon Prosedu ru 1 Bilgisayarda USB konfigu rasyon programını başlatın 2 Kalibre Et Calibrate seçeneğine basın 3 Bip sesini ...

Страница 31: ...zitlere karşı yeterli koruma sağlamak amacıyla saptanmıştır Bu cihaz radyo frekansında enerji u retir kullanır ve yayabilir dolayısıyla hızlı kurulum kılavuzu ve kullanım kılavuzuna uygun olarak kurulmadığında ve kullanılmadığında radyo televizyon ve telsiz iletişiminde parazitlenmelere neden olabilir Hızlı Kurulum Kılavuzuna uyulmadan yapılacak montaj dan doğabilecek masraflar kullanıcının kendisi...

Страница 32: ...Legamaster International B V Kwinkweerd 62 Postbus 111 7240 AC Lochem tel 31 0 573 713000 fax 31 0 573 713001 email info legamaster com internet www e legamaster com Version 1 1 PUDWD ...

Отзывы:

Похожие инструкции для PROFESSIONAL e-Screen 55 inch ETD