background image

                                                      LC Easyjet-16W/18S User Manual V13GZ.1 


34 


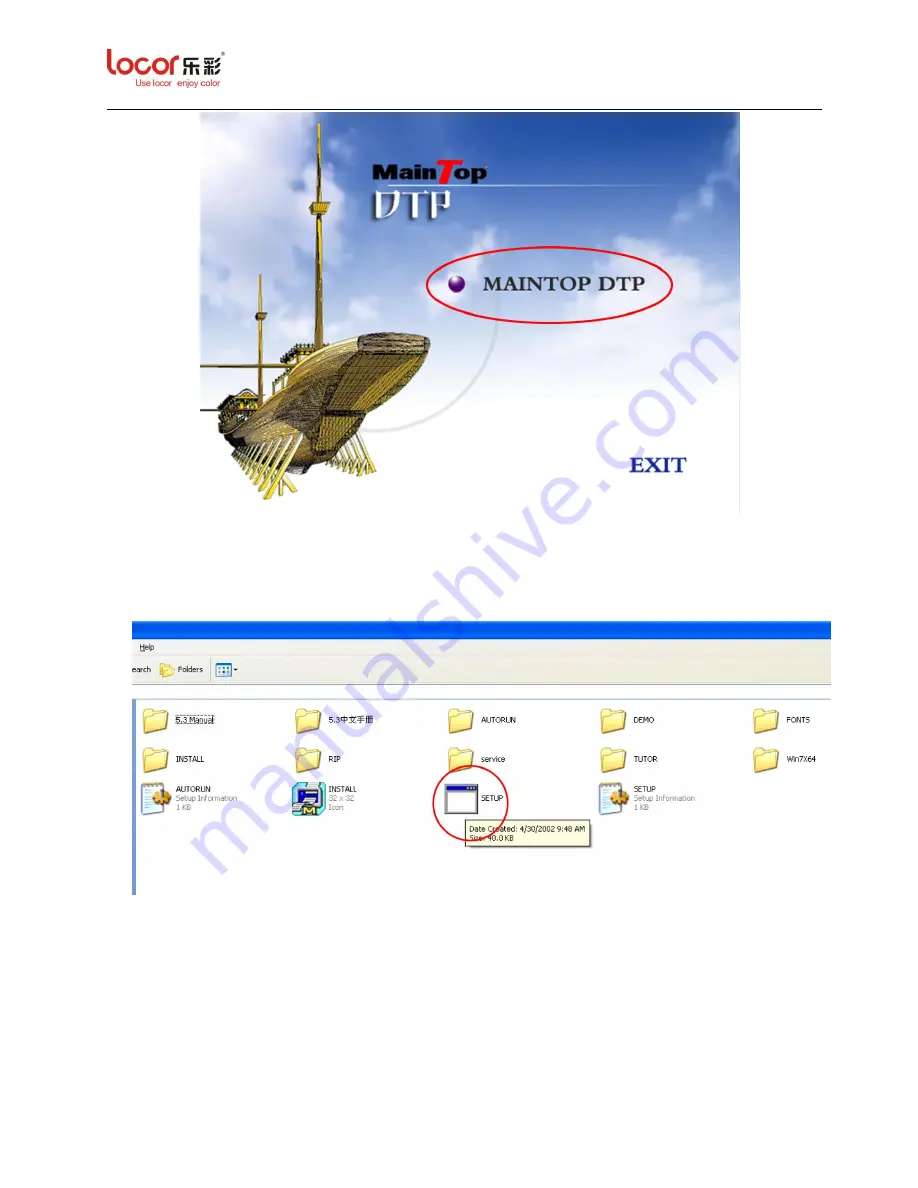
Notice:  If  the  screen  above  is  not  displayed,  please  open  the  “maintop  (E:)”,  and  then 
double click the “SETUP” in the screen below to enter the “MAINTOP DTP” screen. 


3. 

Click “MAINTOP DTP”, the screen below is displayed. Then click “OK”. 

Notice: the maintop is recommended to be installed in C:\. 

Содержание LC Easyjet-16W

Страница 1: ......

Страница 2: ...human computing language in any form or by any means electronic mechanical magnetic or otherwise or disclose to a third party without the express written permission of Zhengzhou LECAI Science And Tec...

Страница 3: ...stall the Carriage 14 2 2 5 1 Structure of Carriage 14 2 2 5 2 Load the Print Head 15 2 2 5 3 Fix the Damper 16 2 2 6 Maintenance Station 18 2 2 7 Media Loading 19 2 2 8 Fill Ink 3 1 7 2 1 19 3 Operat...

Страница 4: ...1 7 4 Reset Menu 30 4 Computer IP Address Setup 30 5 Maintop Installation Setup 33 5 1 Maintop Software Installation 33 5 2 Printer Set Up 36 5 3 Maintop Application 42 5 4 Printer Calibration 53 6 D...

Страница 5: ...s so many malfunctions like seeping inks can t spray inks or something else In this way it wastes the valuable ink and print media Therefore we should intensify the safeguard and maintenance of the pr...

Страница 6: ...chine may not work normally B Set aside enough space around the printer to ensure the normal ventilation C The printer should be placed near the wall for the convenience of the plug s taking out and p...

Страница 7: ...e printer structure and assembly 2 1 Overview Front View No Name No Name 1 Upper Cover 17 Left Media Feeding Unit 2 Back Cover 18 Take up Unit Loading Bracket Holder 3 Front Cover 19 Take up Unit Load...

Страница 8: ...Front Cover 25 Left Stand 10 Metal Gasket 26 Feeding Unit Left Loading Bracket 11 Right Media Feeding Unit 27 Left Front Shell 12 Slide Bar 28 Left Decorating Part 13 Right Stand 29 Left Side Shell 14...

Страница 9: ...e 1 Power Interface Switch 4 Temperature Controller 2 Heater Switch 5 Network Cable Interface 3 Bail Assembly 6 Ink Cartridge Assembly 2 2 Installation 2 2 1 Unpack the Package 1 Please check the pack...

Страница 10: ...LC Easyjet 16W 18S User Manual V13GZ 1 10 2 Please check the contents according the packing list attached in the package make sure all the items are inside...

Страница 11: ...Name Qty No Parts Name Qty 1 Maintop with dongle 1 set 11 Screw M4 10 8 pcs 2 Ink Damper 4 pcs 12 Screw M5 16 52 pcs 3 Maintenance Capper 1 pc 13 Screwdriver 1 pc 4 Ink Cartridge 4 sets 14 Hexagonal W...

Страница 12: ...4 Horizontal Stand 11 Feeling Unit Left Loading Bracket 5 Caster Unlockable 12 Take up Unit Slide Bar 6 Caster Lockable 13 Take up Unit Loading Bracket Holder 7 Beam 14 Take up Unit Loading Bracket 2...

Страница 13: ...ponent is fastened firmly by gently shaking the stands The printer main units installation is completed 2 2 4 Load the Cartridge a Load the ink cartridges into the corresponding slots and push the car...

Страница 14: ...5 Install the Carriage 2 2 5 1 Structure of Carriage No Name No Name A Carriage Board F Print Head Cover B Connection Assembly G Epson DX5 Print Head C Carriage Regulator H Carriage Pedestal D Damper...

Страница 15: ...t front cover of the printer and then remove the left front cover d Remove the carriage cover disassemble the damper holder and dismantle the ink dampers and remove the print head cover Dismantle the...

Страница 16: ...strated as below f When make sure the data wires are well connected please fix the print head to the bracket by the three screws dismantled before and then fix the print head cover 2 2 5 3 Fix the Dam...

Страница 17: ...nual V13GZ 1 17 Notice Connect the ink dampers to the corresponding connectors of print head Do not overexert to avoid damage to the print head Make sure the ink dampers are well connected to the prin...

Страница 18: ...No Name No Name A Flush Box Cover H Draw Spring B Flush Box Sponge I Inner Housing C Flush Box J Middle Housing D Wiper K Outer Housing E Wiper Solenoid Valve L Return Spring F Wiper Holder M Mainten...

Страница 19: ...then connect the scroller to right part in the same way b Lift up the media fixer handle and turn the scroller by hand and wind up several turns of roll media c When inserting the media from the rear...

Страница 20: ...ew Start POS Print begin position setup Media Media Feeding Print Nozzle status test Option Direction Start POS Fant Address Spurt Clean Clean and maintain the print head automatically Function Print...

Страница 21: ...he left Right Long press Right to make the carriage move to the right OK Press OK to save your setting Cancel Press Cancel to cancel your setting and return to Set Menu 3 1 3 Media Menu Press Media to...

Страница 22: ...nozzle testing pattern as below Notice After testing it will print out 4 groups of lines C M Y K in the media for checking the status of nozzles as below Notice If the status not very well please clea...

Страница 23: ...13GZ 1 23 3 1 5 1 Dir Menu Press Dir in Main Menu to enter its submenu as below Dir Print direction Start POS Print begin position setup Fant Print table suction fan Addr Address Default Spurt Printhe...

Страница 24: ...o Option Menu 3 1 5 2 Start POS Mune 3 1 2 3 1 5 3 Fant Mune Press Fant to enter its submenu as below Inc Press Inc to increase the suction strength Dec Press Dec to decrease the suction strength OK P...

Страница 25: ...e spurt strength OK Press OK to save your setting Cancel Press Cancel to cancel your setting and return to Option Menu 3 1 6 Clean Menu Press Clean to enter its submenu as below Notice When press Clea...

Страница 26: ...LC Easyjet 16W 18S User Manual V13GZ 1 26 3 1 7 Function Menu Press Function to enter its submenu as below 3 1 7 1 Print Menu 3 1 4 3 1 7 2 Clean Menu Press Clean to enter its submenu as below...

Страница 27: ...below Notice After press the Pump the pump will work and fill ink until you press the Stop When first time do the ink filling can use this function to fill ink Press Stop will show below Notice After...

Страница 28: ...isable 3 1 7 2 3 CleanHead Menu 3 1 6 3 1 7 2 4 Flush Menu Press Flush to enter its submenu as below Notice After press Flush the carriage will go to the flush box spit ink from the nozzle until you p...

Страница 29: ...the carriage will back to maintenance station After printing job please check and make sure the carriage already back to the maintenance station and make sure the maintenance cap completely close the...

Страница 30: ...Notice This is the machine version information 3 1 7 4 Reset Menu Press Reset to enter its submenu as below Notice Users are not recommend to reset printer 4 Computer IPAddress Setup This section expl...

Страница 31: ...ck My Network Places icon and then select Properties the screen below is displayed 2 Right click Local Area Connection and then select Properties the screen below is displayed 3 Double Click Internet...

Страница 32: ...LC Easyjet 16W 18S User Manual V13GZ 1 32 4 Input IP address 196 12 0 188 and then click Subnet mask 5 After click OK the IP address setup procedure is completed...

Страница 33: ...op software how to set up maintop printer and related parameters Maintop is compatible with Win 7 Windows XP Window 2000 Win98 etc 5 1 Maintop Software Installation 1 Make sure the computer starts nor...

Страница 34: ...creen above is not displayed please open the maintop E and then double click the SETUP in the screen below to enter the MAINTOP DTP screen 3 Click MAINTOP DTP the screen below is displayed Then click...

Страница 35: ...LC Easyjet 16W 18S User Manual V13GZ 1 35 4 Choose Restart immediately and then click Close After restart your PC the maintop software installation is completed...

Страница 36: ...18S User Manual V13GZ 1 36 5 2 Printer Set Up 1 Plug maintop dongle into the USB connector of your PC 2 Click in Start Programs MainTop to enter the maintop software 3 Put the Driver CD to the DVD RW...

Страница 37: ...LC Easyjet 16W 18S User Manual V13GZ 1 37 4 Copy all the files as below 5 Paste all the file to the PC desktop or hard disk...

Страница 38: ...LC Easyjet 16W 18S User Manual V13GZ 1 38...

Страница 39: ...LC Easyjet 16W 18S User Manual V13GZ 1 39 6 Click File Printer Setup in the screen below 7 Click Install option in the following screen...

Страница 40: ...LC Easyjet 16W 18S User Manual V13GZ 1 40 8 Click Custom option in the following screen...

Страница 41: ...you pasted before and select the xinli inf file and then click Open 10 The screen returns to the Printer Setup Click Set As Default Printer to set the printer model you selected as the default printe...

Страница 42: ...5 3 Maintop Application This section explains how to use the Maintop software and how to set up the related parameters before printing the image 1 The screen returns to MainTop DTP V5 3C1 LECAI as be...

Страница 43: ...LC Easyjet 16W 18S User Manual V13GZ 1 43 3 The following screen is displayed...

Страница 44: ...LC Easyjet 16W 18S User Manual V13GZ 1 44 4 Click OK the screen below is displayed 5 Click import image icon to select your job the screen below is displayed...

Страница 45: ...LC Easyjet 16W 18S User Manual V13GZ 1 45 6 Click Open the screen below is displayed...

Страница 46: ...er Manual V13GZ 1 46 7 Right click the image and select Frame Attribution option to set up the image size the screen below is displayed 8 After input your size must click the Constrain Proportion opti...

Страница 47: ...al V13GZ 1 47 9 Press Ctrl D can copy and paste the image at the same time the screen below is displayed 10 Select all images and then click Show Alignment Distributing Panel icon to align the image t...

Страница 48: ...LC Easyjet 16W 18S User Manual V13GZ 1 48 Select all the image and then right click Group Ctrl D can copy and paste this group...

Страница 49: ...LC Easyjet 16W 18S User Manual V13GZ 1 49...

Страница 50: ...LC Easyjet 16W 18S User Manual V13GZ 1 50 11 Click Show Metric Panel icon to setup the image position the screen below is displayed...

Страница 51: ...LC Easyjet 16W 18S User Manual V13GZ 1 51 12 Click Print icon the screen below is displayed...

Страница 52: ...LC Easyjet 16W 18S User Manual V13GZ 1 52 13 Click Properties the following screen appears 14 Click OK the following screen appears 15 Click the Maintop Printing Management System icon the...

Страница 53: ...procedure of Maintop application has been explained above 5 4 Printer Calibration This section explains how to use the calibration software Before run the calibration software please confirm the netw...

Страница 54: ...LC Easyjet 16W 18S User Manual V13GZ 1 54 3 Click Connect to enable the tool interface the following screen appears About the Tool interface function refer to the following illustration...

Страница 55: ...ion Parameter G 6 12 Pass Bidirection Calibration Parameter H Bidirection Calibration Save I Step Calibration J Actual Length Calculate K Step Calibration Save L Nozzle Status Test M File Test N More...

Страница 56: ...at number 4 then you need to use 4 plus the figure in namely 4 17 13 replace 17 with 13 If you find the most straight lines are at number 4 then you need to use 4 plus the figure in C namely 4 17 21...

Страница 57: ...3GZ 1 57 After finish printing please measure the frame length and input and then click Calc to calculate actual length and Save Notice After input the figure in Distance please click Advanced Align t...

Страница 58: ...ntain it with lubricating oil 3 Clean the raster with medicinal alcohol weekly 4 Periodically clean the waste ink bottle flush box and pinch roller to make sure the printer in good condition 5 Periodi...

Страница 59: ...s voltage 4 Change the mainboard fuse 5 Check whether the transformer has voltage 6 Check the mainboard power cable 7 Change the mainboard 8 Change the LCD Turn on but Carriage can t move 1 Motor cabl...

Страница 60: ...ing 6 Suck the ink to the damper or change the damper 7 Please use LECAI original Ink 8 Change the Carriage board Printing but print nothing not ink come out 1 Printhead cable 2 Carriage board 3 Print...

Отзывы: