


11
BATTERY SAFETY
•
The Batteries power source are 4.5V~5.5V, please do not over this value.
•
Batteries are small objects and a hazard to children, must be replaced by an adult.
•
Follow the polarity (+/-) diagram in the battery compartment.
•
Promptly remove dead batteries from the toy.
•
Dispose of used batteries properly.
•
Remove batteries from prolonged storage.
•
Only batteries of the same type as recommended are to be used .
•
DO NOT
incinerate used batteries.
•
DO NOT
dispose of batteries in fire, as batteries may explode or leak .
•
DO NOT
mix old and new batteries.
•
DO NOT
mix alkaline, standard (carbon-zinc) or
•
rechargeable (Ni-Cd, Ni-MH) batteries.
•
DO NOT
recharge non-rechargeable batteries.
•
DO NOT
short-circuit the supply terminals.
•
Rechargeable batteries are to be removed from the toy before being charged.
•
Rechargeable batteries are only to be charged under adult sup ervision.
8
Clock does not turn ON or
does not respond.
8
Clock makes strange sounds,
behaves erratically or makes
improper responses.
8
Sound becomes weak or the
Clock suddenly stops working.
9
Make sure batteries are correctly installed.
9
Make sure battery cover is securely
attached.
9
Remove batteries and put them back in.
9
Clean battery compartment by rubbing
lightly with a soft eraser and then wiping
with a clean dry cloth.
9
Install new batteries.
9
Push the reset button to restart the clock.
If the problem persists, it may be caused by weak
batteries. Please install a new set of batteries and try
again.
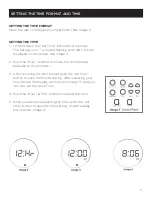
TROUBLESHOOTING


