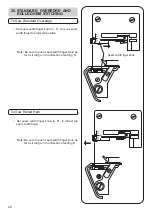
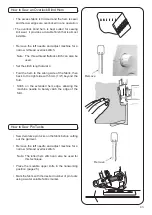
Leader VS 325D Скачать руководство пользователя страница 43

    Pull  on  opposite  sides  of  the  seam  to  pull  the 

     stitches flat.

  Place the movable upper knife in the nonworking 

   position (page 25).  The fabric is not trimmed on 

    this stitch.

•  Fold fabric wrong sides togethe

r.

•  Position the fabric so the seam is sewn with part of 

   the stitch extending off the fabric.

•  Pull on opposite sides of the stitch to flatten.

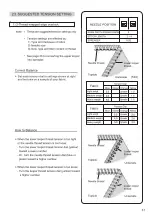
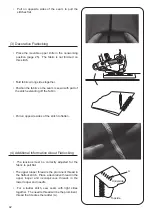
(3) Decorative Flatlocking

    The  tensions  must  be  correctly  adjusted  for  the 

    fabric to pull flat.

  The upper looper thread is the prominent thread in 

    the flatlock stitch.  Place a decorative thread in the 

    upper  looper  and  inconspicuous  threads  in  the 

    lower looper and needle.


For

  a  ladder  stitch,  sew  seam  with  right  sides 

    together.  The needle thread will be the prominent 

    thread that creates the ladder (A).

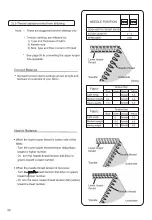
(4) Additional Information 

About Flatlocking

42

Topside

Underside

A

Содержание VS 325D

Страница 1: ...Instruction Book Model VS 325D VS 325D...

Страница 2: ...g machine when considered necessary without notification or obligation IMPORTANT SAFETY INSTRUCTIONS If the supply cord is damaged it must be replaced by the manufacturer or its service agent or a sim...

Страница 3: ...roper throat plate The wrong plate can cause the needle to break Do not use bent needles When sewing keep fingers away from all moving parts Special care is required around the sewing machine needle D...

Страница 4: ...es in this mains lead are colored in accordance with the following code Blue neutral N Brown live L As the colors of the wires in the mains lead of this appliance may not correspond with the colored m...

Страница 5: ...e 25 19 Free Arm Sewing Tubular Work 27 20 Standard Overedge and Rolled Hem Stitching 28 To sew standard overedge 28 To sew rolled hem 28 21 Chaining Off and Test Sewing 29 25 Stitch Variations and Se...

Страница 6: ......

Страница 7: ...0 3 0 504 505 514 2 HANDY REFERENCE CHART The thread tension becomes tighter as the dials are turned to higher numbers The tension settings shown on this page as well as throughout the operator s man...

Страница 8: ......

Страница 9: ...een 5 Upper looper thread tension dial orange 6 Lower looper thread tension dial yellow 7 Throat plate 8 Cloth plate 9 Looper cover 10 Power light switch 11 Stitch length dial 12 Hand wheel 13 Spool s...

Страница 10: ...as it will go 1 Pull cover down toward you 2 Caution Be sure looper cover is closed when sewing Connect the controller electric plug 1 to the machine receptacle 2 Plug power line 3 into electric outl...

Страница 11: ...he thread guide holder The two joints on the telescope will click into place when they are correctly positioned Center the thread guides above the spool pins Place thread over the cone adapters on the...

Страница 12: ...screwdriver 1 Left needle set screw 2 Right needle set screw 3 Left needle 4 Right needle Remove the needle s Caution Be sure to disconnect the machine from the electric outlet before replacing needle...

Страница 13: ...er for quick reference Thread the machine in the order 1 to 4 as shown Orange Yellow Green Blue 1 Upper looper thread 2 Lower looper thread 3 Right needle thread 4 Left needle thread Caution Be sure t...

Страница 14: ...certain it is properly located in between the tension discs 3 Thread the looper area of the machine following the orange color coded thread guides 4 7 Thread the hole in the upper looper from front t...

Страница 15: ...to the front through the thread guide 1 Thread the top cover thread guide by pulling the thread downward until it slips under thread guide 2 While holding thread with finger pass it between the tensi...

Страница 16: ...eft of threading guide 8 Pull the thread up and into thread guide 8 Pass the thread behind and over the top end of left looper 9 A Then pull it downward gently so that it will slip into the slot in th...

Страница 17: ...to the front through the thread guide 1 Thread the top cover thread guide by pulling the thread downward until it slips under thread guide 2 While holding thread with finger pass it between the tensio...

Страница 18: ...upper thread path of the thread guide 6 Thread the eye of the right needle 8 Note Use of tweezers in the accessory set will make needle eye threading easy Draw about 10cm 4 inches of thread through ne...

Страница 19: ...o the front through the thread guide 1 Thread the top cover thread guide by pulling the thread downward until it slips under thread guide 2 While holding thread with finger pass it between the tension...

Страница 20: ...make needle eye threading easy Draw about 10cm 4 inches of thread through needle eye to hang free Place the thread to the back under the presser foot Always thread the needle s last to prevent misthr...

Страница 21: ...tied Pull the threads through the machine one at a time If threads do not pull easily check for tangles on thread guides or looping under thread stand When pulling thread through the needle STOP when...

Страница 22: ...ft needle is used 5 2 6 7 mm 13 64 17 64 inch b When only right needle is used 3 0 4 5 mm 1 8 11 64 inch Overedge seam width can be achieved by repositioning the needle position and also with the widt...

Страница 23: ...is preadjusted at the factory to suit the sewing of medium weight fabrics Most of the materials do not require adjustment of presser foot pressure however there are some instances where adjustment is...

Страница 24: ...is most suited for shirring sleeves yokes front and back bodices skirt hems etc in stretch fabrics such as knits and jerseybefore assembling into garment Set differential feed adjusting lever knob bel...

Страница 25: ...the seam lightly in front and back of the presser foot Note If amount of stretch is not correctly set in relation to the fabric being sewn the fabric is apt to shift away from the needle resulting in...

Страница 26: ...position Turn the hand wheel toward you until the knife clears the top of the machine Continue to rotate the knife to the horizontal position Open looper cover and push the movable knife holder to th...

Страница 27: ...der in the hole B of the upper looper Put the positioning rib C in contact with the upper surface of the looper insert the point D in the hole E of the upper lopper Remove the point D of the hole E of...

Страница 28: ...located on the underside This is especially suited for sewing hard to reach garment areas such as armholes and overcasting trouser cuffs Place garment over the free arm and sew Align projection on cl...

Страница 29: ...move seam width finger to projected position Set seam width finger knob to R to retract the seam width finger Note Be sure to push seam width finger knob as far as it will go in the direction of setti...

Страница 30: ...ght tension Turn the hand wheel toward you 2 or 3 complete turns to start the thread chain Lower presser foot Continue holding the chain and press on the foot controller until the chain is 5 7 5cm 2 3...

Страница 31: ...ER needles 2022 size 100 16 Heavy or thick fabrics may be more difficult to feed than others In these cases start by cutting a notch at the beginning of the seam about 1 2 5 cm down from the top of th...

Страница 32: ......

Страница 33: ......

Страница 34: ......

Страница 35: ......

Страница 36: ......

Страница 37: ......

Страница 38: ...y or stiff fabrics Remove the left needle Move seam width finger knob to setting R See page 28 Align left face of seam width finger support plate with R mark on throat plate by turning seam width fing...

Страница 39: ......

Страница 40: ......

Страница 41: ...tch width that can be obtained for rolled hemming is approximately 1 5mm 1 16 inch since the cutting width cannot be set below 3 5mm 9 64 inch Additional Information About Rolled Hemming Apply a small...

Страница 42: ...ead overlock stitch page 29 Loosen the needle thread tension green or blue generously Loosen the upper looper thread tension orange slightly Tighten the lower looper thread tension yellow generously 1...

Страница 43: ...pposite sides of the stitch to flatten 3 Decorative Flatlocking The tensions must be correctly adjusted for the fabric to pull flat The upper looper thread is the prominent thread in the flatlock stit...

Страница 44: ...stitch Note The rolled hem stitch can also be used for this technique Place the movable upper knife in the nonworking position page 25 Mark the fabric with the desired number of pin tucks using a wat...

Страница 45: ...the thread caught on the finger of the throat plate Note Presser foot has been removed to show detail Turn the fabric and lower the presser foot so that the knife is positioned in line with the cut e...

Страница 46: ...sewing needle such as a tapestry needle with the thread chain Insert the needle into the end of the seam to secure thread Note To secure a rolled hem thread chain see page 40 Place the movable upper k...

Страница 47: ...the machine and sew the garment seam Braiding by Chaining Off Place the movable upper knife in nonworking position Insert filler cord such as yarn or twill tape through the hole in the front of the f...

Страница 48: ...t power line plug from the wall receptacle The oiling points shown in the diagram should be oiled periodically Note Use sewing machine oil Do not use any other oil or damage could result An overlock r...

Страница 49: ...ny difficulties experienced consult your representative to make the adjustments Be sure that the power line plug is disconnected from the electric source Open the looper cover and set the movable uppe...

Страница 50: ...re Use a high quality thread Balance thread tension Check for tangled or caught thread Check threading Loosen thread tension Check for tangled or caught thread Use high quality light weight thread Sho...

Страница 51: ...accordance with the material you are sewing Cotton 100 Silk 100 Spun 80 90 Tetron 80 100 Cotton 60 80 Silk 50 Spun 60 80 Tetron 60 80 Cotton 40 60 Silk 40 60 Spun 60 80 Tetron 50 80 Spun 80 90 Tetron...

Страница 52: ...chine dimensions mm Width Depth Height Weight Kg 1 300 rpm maximum 1 4mm standard rolled hemming F 2 ordinary overedge 3 0 1 0 7 1 2 with differential feed machine Rolled hemming 1 5mm ordinary overed...

Страница 53: ...1...

Страница 54: ...2 0...

Страница 55: ...3 8 N L N L 13 BS 1363 3 5...

Страница 56: ...4 1 6 2 8 3 10 4 10 5 11 6 12 7 12 8 12 9 13 13 10 14 14 14 11 15 15 15 15 1 15 2 16 3 19 4 21 22 12 23 13 24 14 24 24 24 15 25 16 26 26 26 17 28 18 2 29 19 30 20 31 31 21 32 22 33 33 31 27...

Страница 57: ...5 33 23 34 1 2 34 2 2 35 3 3 36 4 3 37 5 3 38 6 4 39 24 40 1 2 41 b 2 41 2 3 42 b 3 42 25 44 44 46 46 47 48 49 49 26 50 50 50 51 27 52 28 53 29 54 48...

Страница 58: ...6 1 1 1 2 3 5 5 7 34 2 1 2 3 5 5 7 35 3 1 3 3 5 5 7 36 4 1 3 37...

Страница 59: ...7 3 5 5 7 5 1 3 3 5 5 7 38 6 2 4 39 3 3 5 5 7...

Страница 60: ...3 5 5 7 2 80 1 3 5 4 0 2 0 34 5 7 3 5 1 0 2 2 3 5 0 5 6 0 35 5 7 0 5 5 0 3 3 5 3 0 3 0 3 0 36 5 7 3 0 3 0 3 0 4 3 5 0 5 5 0 7 0 37 5 7 0 5 5 0 7 0 5 3 5 3 0 1 0 7 0 38 5 7 5 0 0 8 5 6 3 0 3 0 3 0 3 0...

Страница 61: ...9...

Страница 62: ......

Страница 63: ...11 5 1 2 3 4 5 6 7 8 9 10 11 12 13 14 15 16 17 18...

Страница 64: ...12 6 1 2 7 1 2 3 4 5 6 7 8 1 2 3...

Страница 65: ...13 9...

Страница 66: ...14 10 1 2 3 4 10...

Страница 67: ...15 11 1 4 1 2 3 4 1 1 8 1...

Страница 68: ...16 2 3 4 7 8 10...

Страница 69: ...17 2 1 9 1 2 3...

Страница 70: ...18 4 7 4 7 8 8 9 9 B 10 10...

Страница 71: ...19 3 1 8 1 2 3...

Страница 72: ...20 4 7 6 8 10...

Страница 73: ...21 4 1 7 1 2 3...

Страница 74: ...22 4 6 6 7 10 1 2 3...

Страница 75: ...23 12 2 3...

Страница 76: ...24 13 3 4 2 14 5 7 3 5 5 2 6 7 3 0 4 5...

Страница 77: ...25 29 15 A B 6 3 5 3 0...

Страница 78: ...26 16 1 0 7 1 2 0 1 0 1 1 1 0 3 3 2 0 1 0...

Страница 79: ...27 1 0 1 0...

Страница 80: ...28 17 13...

Страница 81: ...29 18 2 2 A B C D E D E...

Страница 82: ...30 19...

Страница 83: ...31 20 S S R R...

Страница 84: ...32 21 2 3 5 7 5...

Страница 85: ...33 22 7 5 100 16 2 5 7 5...

Страница 86: ...34 23 1 2 1 2 3 30 S 2 4 2 5 1 0 3 5 1 0 4 0 1 0 2 5 2 0 4 0 2 0 5 0 2 0...

Страница 87: ...35 2 2 1 2 3 30 S 2 4 0 5 0 0 5 1 0 1 0 5 0 0 5 0 0 5 6 0 1 0 6 5...

Страница 88: ...36 3 3 1 2 3 S 2 4 2 5 3 0 3 0 3 0 3 0 3 0 3 5 3 0 3 0 2 5 3 0 3 0 3 0 3 0 3 0 3 5 3 0 3 0...

Страница 89: ...37 4 3 1 2 3 S 2 4 0 5 5 0 7 0 0 5 5 0 7 0 0 5 5 0 7 0 0 5 5 0 7 0 0 5 5 0 7 0 0 5 5 0 7 0...

Страница 90: ...38 5 3 1 2 3 S 2 4 4 0 0 8 0 5 0 0 8 5 5 0 0 8 5 2 5 1 0 7 0 3 0 1 0 7 0 3 5 1 0 7 0...

Страница 91: ...39 6 4 1 2 3 S 2 4 2 5 2 5 3 0 3 0 3 0 3 0 3 0 3 0 3 5 3 5 3 0 3 0...

Страница 92: ...40 24 R 31 R F 2 80 11 90 14...

Страница 93: ...41 1 2 b 2 S F 2 3 0 2 0 3 0 2 0 2 0 4 0...

Страница 94: ...42 2 3 b 3 R F 2 3 0 5 0 3 0 3 0 3 5 3 5 2 0 5 0 7 0 2 0 2 0 5 0...

Страница 95: ...43 1 5 3 5...

Страница 96: ...44 25 3 1 3 36 2 V...

Страница 97: ...45 3 28 4 A...

Страница 98: ...46 3 3 4 6 3 28...

Страница 99: ...47 1 2 2...

Страница 100: ...48 29 43...

Страница 101: ...49 3 4...

Страница 102: ...50 26 1 2...

Страница 103: ...51 1 28 2 3 2 1...

Страница 104: ...52 27 24 25 25 14 32 14 10 15 22 23 14 10 53 34 43 10 14 14 6 15 22 25 53 34 43 23 15 22 34 43 23 53 24 25 51 51 12 23 12...

Страница 105: ...53 28 100 100 80 90 80 100 11 Sheersucker 60 80 50 60 80 60 80 11 14 40 60 40 60 60 80 50 80 16 80 90 60 80 11 60 80 60 80 60 80 11 14 60 80 50 60 11 14...

Страница 106: ...54 29 1 300 1 4 F 2 3 0 1 0 7 1 2 1 5 3 0 6 7 3 5 27 4 5 5 0 11 11 14 VS 325D 2 3 4 338 280 265 6 0...

Страница 107: ...55 45 C 5 C...

Страница 108: ...T STOCK COMPANY KM 9 Highway No 5 Quan Toan Ward Hong Bang Dist Haiphong City Vietnam 123308 2 3 1 19 1 220136 12 90 1 04071 29 58 98 8 1 7 0 4 7 9 4 1 1 1 2 2 3 3 3 3 1 17 2017 2 04 3 7941 17047941 2...

Отзывы: