background image

AUDIO SETTINGS   

 (Modifica valore = ruotare encoder, conferma modifica valore = premere encoder)

INPUT GAIN LEFT

Amplificazione in ingresso del canale sinistro

000 - 100 

Per un rapporto segnale/rumore ottimale, impostare 

i segnali sinistro e destro al livello più alto possibile 

verificando però che l'indicatore di PICCO del display 

non si accenda o lo faccia solo brevemente, per evi-

tare distorsioni del segnale. Se necessario adeguare 

anche il livello di uscita del dispositivo di riproduzione.

INPUT GAIN RIGHT

Amplificazione in ingresso del canale destro

000 - 100

LIMITER

Attivare/Disattivare il limitatore di ingresso

ON = attivato (raccomandato)


OFF = disattivato

MODE

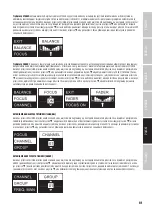
Impostare la modalità di funzionamento 

Mono/Stereo


La modalità di funzionamento selezionata 

viene visualizzata sul display del ricevitore (M 

= Mono, S = Stereo)

MONO = i segnali di ingresso sinistro e destro vengono riprodotti 

convertendoli in segnale mono. Trasferimento del segnale verso 

sinistra o destra sul ricevitore (BALANCE).  


STEREO = riproduzione del segnale di ingresso in stereo. Impostare 

il bilanciamento del ricevitore (BALANCE)


Attivare la modalità di funzionamento STEREO del trasmettitore 

anche quando si desidera utilizzare la modalità di funzionamento 

FOCUS del ricevitore portatile. 

EQ SETTINGS

BASS EQ

G: +/- 15 dB

Regolazione delle basse frequenze da - 15 dB a + 15 dB

f: 60 Hz / 80 Hz / 100 Hz / 

200 Hz

Impostazione della bassa frequenza

MIDDLE EQ

G: +/- 15 dB

Amplificazione delle medie frequenze da - 15 dB a + 15 dB

f: 500 Hz / 1000 Hz / 1500 Hz 

/ 2500 Hz

Impostazione della media frequenza

Q: 0,50 / 0,75 / 1,00 / 1,25

Impostazione del fattore di qualità

TREBLE EQ

G: +/- 15 dB

Amplificazione delle alte frequenze da - 15 dB a + 15 dB

f: 10,0 kHz / 12,5 kHz / 15,0 kHz 

/ 17,5 kHz

Impostazione dell'alta frequenza

EXIT EQ 

SETT.

Uscire dal menu equalizzatore (premere encoder)

EXIT AUDIO SETT.

Uscire dal sottomenu (premere encoder)

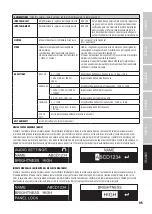
NOME UTENTE PERSONALE (NAME)

Premere l'encoder a rotazione/pressione del trasmettitore (MENU) per accedere al menu principale e, ruotando l'encoder, selezionare la voce 

di menu NAME (sfondo chiaro), quindi premere l'encoder per confermare. Inserire un nome personale (max. 8 caratteri) ruotando l'encoder per 

selezionare una lettera, il trattino basso o un numero per il primo carattere del nome, quindi premere l'encoder per confermare. Poi proseguire 

con l’immissione per il secondo posto ecc. Una volta completato il nome, premere nuovamente l'encoder per confermare. Premere brevemente (!) 

POWER per tornare direttamente alla schermata principale; dopo circa 12 secondi di inattività si apre automaticamente la schermata principale.

IMPOSTAZIONE DELLA LUMINOSITÀ DEL DISPLAY (BRIGHTNESS)

Premere l'encoder a rotazione/pressione del trasmettitore (MENU) per accedere al menu principale e, ruotando l'encoder, selezionare la voce di 

menu BRIGHTNESS (sfondo chiaro), quindi premere l'encoder per confermare. Selezionare uno dei 3 livelli di luminosità del display (HIGH = alta, 

MID = intermedia, LOW = bassa) ruotando l'encoder, quindi premere 2 volte l'encoder per confermare. Premere brevemente (!) POWER per tornare 

direttamente alla schermata principale; dopo circa 12 secondi di inattività si apre automaticamente la schermata principale.

95

DEUTSCH

FRANCAIS

ESPAÑOL

ENGLISH

ITALIANO

POLSKI

Содержание LDU5047IEM

Страница 1: ...USER S MANUAL BEDIENUNGSANLEITUNG MANUEL D UTILISATION MANUAL DE USUARIO INSTRUKCJA OBS UGI MANUALE D USO U500 IEM SERIES IN EAR MONITORING SYSTEM...

Страница 2: ...S PANNES 49 RECOMMANDATIONS POUR VITER LES PANNES 50 CARACT RISTIQUES TECHNIQUES 50 D CLARATIONS 53 ESPA OL INSTRUCCIONES DE SEGURIDAD 54 INTRODUCCI N 55 CONEXIONES ELEMENTOS DE MANEJO Y ELEMENTOS DE...

Страница 3: ...try During disposal of packaging please separate plastic and paper cardboard 22 Plastic bags must be kept out of reach of children 23 Please note that changes or modifications not expressly approved b...

Страница 4: ...nd prolonged exposure When in use this product is capable of producing high sound pressure levels SPL that can lead to irreversible hearing damage in performers employees and audience members For this...

Страница 5: ...ncy response 3 band EQ with parametric mids Switchable limiter Operation in stereo or mono mode Direct monitoring via headphone output on transmitter Bodypack with three stage switchable squelch 10 ho...

Страница 6: ...the MONO STEREO circuit and after INPUT GAIN LIMITER and EQUALIZER There is a high pass filter in the headphone output signal path 5 VOL Volume control for the integrated HEADPHONE output 6 Infrared i...

Страница 7: ...tem settings and changing values in the corresponding menu items To make the keys accessible for operation press the two markers on the sides of the battery compartment cover and pull it down from the...

Страница 8: ...both devices must match When putting the wireless transmission system into operation be sure to position the receiver in the direct line of sight of the transmitter MAIN DISPLAY After switching on th...

Страница 9: ...the encoder to select RF SETTINGS highlighted Press the encoder again to enter the sub menu and select the desired sub menu item by turning the encoder then confirm by pressing the encoder If you chan...

Страница 10: ...nu then turn the encoder to select AUDIO SETTINGS highlighted Press the encoder again to enter the sub menu and select the desired sub menu item by turning the encoder Confirm your entry by pressing t...

Страница 11: ...cally SET THE DISPLAY BRIGHTNESS BRIGHTNESS Press the transmitter s rotary push encoder MENU to enter the main menu then turn the encoder to select BRIGHTNESS highlighted and press the encoder to conf...

Страница 12: ...ress the encoder to confirm Now select the preset number you want to load by turning the encoder 01 10 confirm by pressing the encoder then se lect YES by turning the encoder and confirm by pressing t...

Страница 13: ...ransmitter The two channels left and right are mono summed In the receiver the mono signal can be shifted to the left or right in BALANCE Press SEL MENU for about 2 seconds to enter the main menu then...

Страница 14: ...EL select EXIT again by pressing SEL and press to confirm The main display will automatically appear after approximately 5 seconds of inactivity SET FREQUENCY GROUP GROUP Press SEL MENU for about 2 se...

Страница 15: ...5 seconds of inactivity SET DISPLAY BRIGHTNESS DISPLAY Press SEL MENU for about 2 seconds to enter the main menu then press SEL repeatedly to select DISPLAY highlighted and press to confirm Now selec...

Страница 16: ...transmitter Distortion and interference Receiver Reception is indicated by RF LED Remove possible sources of interference digital devices other radio systems Increase the level of noise reduction SQU...

Страница 17: ...control set to 38 stereo mode 18 dBu gain controls set to 90 TX Volume control set to 38 stereo mode 18 dBu gain controls set to 90 TX Volume control set to 38 stereo mode 18 dBu gain controls set to...

Страница 18: ...dB s 55 55 53 dB s 55 55 53 dB s Residual noise 5 5 uVrms a weighted 5 5 uVrms a weighted 5 5 uVrms a weighted 5 5 uVrms a weighted 5 5 uVrms a weighted Antenna connector Threaded connector Threaded c...

Страница 19: ...d contact either the retailer where they purchased this product or their local government office for details on where and how they can recycle this item in an environmentally friendly manner Business...

Страница 20: ...ungsgesetze Trennen Sie bei der Entsorgung der Verpackung bitte Kunststoff und Papier bzw Kartonagen voneinander 22 Kunststoffbeutel m ssen au er Reichweite von Kindern aufbewahrt werden 23 S mtliche...

Страница 21: ...Dauerbelastung Bei der Verwendung dieses Produkts k nnen hohe Schalldruckpegel SPL erzeugt werden die bei K nstlern Mitarbeitern und Zuschauern zu irreparablen Geh rsch den f hren k nnen Vermeiden Sie...

Страница 22: ...des individuellen Benutzenamens der Presetnummer und des Audiopegels f r den linken und rechten Eingangskanal in der Hauptanzeige Im Bearbeitungsmen werden die Men punkte die Untermen punkte und die e...

Страница 23: ...ANTENNE Senderantenne mit BNC Anschluss TASCHENEMPF NGER 12 ANTENNE Abnehmbare Antenne des Taschenempf ngers F r einen optimalen Empfang nicht verde cken oder knicken Achten Sie darauf dass die Antenn...

Страница 24: ...um die Lautst rke zu erh hen Drehen Sie den Regler gegen den Uhrzeigersinn um die Lautst rke zu verringern und ber den Rastpunkt um den Empf nger auszuschalten Halten Sie die Lautst rke stets auf ein...

Страница 25: ...Empf ngers in direkten Sichtkontakt zur Infrarot Schnittstelle des Senders Distanz ca 10 cm und schalten den Emp f nger ein Dr cken Sie nun auf den Dreh Dr ck Encoder des Senders MENU um in das Hauptm...

Страница 26: ...der und Empf nger in direktem Blickkontakt befinden und keine Hindernisse zwischen Sender und Empf nger den Funkbetrieb st ren k nnen Je nach Situation k nnen abweichende Einstellungen f r einen st ru...

Страница 27: ...Verst rkung der H henfrequenzen von 15 dB bis 15 dB f 10 0 kHz 12 5 kHz 15 0 kHz 17 5 kHz Einstellen der H henfrequenz EXIT EQ SETT Equalizer Men verlassen Encoder dr cken EXIT AUDIO SETT Untermen ver...

Страница 28: ...n durch Drehen des Encoders die Preset Nummer aus die Sie zum Speichern verwenden wollen 01 10 best tigen durch Dr cken auf den Encoder w hlen dann durch Drehen des Encoders YES aus und best tigen den...

Страница 29: ...LTNIS EINSTELLEN BALANCE FADER Betriebsart MONO Aktivieren Sie im Sender die Betriebsart MONO Die beiden Kan le links und rechts werden Mono summiert wiedergegeben Im Empf nger kann im Men punkt BALAN...

Страница 30: ...eder holtes Dr cken auf SEL den Men punkt EXIT aus und dr cken zum Best tigen auf Die Hauptanzeige wird nach circa 5 Sekunden Inaktivit t automatisch angezeigt FREQUENZGRUPPE EINSTELLEN GROUP Dr cken...

Страница 31: ...en Sie die Rauschsperre bei ausgeschaltetem Sender auf die niedrigste Einstellung ein bei der Nebenger usche noch wirksam unterdr ckt werden LOW MID HI In der Einstellung HI kann sich unter ung nstige...

Страница 32: ...reinstimmt berpr fen Sie die Sendeleistung Verringern Sie den Abstand zwischen Sender und Empf nger Stellen Sie sicher dass zwischen Sender und Empf nger eine direkte Sichtverbindung besteht Stellen S...

Страница 33: ...B 35 Hz 16000 Hz 35 Hz 16000 Hz 35 Hz 16000 Hz 35 Hz 16000 Hz 35 Hz 16000 Hz Klirrfaktor THD N bei 1 kHz 4 dBu Eingangssignal 0 3 0 3 0 3 0 3 0 3 Signal Rausch Verh ltnis bei 1 kHz A bewertet 93 dB 93...

Страница 34: ...tagekit Netzadapter BNC Antenne 19 Rack Mon tagekit Netzadapter BNC Antenne 19 Rack Mon tagekit Netzadapter BNC Antenne 19 Rack Mon tagekit Modellnummer LDU5047IEMR LDU5051IEMR LDU505IEMR LDU506IEMR L...

Страница 35: ...t 0 095 kg 0 095 kg 0 095 kg 0 095 kg 0 095 kg Zubeh r im Lieferumfang Antenne mit Gewinde 2 x AA Batterien Antenne mit Gewinde 2 x AA Batterien Antenne mit Gewinde 2 x AA Batterien Antenne mit Gewind...

Страница 36: ...erhalten Sie Informationen zu umweltfreundlichen Entsorgungsm glichkeiten ber den H ndler bei dem das Produkt erworben wurde oder ber die entsprechenden regionalen Beh rden Als gewerblicher Nutzer ko...

Страница 37: ...ent et d branchez sa prise secteur s il s agit d un appareil aliment Cet appareil ne doit tre r par que par un personnel autoris 20 Pour le nettoyage de l appareil utilisez un chiffon sec 21 Observez...

Страница 38: ...ciale de cet appareil est soumise aux r glementations et directives en vigueur dans votre pays en mati re de pr vention d accident En tant que fabricant Adam Hall est tenu de vous avertir formellement...

Страница 39: ...c e durant 1 seconde environ pour mettre l appareil en marche ou l arr ter Appuyez bri vement sur la touche pour acc der directement l cran principal depuis le menu d dition 2 CRAN OLED cran graphique...

Страница 40: ...l antenne de l metteur fournie 11 ANTENNE DE L METTEUR Antenne de l metteur avec connecteur BNC 12 13 15 14 R CEPTEUR DE POCHE 12 ANTENNE Antenne amovible du r cepteur de poche Pour une r ception opt...

Страница 41: ...ouveau vers la droite pour augmenter le volume Tournez le potentiom tre dans le sens inverse des aiguilles d une montre pour r duire le volume et au del du cran pour teindre le r cepteur Maintenez tou...

Страница 42: ...infrarouge du r cepteur en contact visuel direct vers l interface infrarouge de l metteur distance d environ 10 cm et allumez le r cepteur Appuyez ensuite sur l encodeur rotatif bouton poussoir de l m...

Страница 43: ...ommager les casques et couteurs connect s R GLAGES AUDIO AUDIO SETTINGS Appuyez sur l encodeur rotatif bouton poussoir de l metteur MENU pour acc der au menu principal puis tournez le pour s lectionne...

Страница 44: ...fr quences aigu s de 15 dB 15 dB f 10 0 kHz 12 5 kHz 15 0 kHz 17 5 kHz R glage de la fr quence aigu EXIT EQ SETT Quitter le menu de l galiseur appuyer sur l encodeur EXIT AUDIO SETT Quitter le sous m...

Страница 45: ...r Tournez ensuite l encodeur pour s lectionner le num ro de preset que vous souhaitez utiliser pour l enregistrement 01 10 appuyez sur l encodeur pour confirmer puis s lectionnez YES en tournant l enc...

Страница 46: ...it R GLAGE DE LA BALANCE OU DE LA R PARTITION DU VOLUME BALANCE FADER Mode MONO Activez le mode MONO sur l metteur Les deux canaux gauche et droit sont somm s en mono Sur le r cepteur le signal mono p...

Страница 47: ...enu EXIT en appuyant nouveau sur SEL plusieurs fois si n cessaire et appuyez sur pour confirmer L cran principal s affiche automatiquement au bout d environ 5 secondes d inactivit R GLAGE DU REGISTRE...

Страница 48: ...rsque l metteur est teint sur le niveau le plus bas permettant encore d liminer les cr pitements de mani re efficace LOW MID HI Dans des circonstances d favorables le niveau HI est susceptible de r du...

Страница 49: ...nt V rifiez si la fr quence radio de l metteur et du r cep teur est identique V rifiez la puissance d mission R duisez la distance entre l metteur et le r cepteur Assurez vous que l metteur et le r ce...

Страница 50: ...e mode st r o Niveau d entr e max 18 dBu r glages de gain d finis sur 90 r glage du volume TX d fini sur 38 mode st r o 18 dBu r glages de gain d finis sur 90 r glage du volume TX d fini sur 38 mode s...

Страница 51: ...e montage sur rack 19 Adaptateur secteur antenne BNC kit de montage sur rack 19 Adaptateur secteur antenne BNC kit de montage sur rack 19 Adaptateur secteur antenne BNC kit de montage sur rack 19 R f...

Страница 52: ...4 mm Poids 0 095 kg 0 095 kg 0 095 kg 0 095 kg 0 095 kg Accessoires inclus Antenne filet e 2 piles AA Antenne filet e 2 piles AA Antenne filet e 2 piles AA Antenne filet e 2 piles AA Antenne filet e 2...

Страница 53: ...urs non professionnels de contacter le revendeur chez qui ils ont achet le produit ou un repr sentant gouvernemental local pour plus de d tails sur le lieu de collecte et la fa on de recycler cet appa...

Страница 54: ...uir las normas vigentes en su pa s sobre reciclaje de desechos Separe los componentes de pl stico papel y cart n del paquete para reciclarlos en sus contenedores respectivos 22 No deje las bolsas de p...

Страница 55: ...olongada a un nivel SPL alto este equipo puede generar f cilmente un nivel de presi n sonora SPL lo suficientemente elevado como para causar da os auditivos permanentes a los artistas el personal de p...

Страница 56: ...rma breve para acceder directamente a la pantalla principal desde el men de edici n 2 PANTALLA OLED Pantalla gr fica OLED multifuncional que indica la frecuencia de transmisi n el grupo de frecuencia...

Страница 57: ...doblarla Tenga en cuenta que durante el funcionamiento la antena est unida fijamente al receptor apretar la rosca de la antena a mano sin herramientas 13 PANTALLA OLED Pantalla gr fica OLED multifunc...

Страница 58: ...nto de pilas Ahora vuelva a insertar la tapa del compartimento de pilas en la carcasa hasta que la tapa encaje en su sitio Si no va a usar el receptor durante largo tiempo extraiga las pilas para evit...

Страница 59: ...afectar al proceso de sincronizaci n CONFIGURACI N DE LA UNIDAD DE RADIO RF SETTINGS Pulse el mando giratorio y pulsable del transmisor MENU para acceder al men principal y g relo para seleccionar la...

Страница 60: ...eccionar la opci n de men AUDIO SETTINGS marcada en color claro Vuelva a pulsar el mando giratorio para acceder al submen y g relo para seleccionar la opci n de submen de seada Confirme su selecci n p...

Страница 61: ...te AJUSTE DEL BRILLO DE PANTALLA BRIGHTNESS Pulse el mando giratorio y pulsable del transmisor MENU para acceder al men principal y g relo para seleccionar la opci n de men BRIGHTNESS marcada en color...

Страница 62: ...de nuevo para confirmar Ahora gire el mando giratorio para seleccionar el n mero de preset que quiere cargar 01 10 pulse el mando giratorio para confirmar g relo para seleccionar YES y p lselo dos vec...

Страница 63: ...En el receptor se puede desplazar la se al mono a izquierda o derecha en la opci n de men BALANCE Pulse el bot n SEL MENU unos 2 segundos para acceder al men principal A continuaci n pulse varias vece...

Страница 64: ...i n de men EXIT volviendo a pulsar SEL las veces necesarias y pulse para confirmar La pantalla principal aparece autom ticamente tras unos 5 segundos de inactividad AJUSTE DEL GRUPO DE FRECUENCIA GROU...

Страница 65: ...de inactividad AJUSTE DEL BRILLO DE PANTALLA DISPLAY Pulse el bot n SEL MENU unos 2 segundos para acceder al men principal A continuaci n pulse varias veces SEL para seleccionar la opci n de men DISP...

Страница 66: ...or Distorsiones e interfer encias Receptor El LED RF indica la recepci n Elimine la posible fuente de interferencias equipos digitales otros sistemas inal mbricos Aumente la intensidad de la supresi n...

Страница 67: ...o 9 dBu todos los controles de ganancia al m ximo modo est reo M x nivel de entrada 18 dBu controles de ganancia ajustados a 90 control de volumen TX ajustado a 38 modo est reo 18 dBu controles de gan...

Страница 68: ...470 490 MHz 514 542 MHz 584 608 MHz 655 679 MHz 823 832 MHz 863 865 MHz Grupos de radiofrecuencia 1 1 10 10 8 Canales de radiofrecuencia 12 12 12 12 12 Salida de auriculares Jack est reo de 3 5 mm Jac...

Страница 69: ...aja se al de 500 Hz a trav s del jack de los auriculares Indicaci n adicional de bater a baja se al de 500 Hz a trav s del jack de los auriculares Indicaci n adicional de bater a baja se al de 500 Hz...

Страница 70: ...ible de los componentes de este equipo Si es un particular p ngase en contacto con el distribuidor donde adquiri este producto o con el ayuntamiento para informarse sobre el reciclaje adecuado de este...

Страница 71: ...aw takiego urz dzenia mo e wykona tylko autoryzowany personel specjalistyczny 20 Do czyszczenia urz dzenia stosowa such ciereczk 21 Przestrzega obowi zuj cych w danym kraju przepis w dotycz cych usuwa...

Страница 72: ...cent zobowi zana do wyra nego informowania o potencjalnym zagro eniu dla zdrowia Utrata s uchu w wyniku wysokiego poziomu g o no ci i d ugotrwa ego nara enia podczas stosowania tego produktu mo e pows...

Страница 73: ...zej bezpo rednio z menu edycyjnego do ekranu g wnego 2 OLED DISPLAY Wielofunkcyjny wy wietlacz graficzny OLED do prezentacji cz stotliwo ci nadawania grupy i kana u cz stotliwo ci indywidualnej nazwy...

Страница 74: ...DAWCZA Antena nadawcza ze z czem BNC 12 13 15 14 KIESZONKOWY ODBIORNIK 12 ANTENA Zdejmowana antena odbiornika kieszonkowego Dla zapewnienia optymalnego odbioru nie zakrywa ani nie zgina anteny Upewni...

Страница 75: ...wo przez punkt zatrzaskowy aby w czy odbiornik Dalsze obracanie w prawo spowoduje zwi kszenie g o no ci Obr ci pokr t o w lewo aby zmnie jszy g o no Dalsze obr cenie przez punkt zatrzaskowy spowoduje...

Страница 76: ...RUN Aby zsynchronizowa odbiornik kieszonkowy z cz stotliwo ci radiow ustawion w nadajniku i nazw u ytkownika nale y wprowadzi interfejs podczerwieni odbiornika w bezpo redni kontakt z interfejsem pod...

Страница 77: ...mo e spowodowa uszkodzenie s uchu oraz pod czonych s uchawek USTAWIENIA AUDIO AUDIO SETTINGS Nacisn pokr t o enkodera nadajnika MENU aby przej do menu g wnego a nast pnie obracaj c pokr t o wybra pozy...

Страница 78: ...2500 Hz Ustawianie rednich cz stotliwo ci Q 0 50 0 75 1 00 1 25 Ustawienie wsp czynnika jako ci TREBLE EQ G 15 dB Wzmocnienie rednich cz stotliwo ci z 15 dB do 15 dB f 10 0 kHz 12 5 kHz 15 0 kHz 17 5...

Страница 79: ...ia Nale y wybra numer zestawu ustawie wst pnych kt re maj by zapisane obracaj c pokr t o 01 10 potwierdzi naciskaj c pokr t o a nast pnie wybra YES tak obracaj c pokr t o i naciskaj c je dwa razy aby...

Страница 80: ...rto szczytowa Peak PK Kana prawy USTAWIANIE BALANSU LUB STOSUNKU G O NO CI BALANCE FADER Tryb pracy MONO Aktywowa w nadajniku tryb pracy MONO Oba kana y lewy i prawy s sumowane do sygna u monofoniczne...

Страница 81: ...T naciskaj c ponownie przycisk SEL oraz nacisn przycisk aby potwierdzi Ekran g wny pojawi si automatycznie po oko o 5 sekundach bezczynno ci USTAWIANIE GRUPY CZ STOTLIWO CI GROUP Naciska przycisk SEL...

Страница 82: ...chawek Ustawi t umienie szum w gdy nadajnik jest wy czony na najni sz warto aby ha as otoczenia by nadal skutecznie t umiony LOW MID HI Przy ustawieniu HI zasi g trans misji mo e zosta zmniejszony w n...

Страница 83: ...czy cz stotliwo nadajnika i odbiornika jest zgodna Sprawdzi moc nadawania Zmniejszy odleg o mi dzy nadajnikiem a odbiornikiem Upewni si e nadajnik jest skierowany bezpo rednio na odbiornik Upewni si...

Страница 84: ...9 dBu wszyst kie regulatory wzmocnienia na maks wart tryb stereo 9 dBu wszyst kie regulatory wzmocnienia na maks wart tryb stereo Maks poziom wej cia 18dBu regulatory wzmocnienia na 90 poziom g o no c...

Страница 85: ...19 Zasilacz antena BNC zestaw monta owy do stela a 19 Numer modelu LDU5047IEMR LDU5051IEMR LDU505IEMR LDU506IEMR LDU508IEMR Typ produktu S uchawki douszne w systemach monitorowania S uchawki douszne w...

Страница 86: ...095 kg 0 095 kg 0 095 kg 0 095 kg Do czone akcesoria Antena gwintowana 2 x baterie AA Antena gwintowana 2 x baterie AA Antena gwintowana 2 x baterie AA Antena gwintowana 2 x baterie AA Antena gwintowa...

Страница 87: ...kt regoproduktzosta zakupiony lubwodpowiednichplac wkachregionalnych U ytkownicyb d cyprzedsi biorcamiproszenis okontaktzeswoimi dostawcamiiewentualnesprawdzenieuzgodnionychumowniewarunk wutylizacjiu...

Страница 88: ...0 Per la pulizia del dispositivo utilizzare un panno pulito 21 Rispettare le leggi sullo smaltimento in vigore nel Paese di installazione Al momento di smaltire l imballo separare la plastica dalla ca...

Страница 89: ...li utenti degli eventuali rischi per la salute Danni all udito provocati da un esposizione prolungata a un livello sonoro elevato l utilizzo di questo prodotto pu generare elevati livelli di pressione...

Страница 90: ...remuto il tasto per circa 1 secondo Premere brevemente il tasto per passare direttamente dal menu operativo alla schermata principale 2 OLED DISPLAY Display grafico OLED multifunzione per la visualizz...

Страница 91: ...ntenna del trasmettitore in dotazione 11 ANTENNA DEL TRASMETTITORE Antenna del trasmettitore con collegamento BNC 12 13 15 14 RICEVITORE PORTATILE 12 ANTENNA Antenna rimovibile del ricevitore tascabil...

Страница 92: ...ricev itore e ruotarlo verso destra per alzare il volume Ruotare il regolatore in senso antiorario per ridurre il volume e fino a sentire un clic per spegnere il ricevitore Mantenere sempre il volume...

Страница 93: ...adiofrequenza impostata nel trasmettitore e il nome utente personale orientare l interfaccia a infrarossi del ricevitore verso quella del trasmettitore distanza circa 10 cm e accendere il ricevitore P...

Страница 94: ...re possono generarsi dei rumori di fondo alti che in certi casi possono danneggiare l udito e le cuffie o gli auricolari collegati IMPOSTAZIONI AUDIO AUDIO SETTINGS Premere l encoder a rotazione press...

Страница 95: ...ostazione della media frequenza Q 0 50 0 75 1 00 1 25 Impostazione del fattore di qualit TREBLE EQ G 15 dB Amplificazione delle alte frequenze da 15 dB a 15 dB f 10 0 kHz 12 5 kHz 15 0 kHz 17 5 kHz Im...

Страница 96: ...r per confermare Selezionare il numero di preset che si desidera salvare 01 10 ruotando l encoder quindi confermare premendo l encoder selezionare YES ruotando l encoder e confermare la procedura prem...

Страница 97: ...MPOSTAZIONE DEL BILANCIAMENTO O DEL RAPPORTO DEL VOLUME BALANCE FADER Modalit di funzionamento MONO attivare la modalit di funzionamento MONO sul trasmettitore I due canali sinistro e destro vengono r...

Страница 98: ...mendo di nuovo se necessario ripetutamente SEL e premere per confermare Dopo circa 5 secondi di inattivit la schermata principale comparir in automatico IMPOSTAZIONE DEL GRUPPO DI FREQUENZA GROUP Prem...

Страница 99: ...colari collegati A trasmettitore spento impostare il filtro di soppressione del rumore al livello pi basso possibile per sopprimere con maggiore efficacia i rumori di fondo LOW MID HI Se l impostazion...

Страница 100: ...e ricevitore Controllare la potenza di trasmissione Ridurre la distanza tra trasmettitore e ricevitore Assicurarsi che tra trasmettitore e ricevitore siano rivolti l uno verso l altro direttamente As...

Страница 101: ...trolli del guadagno full modalit stereo Max livello input 18 dBu controlli del guadagno impostati su 90 controllo del volume TX impostato su 38 modalit stereo 18 dBu controlli del guadagno impostati s...

Страница 102: ...tatore di alimentazione antenna BNC set di montaggio su rack da 19 Adattatore di alimentazione antenna BNC set di montaggio su rack da 19 Adattatore di alimentazione antenna BNC set di montaggio su ra...

Страница 103: ...so 0 095 kg 0 095 kg 0 095 kg 0 095 kg 0 095 kg Accessori inclusi Antenna filettata 2 batterie AA Antenna filettata 2 batterie AA Antenna filettata 2 batterie AA Antenna filettata 2 batterie AA Antenn...

Страница 104: ...ienti privati possono richiedere informazioni sulle possibilit di smaltimento ecosostenibile al rivenditore presso il quale stato acquistato il prodotto o presso le autorit regionali competenti I clie...

Страница 105: ......

Страница 106: ......

Страница 107: ......

Страница 108: ...Adam Hall GmbH Adam Hall Str 1 61267 Neu Anspach Germany Phone 49 6081 9419 0 adamhall com LD SYSTEMS COM REV 01...

Отзывы: