8
DEUTSCH
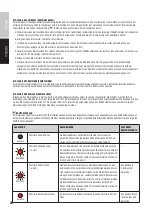
DIP SWITCH 2 SW RESET (SOFTWARE RESET)
In order to completely restore the factory settings and to avoid volume jumps after the start-up process, set all DIP switches of the device to the OFF
position, the 3-way switch for setting the channel mode to ST (stereo) and turn level controls CH1 to CH4 fully counter-clockwise
-∞
before starting
the software reset. Then carry out the software reset step by step:
A. Activate the standby mode of the device (press standby button no. 16) and wait until the STANDBY indicator LED lights up red continuously.
Then switch the device off (switch number 3 on the back of the device) and wait until the LED display goes out completely.
B. Move the DIP switch 2 SW RESET to the ON position.
C. Switch the device on again and wait until the standby LED on the front is permanently white (to abort the
reset process now move DIP switch 2 SW RESET to the OFF position).
D. Activate the standby mode of the device and wait until the STANDBY indicator LED lights up red continuously.
Then switch the device off and wait until the LED display goes out completely.
E. Move DIP switch 2 SW RESET to the OFF position.
F. Switch the device on; the software is now reset. During the reset process, the device is started fully and then shutdown again.
The device is then restarted. During the restart, the successful reset is reported such that
display fields SIG and BRIDGE on the front of the device light up briefly one after the other.
Do not switch off the amplifier during the phase under point F and do not change any settings!
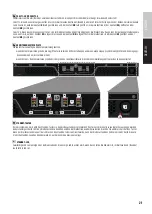
DIP SWITCH 3 REM MODE (REMOTE MODE)
DIP switch 3 REM MODE is reserved for the integration of future LD Systems remote bus accessories. More detailed information can be found in the
user manual of the additional remote bus accessories. The DIP switch currently has no function.
DIP SWITCH 4 REM LOCK (REMOTE LOCK)
Move DIP switch 4 to the ON position to lock all of the device’s control elements (level control, DIP switch, switch for channel mode and STANDBY
button), the REM LOCK LED display permanently lights up. To unlock the control elements, move the DIP switch to the OFF position. The display LED
goes out, provided that no changes have been made to the control elements on the back or value changes have been made using the Ethernet
control.
14
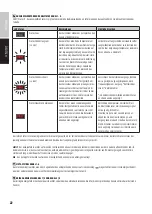
REMOTE LOCK LED
The extended access to all internal DSP settings and the analog input amplification can take place independently of the control elements on the
back using an optionally available Ethernet expansion card. The following operating states are reported by the LED REMOTE LOCK display:
LED STATUS
DESCRIPTION
LOCKED
CONTROL
ELEMENTS
REM LOCK
REM LOCK permanently off
The control elements on the back are not locked and no changes
have been made to the DSP settings using the Ethernet control.
/
REM LOCK
REM LOCK blinks slowly
(approx. 2 Hz)
The DSP settings are changed using the Ethernet control. The setting
changes cannot be undone using the control elements on the back.
In order to end this state, perform a software reset (see point 13,
DIP switch 2).
/
REM LOCK
REM LOCK blinks quickly
(approx. 8Hz)
During the Remote Lock ON state, changes were made to the control
elements on the back or volume-relevant settings were changed
using the Ethernet control. In order to avoid volume jumps when
deactivating the Remote Lock function (Remote Lock OFF), the
control elements on the back remain locked. In order to terminate
this state, perform a software reset (see point 13, DIP switch 2).
All control
elements
on the back
REM LOCK
REM LOCK permanently lit
The remote lock function is activated (see point 13, DIP switch 4 ON).
All control
elements on the
front and back
Содержание IPA 412 T
Страница 27: ......


