Lavry Latency Killer LK-SOLO Скачать руководство пользователя страница 10

Setup and Use 


10 

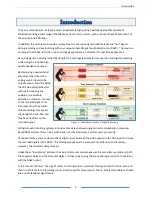
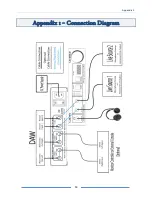
The LK-Solo has two front panel inputs for recording source connection: 

CH1/MONO

 and 

CH2

The 

CH1/MONO Input

 can serve as a MONO input when only one source is to be recorded. When there is 

nothing plugged into the front panel 

CH2

 input, the signal is routed from the 

CH1/MONO

 input to both the 

CH1

 and 

CH2 

inputs.  Due to the direct connection between the front and rear panel jacks, when a mono 

signal is routed to both 

CH1

 and 

CH2

 inputs, the same signal will appear on both 

CH1

 and 

CH2

 outputs. 

PANNING 

The source signal or signals in the headphone mix are automatically distributed in the following manner: 

1.) When only one source is connected to the front panel 

CH1/MONO 

input, the signal is routed to 

CH1

 and 

CH2

, resulting in the signal appearing in the headphone mix with CENTER panning when the Volume is 

adjusted using the 

CH1+2 

setting.  

2.) When either two separate sources or one stereo source are connected to the front panel 

CH1/MONO

 and 

CH2

 inputs, the CH1 signal will appear in the headphone mix with LEFT panning and the CH2 signal will 

appear with RIGHT panning. With individual sources, the individual 

CH1

 and 

CH2

 settings would typically be 

used to control the Volume. For stereo sources, the 

CH1+2

 setting allows easy adjustment of both channels 

at the same time. 

1.


First, complete all steps listed in the section titled 

Setup for Playback Listening 

included 

previously in this chapter of the manual. 

2.


Select 

CH1+CH2

, and lower the Volume to zero. 

3.


Connect live signal source to 

CH1 Input/ Mono Input

4.


Connect 

CH1 Output

 to the analog record input of your DAW. Use balanced cables


for balanced 

signals or unbalanced cables for unbalanced signals. 

5.


Raise the Volume of 

CH1+2 

to the optimal level. 


CH1+2, CH1

, and 

CH2

 are three completely independent Volume settings.  Changing the Volume of 

CH1


or 

CH2

 does not affect the Volume of 

CH1+2

, or vice versa.  By selecting either 

CH1

 or 

CH2

 and rotating 

the knob, the unit will suddenly switch to stereo mode Volume settings.  If 

CH1

 or 

CH2

 are set to a much 

higher Volume setting than 

CH1+2

, a sudden increase in loudness will be heard, and damage to 

hearing/headphones may result.  To prevent damage in case of accidentally switching to stereo mode, it 
is highly recommended to make sure that 

CH1

 and 

CH2

 are both muted during setup. 

Содержание Latency Killer LK-SOLO

Страница 1: ...With Latency Killer TM Technology Model LK Solo HP Amp 2x2 Loop Thru Mixer ...

Страница 2: ...2 Lavry Engineering Inc P O Box 4602 Rolling Bay WA 98061 www lavryengineering com February 12 2014 Rev 1 0 ...

Страница 3: ...e may result in damage to the unit There are no user serviceable parts inside AVOID HEARING HEADPHONE DAMAGE It is strongly recommended that you REDUCE THE VOLUME TO A LOW LEVEL BEFORE CONNECTING YOUR HEADPHONES This is especially important for headphones designed for portable battery powered devices including ear buds Failure to do so can result in DAMAGE TO THE HEADPHONES and possible HEARING DA...

Страница 4: ...ROL 10 PANNING 10 Setup for Mono Recording 10 Setup for Recording Two Sources 11 Setup for Stereo Recording 11 Recording with the LK Solo 12 Input Monitoring In Record 12 Specifications 13 Input Signals 13 Output Signals 13 Headphone Output 13 AC Power 13 Physical 13 Appendix 1 Connection Diagram 14 Limited Warranty Lavry LK Solo 15 ...

Страница 5: ...loration or noise to the recorded signal This also means that the LK Solo Volume settings only impact the headphone Cue Mix and thus have no effect on the recorded signal All digital audio recording systems introduce time delay between signal arrival and playback In computer based DAW systems this can be a combination of converter delay and computer processing To reduce latency some systems utiliz...

Страница 6: ...sists of 2 pushbuttons one column of LEDs one rotary knob and a numerical LED display Figure 2 Front Panel Layout 1 Headphone Output 2 CH1 Mono Input 3 CH2 Input 4 Selection Indicator LEDs 5 Select Button 6 Resolution Button 7 Volume Level Display dB 8 Rotary Encoder Volume Control Knob HEADPHONE OUTPUT This headphone output works with a wide range of headphones The unit provides protection agains...

Страница 7: ...e adjustment step size of the Rotary Knob between 3dB and dB VOLUME DISPLAY This 3 digit display reads out the relative Volume level dB of the current selection The minimum level is 00 0 and the signal is Muted The maximum level is 66 0 ROTARY ENCODER VOLUME CONTROL KNOB Rotation of the Rotary Knob adjusts the Volume of the selected signal in the Headphone Cue mix as indicated by the Volume Displa...

Страница 8: ... stereo source STEREO OUTPUT RIGHT This output is hardwired to Stereo Input Right allowing an unbroken connection from the right analog output of the DAW to the destination i e monitor controller mixer etc CH1 OUTPUT This output is hardwired to the CH1 Mono Input on the front panel allowing an unbroken connection from the CH1 Mono Source to the analog input of the DAW CH2 OUTPUT This output is har...

Страница 9: ...l Adding External Monitoring Connect the Stereo Output Left and Stereo Output Right of the LK Solo to a monitor system This signal is not affected by the LK Solo Volume settings and is the same un attenuated level as the DAW main stereo output The LK Solo must be powered on when the system that it is connected to is in use Distortion may result to signals passing through the LK Solo when it is not...

Страница 10: ... CH2 signal will appear with RIGHT panning With individual sources the individual CH1 and CH2 settings would typically be used to control the Volume For stereo sources the CH1 2 setting allows easy adjustment of both channels at the same time 1 First complete all steps listed in the section titled Setup for Playback Listening included previously in this chapter of the manual 2 Select CH1 CH2 and l...

Страница 11: ...Select CH1 2 and raise the Volume to the optimal level CH1 2 CH1 and CH2 are three completely independent Volume settings Changing the Volume of CH1 or CH2 does not affect the Volume of CH1 2 or vice versa By selecting either CH1 or CH2 and rotating the knob the unit will suddenly switch to stereo mode Volume settings If CH1 or CH2 are set to a much higher Volume setting than CH1 2 a sudden increa...

Страница 12: ...rd In this case a second track can be used as the record track with the fader all the way down or the mute enabled After recording time locking the newly recorded segment allows it to be moved to the playback channel before the next take For more information please visit the following URL http lavryengineering com pdfs lavry working with protools and the lavry latency killer pdf Cakewalk Turn off ...

Страница 13: ...igned for a maximum output level of 18 dBu An appropriate adapter can be used to connect headphones with a 1 8 mini plug The unit automatically adjusts to power inputs in the range of 83 265VAC 47 63Hertz No change of settings is necessary Dimensions 8 W x 1 75 H x 10 75 D front panel to rear panel connectors front panel knob adds 5 8 An optional Rack Mount Kit is available which can be used to mo...

Страница 14: ...Appendix 1 14 Appendix 1 Connection Diagram ...

Страница 15: ...similar businesses This limited warranty gives you specific legal rights You may have others which vary from state jurisdiction to state jurisdiction LIMITS AND EXCLUSIONS LAVRY ENGINEERING DOES NOT BY VIRTUE OF THIS AGREEMENT OR BY ANY COURSE OF PERFORMANCE COURSE OF DEALING OR USAGE OF TRADE MAKE ANY OTHER WARRANTIES EXPRESS OR IMPLIED INCLUDING WITHOUT LIMITATION ANY WARRANTY OF MERCHANTABILITY...

Отзывы: