


Manual: RTI Nano Rainbow Series
page 3 / 25
Content:
1.
Product and package contents
2.
Preliminary warning notices
3.
Steps for setup, safety instructions
4.
Safety instructions for work on the device
5.
Service notes
6.
Warnings and other notices on the device
7.
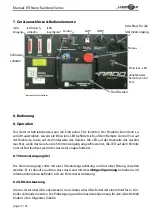
Device connections
8.
Operation
9.
Remote Control Pad
10.
Cleaning
Final statement
Technical data sheet
Laser specifications


