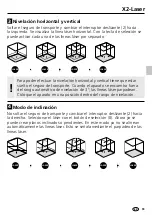
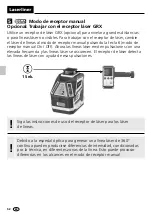
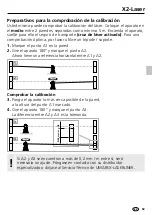
background image

50

ES

1

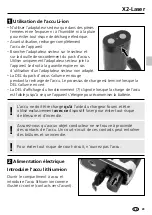
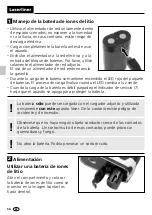
Manejo de la batería de iones de litio

–  Utilizar el alimentador de red únicamente dentro 

de espacios cerrados; no exponer a la humedad 

ni a la lluvia, en caso contrario, existe riesgo de 

descarga eléctrica.

–  Cargar completamente la batería antes de usar 

el aparato.

–  Enchufar el alimentador a la red eléctrica y a la 

entrada del bloque de baterías. Por favor, utilice 

solamente el alimentador de red adjunto.  

El uso de un alimentador de red erróneo anula 

la garantía.

–  Durante la carga de la batería se mantiene encendido el LED rojo del paquete 

de baterías. El proceso de carga finaliza cuando el LED cambia a luz verde.

–  Cuando la carga de la batería es débil parpadea el indicador de servicio (7) 

hasta que el aparato se apaga para proteger la batería.

2

Abrir el compartimento y colocar 

la batería de iones de litio como se 

muestra en la imagen (contactos 

hacia dentro).

Utilizar una batería de iones 

de litio

Alimentación

No abra la batería. Podría provocar un cortocircuito.

!

Obsérvese que no haya ningún objeto conductor cerca de los contactos 

de la batería. Un cortocircuito de esos contactos puede provocar 

quemaduras y fuego.

!

 La  batería 

sólo

 puede ser cargada con el cargador adjunto y utilizada 

únicamente 

con este

 aparato láser. De lo contario existe peligro de 

accidente y de incendio.

!

Содержание F031.550L

Страница 1: ...X2 Laser 1H360 2V 1P S DE 02 EN 11 NL 20 DA 29 FR 38 ES 47 IT 56 PL FI PT SV NO TR RU UK CS ET RO BG EL Laser 515nm...

Страница 2: ...ungsanleitung das beiliegende Heft Garantie und Zusatzhinweise sowie die aktuellen Informationen und Hinweise im Internet Link am Ende dieser Anleitung vollst ndig durch Befolgen Sie die darin enthalt...

Страница 3: ...optischen Ger ten Lupe Mikroskop Fernglas Verwenden Sie den Laser nicht auf Augenh he 1 40 1 90 m Gut reflektierende spiegelnde oder gl nzende Fl chen sind w hrend des Betriebes von Lasereinrichtungen...

Страница 4: ...nde Unterseite LED Handempf ngermodus Handempf ngermodus LED Betriebsanzeige Batterieladung Wahltaste Laserlinien Laseraustrittsfenster Lotlaser 5 7 Gr ne Lasertechnologie Ger te mit der Technologie P...

Страница 5: ...rot Der Ladevorgang ist abgeschlossen wenn die LED gr n leuchtet Bei schwacher Ladung des Akkus blinkt die Betriebsanzeige 7 bis sich das Ger t zur Schonung des Akkus abschaltet 2 Das Akkufach ffnen u...

Страница 6: ...sicherung l sen Schiebeschalter 2 nach links schieben Die horizontale Laserlinie erscheint Mit der Wahltaste k nnen die Laserlinien einzeln geschaltet werden 3 Neigungsmodus Die Transportsicherung nic...

Страница 7: ...serempf ngers f r Linienlaser Handempf ngermodus Optional Arbeiten mit dem Laserempf nger GRX Verwenden Sie zum Nivellieren auf gro e Entfernungen oder bei nicht mehr sichtbaren Laserlinien einen Lase...

Страница 8: ...auf der Wand 2 Drehen Sie das Ger t um 180 u markieren Sie Punkt A2 Zwischen A1 u A2 haben Sie jetzt eine horizontale Referenz Kalibrierung berpr fen 3 Stellen Sie das Ger t so nah wie m glich an die...

Страница 9: ...n Ger t einschalten und den vertikalen Laser auf die Lotschnur richten Die Genauigkeit liegt innerhalb der Toleranz wenn die Abweichung zwischen Laserlinie und Lotschnur nicht gr er als 1 mm betr gt b...

Страница 10: ...igkeit 0 2 mm m Nivellierung automatisch Sichtbarkeit typisch 60 m Arbeitsbereich mit Handempf nger von technisch bedingtem Helligkeitsunterschied abh ngig 60 m Laserwellenl nge 515 nm Laserwellenl ng...

Страница 11: ...the operating instructions the Warranty and Additional Information booklet as well as the latest information under the internet link at the end of these instructions Follow the instructions they conta...

Страница 12: ...fying glass microscope binoculars be used to look at the laser beam or reflections Do not use the laser at eye level 1 40 1 90 m Reflective specular or shiny surfaces must be covered whilst laser devi...

Страница 13: ...1 4 5 8 tripod threads bottom LED hand receiver mode Hand receiver mode LED status indicator Battery charge Laser line selection button Laser emitting window reference beam 5 7 3 4 1 2 a b Devices wi...

Страница 14: ...tery is charging When the LED changes to green charging is complete The status indicator 7 flashes if the battery charge is low until the device shuts down to protect the battery 2 Open the battery co...

Страница 15: ...rt restraint push the slide switch 2 to the left The horizontal laser line appears The laser lines can be switched individually with the selection button 3 Slope mode Do not release the transport rest...

Страница 16: ...ons for line lasers Hand receiver mode Optional Working with the laser receiver GRX Use an GRX laser receiver optional to carry out levelling at great distances or when the laser lines are no longer v...

Страница 17: ...ice is mounted on a tripod 1 Mark point A1 on the wall 2 Turn the device through 180 and mark point A2 You now have a horizontal reference between points A1 and A2 Performing the calibration check 3 P...

Страница 18: ...ng freely Switch on the device and align the vertical laser to the plumb line The precision is within the specified tolerance if the deviation between the laser line and the plumb line is not greater...

Страница 19: ...curacy 0 2 mm m Levelling auto Visibility typical 60 m Working range with hand receiver depends on how the technology affects the difference in brightness 60 m Laser wavelength 515 nm Plumb laser wave...

Страница 20: ...de bijgevoegde brochure Garantie en aanvullende aanwijzingen evenals de actuele informatie en aanwijzingen in de internet link aan het einde van deze handleiding volledig door Volg de daarin beschrev...

Страница 21: ...kijker Gebruik de laser niet op ooghoogte 1 40 1 90 m Goed reflecterende spiegelende of glanzende oppervlakken moeten tijdens het gebruik van laserinrichtingen worden afgedekt In openbare verkeersbere...

Страница 22: ...e 1 4 5 8 schroefdraad onderzijde LED handontvangermodus Handontvangermodus LED bedrijfsindicator Batterijlading Keuzetoets laserlijnen Laseruitlaat referentiestraal 5 7 3 4 1 2 a b Apparaten met de t...

Страница 23: ...ck rood Het laadproces is afgesloten wanneer de LED groen brandt Bij een lage spanning van de accu knippert het indicatielampje 7 totdat het apparaat uitschakelt om de accu te sparen 2 Open het accuva...

Страница 24: ...beveiliging en schuif de schuifschakelaar 2 naar links De horizontale laserlijn verschijnt Met behulp van de keuzetoets kunnen de laserlijnen afzonderlijk worden geschakeld 3 Neigingsmodus Laat de tra...

Страница 25: ...e laserontvanger voor lijnlasers in acht Handontvangermodus Optioneel Werken met de laserontvanger GRX Gebruik een laserontvanger GRX optioneel voor het nivelleren op grote afstanden of in geval van n...

Страница 26: ...stel 180 om en markeer het punt A2 Tussen A1 en A2 hebt u nu een horizontale referentie Kalibratie controleren 3 Plaats het toestel zo dicht mogelijk tegen de wand ter hoogte van punt A1 4 Draai het t...

Страница 27: ...apparaat instellen in de verticale positie en wanneer u de draad nadert mag het verschil niet meer zijn dan 1 mm In dat geval blijft u binnen de gestelde tolerantie Controleer regelmatig de kalibrati...

Страница 28: ...keurigheid 0 2 mm m Nivellierung automatisch Zichtbaarheid karakteristiek 60 m Werkbereik met handontvanger afhankelijk van de helderheids verschillen om technische redenen 60 m Lasergolflengte 515 nm...

Страница 29: ...ngsvejledningen det vedlagte h fte Garanti og supplerende anvisninger samt de aktuelle oplysninger og henvisninger p internet linket i slutning af denne vejledning fuldst ndigt igennem F lg de heri in...

Страница 30: ...m aldrig betragtes gennem optisk udstyr lup mikroskop kikkert Undlad at anvende laseren i jenh jde 1 40 1 90 m Godt reflekterende spejlende eller skinnende overflader skal tild kkes s l nge der bruges...

Страница 31: ...tterirum underside 1 4 5 8 gevindb sning underside LED h ndmodtagermodus H ndmodtagermodus LED str mindikator Batteriladning Tast til valg af laserlinje Laserudgangsvindue referencestr le 5 7 3 4 1 2...

Страница 32: ...t Ladeprocessen er afsluttet n r LED en lyser gr nt N r batteriladningen er svag blinker driftsindikatoren 7 til apparatet frakobles for at sk ne batteriet 2 bn batterirummet og is t lithium ion batte...

Страница 33: ...L sn transportsikringen og skub skydekontakten 2 til venstre Den horisontale laserlinje viser sig Med valgtasten kan man aktivere laserlinjerne enkeltvis 3 H ldningsfunktion Undlad at l sne transports...

Страница 34: ...lasere H ndmodtagermodus Ekstraudstyr Arbejdet med lasermodtageren GRX Brug af laser modtager GRX ekstraudstyr til at udf re nivellering over store afstande eller n r laserlinjer ikke l ngere er synl...

Страница 35: ...en 2 Drej laseren n jagtig 180 og marker laserplanet A2 p den modst ende v g Da laseren er placeret n jagtig midt mellem de 2 v gge vil markeringerne A1 og A2 v re n jagtig vandret overfor hinanden Ko...

Страница 36: ...h nger frit Den lodrette laserstr le t ndes laseren sigtes ind s den lodrette laserstr le flugter med snoren og det kontrolleres at linien ikke afviger mere end 1 mm fra snoren Kontroll r regelm ssigt...

Страница 37: ...tighed 0 2 mm m Nivellering automatisk Sigtbarhed typisk 60 m Arbejdsomr de med h ndmodtager afh ngig af teknisk relateret lysstyrkeforskel 60 m Laserb lgel ngde 515 nm Laserb lgel ngde lodlaserens 65...

Страница 38: ...ez enti rement le mode d emploi le carnet ci joint Remarques suppl mentaires et concernant la garantie et les renseignements et consignes pr sent s sur le lien Internet pr cis la fin de ces instructio...

Страница 39: ...ser hauteur des yeux entre 1 40 et 1 90 m Couvrir les surfaces brillantes sp culaires et bien r fl chissantes pendant le fonctionnement des dispositifs laser Lors de travaux sur la voie publique limit...

Страница 40: ...5 8 partie inf rieure DEL mode r cepteur manuel Mode r cepteur manuel Diode DEL temoin d utilisation Charge de la pile Touche de s lection des lignes laser Fen tre de sortie du rayon de r f rence 5 7...

Страница 41: ...accu Le processus de charge est termin lorsque la DEL s allume en vert La DEL d affichage du fonctionnement 7 clignote lorsque la charge de l accu est faible jusqu ce que l appareil s teigne pour con...

Страница 42: ...terrupteur coulisse 2 sur ON MARCHE La ligne laser horizontale appara t La touche de s lection permet d activer s par ment les lignes laser 3 Mode d inclinaison Ne pas d gager le blocage de transport...

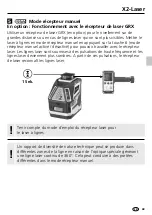
Страница 43: ...En option Fonctionnement avec le r cepteur de laser GRX Utiliser un r cepteur de laser GRX en option pour le nivellement sur de grandes distances ou en cas de lignes laser qui ne sont plus visibles Me...

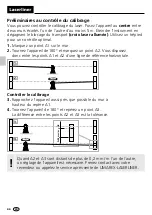
Страница 44: ...nt A1 sur le mur 2 Tournez l appareil de 180 et marquez un point A2 Vous disposez donc entre les points A1 et A2 d une ligne de r f rence horizontale Contr ler le calibrage 3 Rapprochez l appareil aus...

Страница 45: ...et aligner le laser vertical sur le fil d aplomb La tol rance de pr cision est respect e lorsque l cart diff rence entre la ligne laser et le fil d aplomb ne d passe pas 1 mm V rifier r guli rement le...

Страница 46: ...ique 3 Pr cision 0 2 mm m Nivellement automatique Visibilit typique 60 m Zone de travail avec le r cepteur manuel d pend du rapport de diversit de nature technique 60 m Longueur d onde du laser 515 nm...

Страница 47: ...las instrucciones y el libro adjunto de Garant a e informaci n complementaria as como toda la informaci n e indicaciones en el enlace de Internet indicado al final de estas instrucciones Siga las inst...

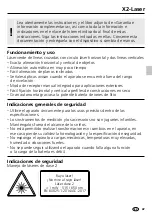
Страница 48: ...s ojos 1 40 1 90 m Durante el uso de un equipo l ser hay que cubrir necesariamente todas las superficies reflectantes especulares o brillantes En zonas de tr fico p blicas debe limitarse el recorrido...

Страница 49: ...Conexi n de rosca 1 4 5 8 lado inferior Modo de receptor manual LED Modo de receptor manual LED de indicaci n de servicio Carga de la pila LED Selector l neas l ser Salida de l ser rayo de referencia...

Страница 50: ...e de bater as El proceso de carga finaliza cuando el LED cambia a luz verde Cuando la carga de la bater a es d bil parpadea el indicador de servicio 7 hasta que el aparato se apaga para proteger la ba...

Страница 51: ...el interruptor deslizante 2 hacia la izquierda Se visualiza la l nea l ser horizontal Con la tecla de selecci n se puede activar cada una de las l neas l ser por separado 3 Modo de inclinaci n No sol...

Страница 52: ...s l ser de l neas Modo de receptor manual Opcional Trabajar con el receptor l ser GRX Utilice un receptor de l ser GRX opcional para nivelar a grandes distancias o para l neas l ser no visibles Para t...

Страница 53: ...ma por favor utilice un tr pode soporte 1 Marque el punto A1 en la pared 2 Gire el aparato 180 y marque el punto A2 Ahora tiene una referencia horizontal entre A1 y A2 Comprobar la calibraci n 3 Ponga...

Страница 54: ...ical seg n la cuerda de plomada La precisi n se encuentra dentro de la tolerancia si la desviaci n entre la l nea de l ser y la cuerda de plomada no supera los 1 mm Compruebe regularmente la calibraci...

Страница 55: ...d t pico 60 m Rango de trabajo con el receptor manual seg n diferencias de intensidad condicionadas por la t cnica 60 m Longitud de onda del l ser 515 nm Longitud de onda del l ser de plomada 650 nm C...

Страница 56: ...attentamente le istruzioni per l uso l opuscolo allegato Ulteriori informazioni e indicazioni garanzia nonch le informazioni e le indi cazioni pi recenti raggiungibili con il link riportato al termine...

Страница 57: ...coli ecc Non utilizzare il laser all altezza degli occhi 1 40 1 90 m Le superfici riflettenti a specchio o lucenti devono essere coperte durante il funzionamento di apparecchi laser In zone di traffic...

Страница 58: ...4 5 8 lato inferiore LED modalit di ricezione manuale Modalit di ricezione manuale Indicatore di funzionamento LED Carica delle batterie Tasto di selezione linee laser Finestra di uscita laser raggio...

Страница 59: ...il LED si accende in verde Se la batteria quasi scarica la spia di funzionamento 7 lampeggia lampeggiano assieme e l apparecchio si spegne per risparmiare la batteria 2 Aprire il vano batteria e inse...

Страница 60: ...trasporto e portare l interruttore a scorrimento 2 in posizione ON Appare la linea laser orizzontale Con il tasto di selezione si possono azionare singolarmente le linee laser 3 Modalit di inclinazio...

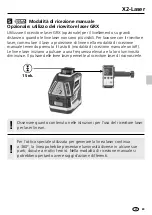
Страница 61: ...r lineari Modalit di ricezione manuale Opzionale utilizzo del ricevitore laser GRX Utilizzare il ricevitore laser GRX opzionale per il livellamento su grandi distanze o quando le linie laser non sono...

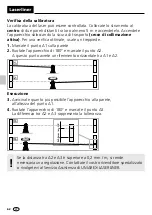
Страница 62: ...ede 1 Marcate il punto A1 sulla parete 2 Ruotate l apparecchio di 180 e marcate il punto A2 A questo punto avrete un riferimento orizzontale tra A1 e A2 Esecuzione 3 Avvicinate quanto pi possibile l a...

Страница 63: ...r oscillare liberamente Accendere l apparecchio e puntare il laser verticale sul filo a piombo La precisione rientra nella tolleranza se lo scostamento tra la linea laser e il filo a piombo non maggio...

Страница 64: ...co Visibilit tipica 60 m Area di lavoro con ricevitore manuale a seconda della differenza di luminosit dovuta a motivi tecnici 60 m Lunghezza delle onde laser 515 nm Lunghezza dell onda laser Laser fi...

Страница 65: ...X2 Laser 65...

Страница 66: ...66...

Страница 67: ...X2 Laser 67...

Страница 68: ...RVICE Umarex GmbH Co KG Laserliner M hnestra e 149 59755 Arnsberg Germany Tel 49 2932 638 300 Fax 49 2932 638 333 info laserliner com Umarex GmbH Co KG Donnerfeld 2 59757 Arnsberg Germany Tel 49 2932...

Отзывы: