Laser PJT-DVDHD-906 Скачать руководство пользователя страница 6

Instruction Manual

PJT-DVDHD-906

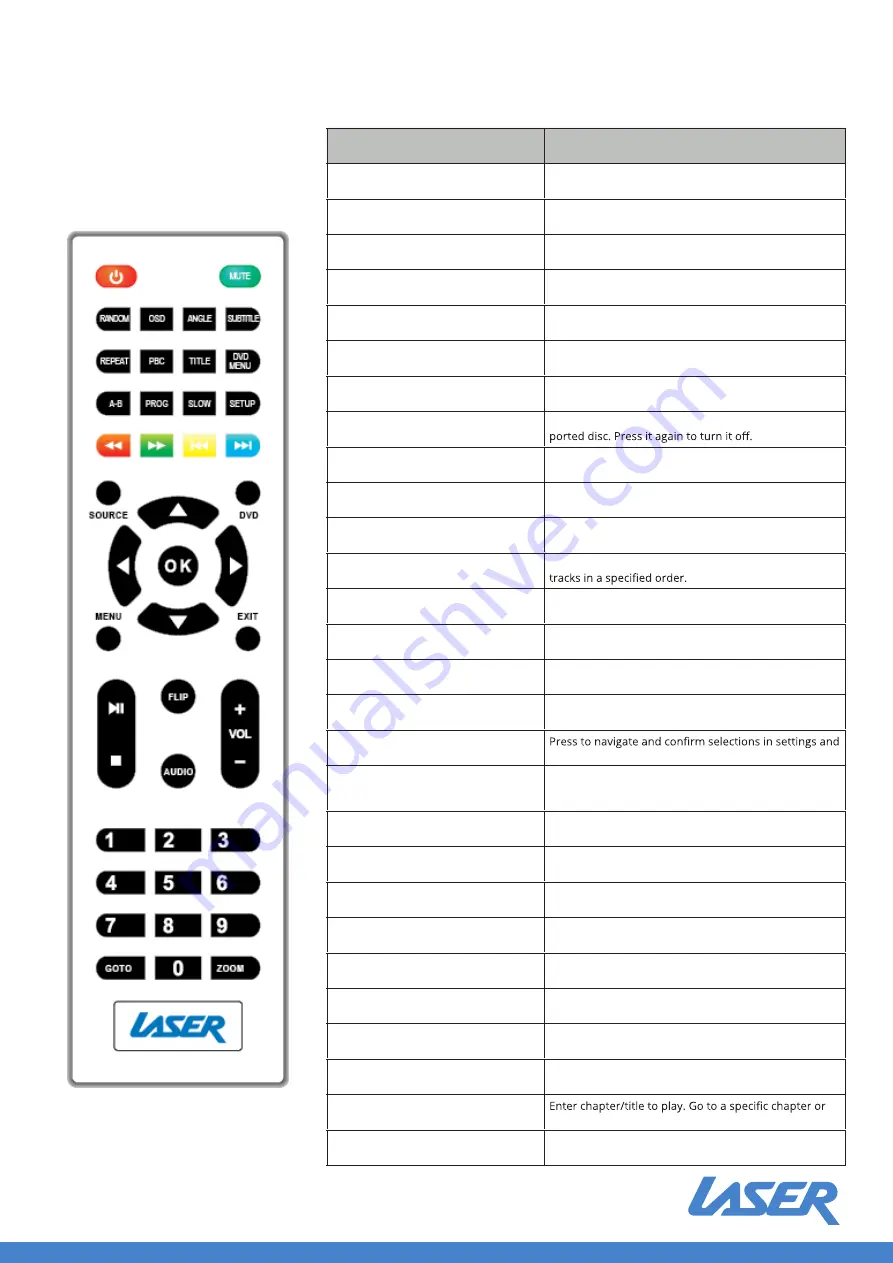
Remote Control 
POWER
 Press to power unit ON / OFF. 
Mute Mutes all audio from the projector. 
RANDOM Press to random playing for the loaded disc. 
OSD Press to display information of the current video/ audio. 
Angle On supported DVDs, press and hold to view alternate angles. 
Subtitle Press to change subtitle mode. 
Repeat Press to cycle through repeat options for the loaded disc. 
PBC Press to activate Play Back Control function for a supported disc. Press it again 

to be off. 

Title Press to view the title menu on a loaded DVD. 
DVD Menu Press to view the main menu on a loaded DVD. 
A-B Press to create a repeating loop on a loaded DVD. 
PROG Program a loaded disc to play chapters and titles or tracks in a specified 

order. 

SLOW During playback, enables slow-motion playback for disc. Press OK button to 

resume. 

SETUP Press to access the setup menu for DVD. 
Previous/Next Press to skip between chapters or tracks. 
Rewind/ Fwd Press to search through an individual chapter or track. 
Arrows (UP/DOWN/LEFT/RIGHT)/ OK Press to navigate and confirm selections in settings and other 

menus. 

SOURCE Press to select media source (AV/HDMI 1/ HDMI 2/VGA/ DVD/MEDIA PLAYER). 
DVD Press to enter the DVD player mode when in another source. 
MENU Press to access projector settings menu. 
EXIT Press to exit the projector menu or the audio/movie playback. 
Play/Pause Press here to play or pause the audio / movie playback. 
STOP Stop the audio/video /photo playback. 
FLIP Press to rotate/ mirror projector screen. 
Audio Press here to switch the available audio channels provided by the disc. 
VOL + Adjust volume up. 
VOL- Adjust volume down.  


Button

Action

POWER

Press to power unit ON / OFF.

Mute

Mutes all audio from the projector.

RANDOM

Press for random playback.

OSD

Press to display information of the current video/ 

audio.

Angle

On supported DVDs, press and hold to view alternate 

angles.

Subtitle

Press to change subtitle mode.

Repeat

Press to cycle through repeat options for the loaded 

disc.

PBC

Press to activate Play Back Control function for a sup-

Title

Press to view the title menu on a loaded DVD.

DVD

Press to view the main menu on a loaded DVD.

A-B

Press to create a repeating loop on a loaded DVD.

PROG

Program a loaded disc to play chapters and titles or 

SLOW

During playback, enables slow-motion playback for 

disc. Press OK button to resume.

SETUP

Press to access the setup menu for DVD.

Previous/Next

Press to skip between chapters or tracks.

Rewind/ Fwd

Press to search through an individual chapter or track.

Arrows (UP/DOWN/LEFT/RIGHT)/OK other menus.

SOURCE

Press to select media source (AV/HDMI 1/ HDMI 2/

VGA/ DVD/MEDIA PLAYER). DVD Press to enter the DVD 

player mode when in another source.

MENU

Press to access projector settings menu.

EXIT

Press to exit the projector menu or the audio/movie 

playback.

Play/Pause

Press here to play or pause the audio / movie playback.

STOP

Stop the audio/video /photo playback.

FLIP

Press to rotate/ mirror projector screen.

Audio

Press here to switch the available audio channels pro-

vided by the disc. 

VOL + 

Adjust volume up.

VOL- 

Adjust volume down.

0-9 Number Keypad

track numbers. Use play button to begin playing.

Zoom

For the movie/video, press to access the zoom function, 

select from 2x, 3x, 4x, 1/2, 1/3, 1/4.

Содержание PJT-DVDHD-906

Страница 1: ...Laser Bluetooth DVD Projector PJT DVD01 BLK Instruction Manual Laser Bluetooth DVD Projector PJT DVDHD 906...

Страница 2: ...9 Always hold the plug when pulling it out of the main supply socket Do not pull the power cord This can cause a short circuit CAUTION This unit should only be opened or repaired by quali ed personnel...

Страница 3: ...NOTE A projector mount is required to install the projector not included Removing the Lens Cover Remove the lens cover before using the unit Close the lens cover when unit is not in use Installing you...

Страница 4: ...A B Pr PROG order SLOW resum SETUP Mounting your Projector to the Ceiling When mounting the projector to the ceiling please purchase a projector mount recommended by an installation professional and f...

Страница 5: ...andom playing for the loaded disc o display information of the current video audio pported DVDs press and hold to view alternate angles s to change subtitle mode s to cycle through repeat options for...

Страница 6: ...sc Press OK button to resume SETUP Press to access the setup menu for DVD Previous Next Press to skip between chapters or tracks Rewind Fwd Press to search through an individual chapter or track Arrow...

Страница 7: ...ntrol Remove the battery compartment cover on the back of your remote by carefully sliding to open The battery cover can then be lifted away Fit the correct batteries 2x AAA not included referring to...

Страница 8: ...21 LENS 22 IR WINDOW FRONT 23 VGA PORT 24 IR WINDOW REAR 25 TRAPEZOIDAL ADJ KNOB 26 FOCUS ADJ KNOB 1 VOLUME 2 VOLUME 3 PLAY PAUSE 4 STOP 5 NAVIGATOR BUTTONS 6 OK 7 SOURCE BUTTON 8 MENU BUTTON 9 RETURN...

Страница 9: ...ow picture to connect power adapter Connect the small pin into the port marked DC on the unit Connect the plug end to the mains outlet Connec ng HDMI Follow below picture to connect a HDMI cable and s...

Страница 10: ...on projector screen connecting the VGA cable Follow below picture to connect AV cable and device connecting an AV cable as shown below power button to turn on unit and power indicator will be lit GREE...

Страница 11: ...re to connect a USB and TF card Turn off the unit before connecting a USB TF card Instruction Manual PJT DVDHD 906 Follow below picture to connect audio cable and device 1 Press the power button to tu...

Страница 12: ...t or button of remote to start playback 7 Press button to fast search forward and rewind 8 Press button to search next or previous le 9 During playback press the button to pause and press again to res...

Страница 13: ...1 Clock Select clock to set Day Month Year Hour and Minutes 2 Off Timer Select turn off timer to Day Hour and Minutes 3 On Timer Select turn on timer to Day Hour and Minutes 4 Sleep Timer Select slee...

Страница 14: ...you are casting from smartphone tablet etc to the same Wi Fi network you connected the DVD Projector to 3 On the DVD Projector main menu select the Miracast Android device or iOS Cast iOS device opti...

Страница 15: ...sumption Operating 48W Standby 0 8W Power Input Connect Included Adapter DC 12V 4A Included Adapter Connect DC input of unit Input AC 100 240V 50 60Hz Output DC12V 4A Color Temperature 6000K 8000K Pro...

Страница 16: ...Source button on the Control Panel or the Remote to select the correct setting a period of time Is the warning light indicator red If so the projector is automatically 1 Leave the projector to cool f...

Страница 17: ...r store refund or warranty policy Step 2b If your place of purchase cannot be contacted then you can contact Laser Customer Service with details of your defective Laser Product Phone 02 9870 3388 or E...

Отзывы: