background image

10

11

SeTTInG up The fm raDIo

The DVB-T Touch can be used as a FM radio receiver so you can listen to all your 
favourite FM radio stations that are broadcast in your area.

Important Note

You will need to insert the Earphones to improve FM reception.

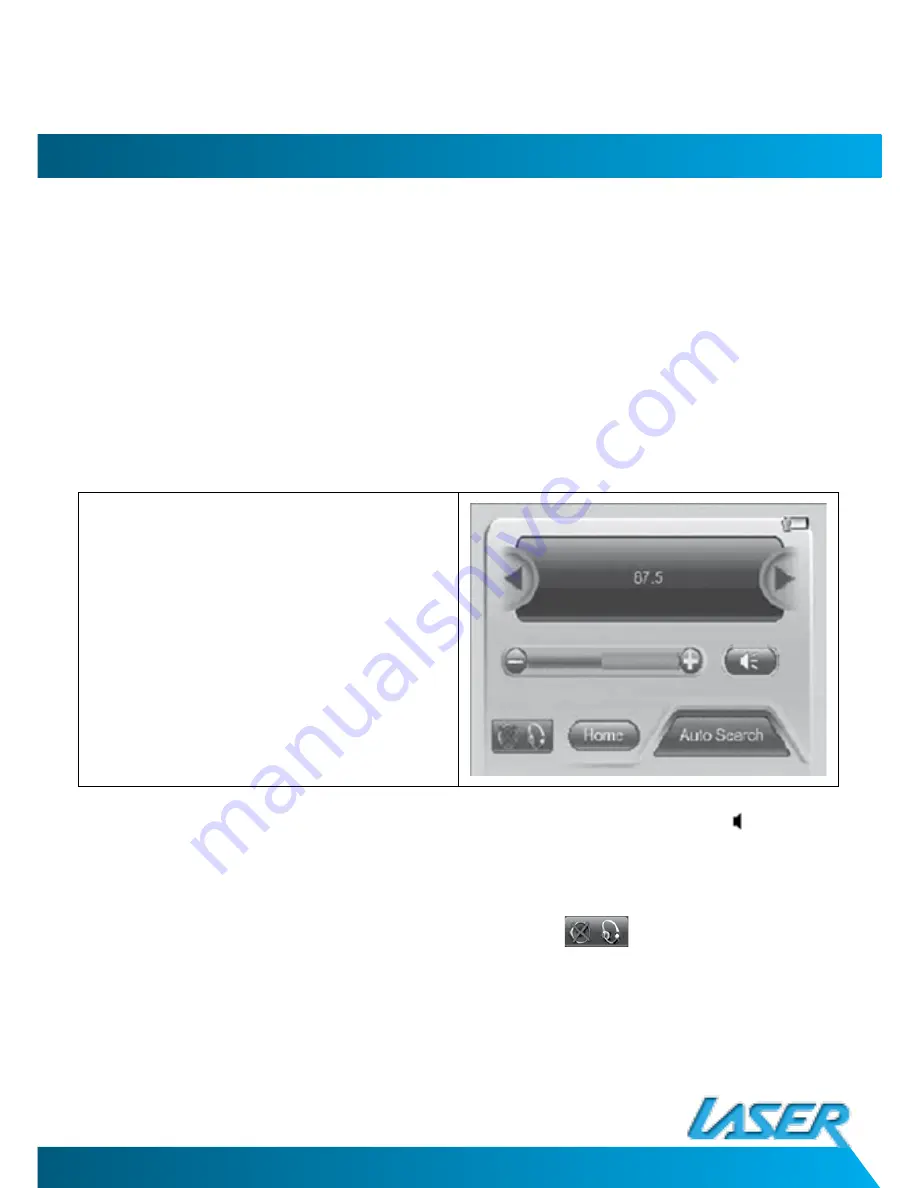
1. Double tap the FM/RDS Radio ICON in the main menu to start the FM Radio 

service.

2. It is possible to tune the FM radio frequencies manually or automatically.

A)  Manual Scanning: Tap the [  ] button or the [ ] 

button to adjust the frequency up or down to 

tune the radio.

B)  Automatic Scanning: Tap the [Auto Search] but-

ton to automatically scan for the next station.

Note

:  After a few seconds, the screen will go blank. 

This is a power saving feature. Touch the screen 
anywhere to display the screen again.

3. To adjust the volume tap the [+] or [-] button as required or tap the [ ] to mute 

the sound. Tap again to restore the sound.

4. The Radio will be played to both the Earphones and the internal speaker. 


The internal speaker can be muted by tapping the 

 button.  

Tap again to activate the internal speaker. 

5. To return to the Main Menu tap on the [HOME] button.

Содержание DVBT-ST35

Страница 1: ...DVBT ST35 User Manual Please read carefully before use ...

Страница 2: ...this device to fail There are no serviceable parts in this device Attempts to open this device by unauthorised personnel may cause further damage and void the warranty Picture quality will be dependant on signal quality and strength This device may not be able to pick up all stations in all areas For best results use in a strong signal area and ensure that the antenna has a clear unobstructed view...

Страница 3: ...d replace the battery Use headphones safely Using headphones while operating a vehicle is not recommended and is illegal in some areas Be careful and attentive while driving Stop using this device if you find it disruptive or distracting while driving or performing any other activity that requires your full attention Use only the USB drive adaptor to connect USB drives to the Device Do not attempt...

Страница 4: ...tion 2 Table of contents 4 Accessory list and connection guide 5 Knowing your DVT 6 Using the main menu 7 Quick Start Guide for first time use 8 Setting up the FM radio 11 Touch System menus 12 System setting 13 Changing the settings 16 Trouble Shooting 19 Specifications 20 ...

Страница 5: ... Accessory List 1 External Antenna 2 MCX to ICE cable 3 Earphone 4 AC DC Power adaptor Connection Guide 5 Wrist strap 6 Carry pouch 7 USB Cable ...

Страница 6: ...VT 1 Built in Antenna 2 External Antenna socket 3 Ear Phone out Socket 4 USB Port For Charging Only 5 Power Button Charging LED 6 LCD Touch Panel 7 Speaker and Ventilation Grill 8 Wrist Strap Eyelet 9 Reset Button 10 Stand 11 Battery Flap ...

Страница 7: ...t DVB T TV mode DVB T Radio mode FM radio Playback or enter the system settings menu DVB T TV mode To enter DVB T TV Mode DVB T Radio mode To Enter DVB T Radio Mode FM Radio mode To Enter FM Radio Mode System Settings To enter the System setting Menu to configure the device ...

Страница 8: ...an also be used while charging The LED will turn purple if used when being charged The length of time required to charge the unit will increase if it is being used Step 3 Setting up the device the first time 1 Double tap the DVT T ICON in the main menu to start the Digital TV service 2 As no channels have been stored the channel bar should read 000 No Channel 3 Tap the MENU button on the lower rig...

Страница 9: ...watch and then press the X to exit 4 To adjust the volume tap the or button as required or tap the to mute the sound Tap again to restore the sound 5 To access the DVB T system menu tap on the menu button 6 To return to the Main Menu tap on the HOME button Note Channel listings will vary between areas It may be necessary to rescan for new channels if you have changed location substantially This de...

Страница 10: ... lower left hand side of the screen 4 Tap the EXIT Button to start the First Time Instillation Wizard 5 Tap the OK Button to begin 6 If the Country and Antenna settings are incorrect tap and select the correct setting 7 Once all the settings are correct tap the START button 8 Once the Wizard is complete the radio screen will be shown Note After a few seconds the screen will go blank This is a powe...

Страница 11: ...on or the button to adjust the frequency up or down to tune the radio B Automatic Scanning Tap the Auto Search but ton to automatically scan for the next station Note After a few seconds the screen will go blank This is a power saving feature Touch the screen anywhere to display the screen again 3 To adjust the volume tap the or button as required or tap the to mute the sound Tap again to restore ...

Страница 12: ...ation of all available channels Antenna Selection Select either inbuilt Antenna or external antenna for Receiving Digital broadcasts Auto Search To automatically search for available Digital Channels in your current area Audio Settings Allows the selection either the master or secondary language audio chan nel if broadcast Program Information To show the information of the current service s system...

Страница 13: ...y tapping the icon Please see below for an explanation of the functions Country Language Set the Screen language to be displayed and the Country for current location Time Setting Enables Disables daylight saving and sets GMT offset for current location Software Version Displays the current software firmware version used on the device May be required for tech Support Reset Defaults Resets the syste...

Страница 14: ...2 Press the highlighted channel to show the detail schedule of the selected channel 3 Tap the X button to exit B Program Schedule 1 Choose the desired date by touching it on the screen 2 Press the desired program name to see brief information 3 Tap the X button to return to the Program List page C Program Schedule 1 Tap the X button to return to the Program List page ...

Страница 15: ... country setting 2 Select the required antenna setting by tapping the current antenna setting 3 Select the required options as displayed to change the settings 4 Tap the Start button to begin the Auto Search 5 Tap the X to exit 4 Audio Setting 1 Tap on the Highlighted text to change the set ting 2 Any available options will be displayed Select the desired option 3 Tap the X to exit ...

Страница 16: ... 1 Tap the X button to exit 6 Aspect ratio 1 Tap on the desired display format 2 Tap X to exit 7 Subtitle 1 Tap the desired available Subtitle language to display it 2 Tap X to exit Note Subtitles are only available if broadcast by current channel ...

Страница 17: ...the 100 button to go to the previous 100 pages 7 Tap the X button to exit 9 Country Language 1 Choose the Language you would like the menus to be displayed in 2 Choose your correct DVB T region by tapping the highlighted current country setting 3 Tap X to exit 10 Time Setting 1 To enable or disable daylight savings tap the highlighted current setting 2 Select the correct GMT offset setting by tap ...

Страница 18: ...xit Note This information may be required if requested by technical support 12 Reset Default 1 Tap the Yes button to reset the device to the factory settings 2 Tap the No button or the X button to exit Note Resetting the default will cause all stored channels to be lost ...

Страница 19: ...some channels is too low Use the external antenna to increase the reception sensitivity For Indoor use place the antenna on a high point close to a window Some TV channels are not available Only the locally broadcast channels can be viewed They can differ from area to area All channels show No Signal or random mosaic tiles appear on the display Some TV channels signal quality is too low Use the ex...

Страница 20: ...e 5V DC from USB Power Consumption 1 8Watt 1 6Watt Battery Built in 3 7V 1300mAh rechargeable polymer Software Feature Multi Language English German French Spanish Italian Turkish Traditional Chinese Functions DVB T TV and FM Radio Auto Scanning EPG Channel Management Teletext Subtitle and Aspect Ratio Adjustment If Broadcast Input Output Features Audio Output 1 Stereo Earphone L R out 3 5ø Speake...

Отзывы: