Contents
Page No.
2
7
Introduction
The Digital Belt Tension Gauge is a professional instrument that offers a highly accurate
method of measuring and adjusting the tension of all types of rubber timing and auxiliary
drive belts fitted to motor vehicles and machinery (maximum belt width 36mm). Tension can
be displayed in a variety of standard and manufacturers’ units. Tension limits can be set into
the instrument by the user.
During belt tension measurement and adjustment, the belt tension can be displayed on
the
visual display
and also via an
audible beep
. The audible beep changes depending on
whether the tension is within or outside the user’s set limits.
This avoids the user having
to read the display while adjusting the belt
. The selected tension limits, measurement
units and calibration parameters are stored in the memory of the tester, and remain in the
memory even when the instrument is switched off and the batteries removed.
The gauge can communicate with a PC computer for statistics recording and printing by
connecting the optional cable and software for USB interface.
Principle of Operation
The measuring head is placed on the belt and the clamp is tightened using the clamping
knob (finger tight only). This deflects the belt through a known angle defined by the anvil
and the fixed pillars.
A load cell attached to the clamp measures the force required to deflect the belt, which is
proportional to the tension in the belt. The output signal from the load cell is fed into the
handset to be digitized and scaled to give the correct tension reading on the instrument
display.
Please read the following instructions carefully and always keep this manual with the
machine for reference.
For specific belt tension settings always refer to the vehicle/
machinery manufacturers data
.
Calibration Procedure
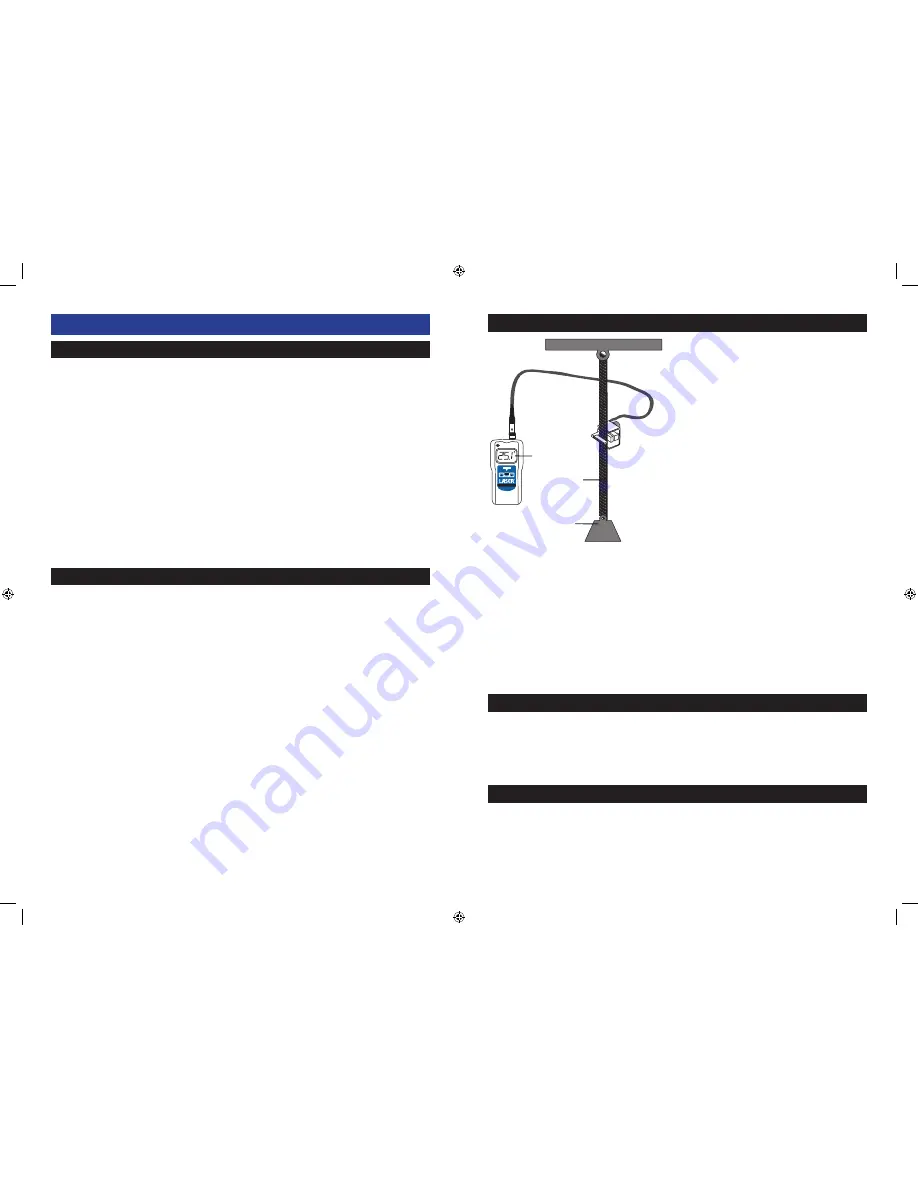
A feature of the Laser 5846 is its ability to be
easily recalibrated by the user.
A calibration test-belt rig is set up using a
fixed and known weight (2)
. An
old cam
belt (1)
is first weighed then set up as per
the diagram. Make sure the cam belt is
connected securely to the suspension beam
and the weight.
The weight must be 25
kilograms minimum but can be higher
.
Switch on the 5846 handset. Clamp the
Measuring Head into position about half
way along the length of the belt. Turn the
clamping knob clockwise until the flat side of
the belt contacts the anvil, and a resistance
is felt. This should only be finger-tight.
Do not over tighten
.
A reading will show on the display. Wait until the reading has stabilized, then press and
hold the POWER key until
CAL
appears on the display. This is calibration mode. Change
the displayed value to the calibration weight. The calibration weight (
W
) is the sum of the
cam belt weight (
W1
) and the fixed known weight (
W2
). Thus in our example,
W = 25.1
(100g + 25kg). Use the UP and/or DOWN keys to enter the calibration weight into the
handset.
To save and quit, press the POWER key again for a few seconds.
Note
: If calibration mode (
CAL
) is entered and there is no weight connected or the weight
is less that 25kg, then
Err1
will show on the display.
LO OK HI
ZERO
UNIT
Belt Tension Gauge
5846
2 (W2)
25kg
1 (W1)
W = W1 = W2
W
Auto Power Off
If no key is pressed for approximately 10 minutes, the instrument will switch itself off to
save the battery. The unit can also be switched off at any time by holding down the power
on button until ‘OFF’ is shown on the screen.
Low Battery Indication
1. When the battery voltage is less than approximately 5v, the battery symbol will appear
on the display.
2. Slide the battery cover away from the instrument and remove batteries.
3. Install 4 x 1.5v AAA batteries correctly into the case.
4. If the instrument is not to be used for any extended period remove batteries.


