
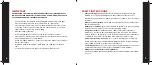


6
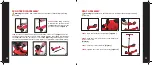
SCOOTER FEATURES
Model Number: 99
Recommended Age: 3+ years
Maximum Weight: 130 lbs.
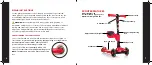
7
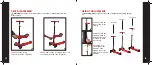
Handle Grip
Collar Clamp
Adjustable Seat Height
Adjustable T-Bar
Handlebar/Steering
Rod
Rear Brake
Non-Slip Deck
Fixing Sleeve
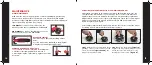
RIDING INSTRUCTIONS
To ride, grasp the handles of the T-shaped steering bar. To get started,
stand with one leg on the board and push off with the other foot. Once you
are underway, place both feet spread apart on the scooter’s deck, at an
approximately 45° angle to the direction of travel.
WARNING!
Do not attempt stunts, tricks, jumps, curb-grinding, or
backwards riding on your scooter, as it is not made to withstand such abuse.
Racing and stunts also increase the risk of losing control of the scooter.
Aggressive riding diminishes your maneuvaribility and control. Take all
necessary precautions and practice in a safe area.
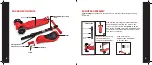
UNDERSTANDING THE SCOOTER BRAKE
The scooter’s brake is a friction brake, designed for reduction of speed on
flat surfaces only.
Brake at low speeds by gently pushing a foot against the
back wheelplate. Faster speeds will require more
pressure, but be careful: braking too hard can
cause you to slow or stop abruptly, which can
cause you to fall. Practice braking at walking speed.
NOTE:
The brake and protection plate can become
hot.


