background image

56

3

1

2

4

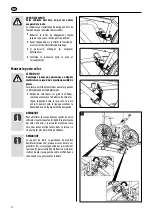
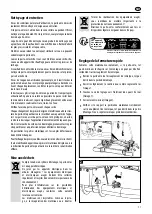
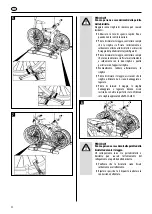
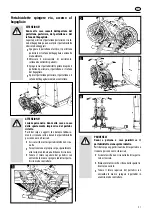
PERICOLO!

Danni alle persone o alle cose a causa di un 

portabiciclette non assicurato.

Se la leva non è assicurata dal bloccaggio, il  

portabiciclette potrebbe staccarsi dal veicolo 


durante la guida.

Bloccare sempre il portabici.

4

Controllate di aver bloccato la leva e rimosso 

la chiave. Da Bloccare il portabiciclette rende  

anche più difficile possibile furto del portabici.

4

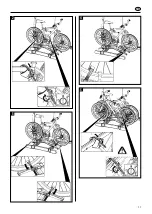
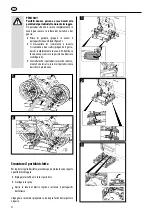
PERICOLO!

Danni alle persone o alle cose a causa della 

perdita del portabiciclette durante la guida.

Una connessione allentata tra il portapacchi e il 

gancio di traino può causare l‘allentamento del  

portabiciclette.

Controllare che il portabici sia ben fissato.

4

Se la connessione è allentata, ripetete i passi da 

1 a 4. Se non c‘è alcun miglioramento, potrebbe 

essere necessario regolare il bloccaggio rapido,  

vedi capitolo „Regolazione della chiusura rapi-

da“.

4

5

Содержание 11596

Страница 1: ...cioditraino Istruzioni per l uso 51 Réf 11596 SD260 Porte vélospourl accouplementderemorque Manuel de l opérateur 35 Art No 11596 SD260 Cycle rack for the towbar Operating instructions 19 Art Nr 11596 SD260 Fahrradträger für die Anhängerkupplung Bedienungsanleitung 3 ...

Страница 2: ...2 ...

Страница 3: ...__________________________________________________________7 Montage des Fahrradträgers an der Anhängerkupplung ____________________________________________________7 Fahrräder montieren_________________________________________________________________________10 Fahrradträger wegschieben ____________________________________________________________________13 Zugang zum Kofferraum______________________...

Страница 4: ...as Produkt oder etwas in der Umgebung könnte schwerbeschädigtwerden Personen oderSachschadenmöglich HinweisemitdemWortACHTUNGwarnenvoreiner möglicherweise schädlichen Situation Wenn sie nicht gemieden wird kann das Produkt oder etwas in der Umgebung beschädigt werden SonstigeHinweise Nützlicher Tipp Erleichtert die Bedienung oder Montage des Produkts oder dient zum besseren Verständnis Der Fahrrad...

Страница 5: ... Abmessungen BxHxT ca 108 x 75 x 60 cm Montieren Sie den Fahrradträger nur an Anhängerkupplungen die folgende Eigenschaften besitzen Material mind StahlSt52oderGraugussGGG52 Kupplungskugel Ø 50mm Klasse A 50 gemäß EC 94 20 oder ECE R55 D Wert 7 6kN Montieren Sie den Fahrradträger nur an eine KupplungausStahlSt52 GraugussGGG52oder besserer Güte 4 MontierenSiedenTrägernieaneinerKupplung aus Aluminiu...

Страница 6: ...ngaben keinesfalls 4 Überprüfen Sie vor jedem Fahrtantritt den korrekten und festen Sitz des Gurtes um die Fahrräder und Rahmenhalter desTrägers sehe Abbildung 8 Kapitel Fahrräder montieren 4 Überprüfen Sie vor jedem Fahrtantritt ob der verwendete Gurt unbeschädigt und unver schlissen ist 4 Ein beschädigter oder verschlissener Gurt muss vor Fahrtantritt gegen einen unbeschädigten Gurt ausgetauscht...

Страница 7: ...ger MontagederRahmenhalteramFahrradträger MontagedesFahrradträgersander Anhängerkupplung Stellen Sie Ihr Fahrzeug auf einer ebenen Fläche ab und ziehen Sie dieHandbremsean WARNUNG Personen oder Sachschaden durch beschä digten Fahrradträger Beschädigungen des Trägers z B durch verbogene Teile Risse oder Kratzer schließen die sichere Funktion desTrägers aus Montieren Sie den Fahrradträger nicht wenn...

Страница 8: ...ießen erschweren Sie auch einem eventuellen Diebstahl des Fahrradträgers 4 WARNUNG Personen oder Sachschaden durch Verlust des Fahrradträgers während der Fahrt Eine lockere Verbindung zwischen Träger und Anhängerkupplung kann zum Lösen des Fahrrad trägers führen Prüfen Sie den Fahrradträger auf sichere Befes tigung 4 Wiederholen Sie bei lockerer Verbindung die Arbeitsschritte 1 bis 4 Sollte sich k...

Страница 9: ...l nicht durch die Schnellspannhe beln gesichert könnte dies sich während der Fahrt lösen Klappen Sie die Schnellspannhebel um bis es fühlbar einrastet 4 Die Radhalter sind verstellbar Um die optimale Stabilität Ihrer Fahrräder zu gewährleisten sollten diese vor der Benutzung immer vollständig ausgefahren werden 4 6 7 8 ...

Страница 10: ...Sie alle nicht fest mit dem Fahrrad verbundenen Teile wie z E Bike Akku Luftpumpe Fahrradtasche Fahrradkiste oder Navigationsgeräte 4 HINWEIS Um das Fahrverhalten Ihres Fahrzeugs zu verbessern montieren Sie am besten das schwerste Fahrrad zuerst Außerdem sollten Sie wenn Sie nur ein Fahrrad montieren das Fahrrad in die Schiene setzen die sich am nächsten zum Heck des Fahrzeugsbefindet HINWEIS Die ...

Страница 11: ...11 2 3 4 5 ...

Страница 12: ...f nach 4 Überprüfen Sie vor jedem Fahrtantritt ob die verwendeten Gurte unbeschädigt und unver schlissen sind 4 Beschädigte oder verschlissene Gurte müssen vor Fahrtantritt gegen unbeschädigte Gurte ausgetauscht werden Es dürfen nur Gurte verwendet werden die von EAL GmbH dafür zugelassen sind 4 8 WARNUNG Personen oder Sachschaden durch Verlust einesFahrradswährendderFahrt Eine lockere Verbindung ...

Страница 13: ...perteile oder Gegenstände die sich beim Verschieben unter oder vor demTräger befinden können gequetscht werden Vergewissern Sie sich dass sich nichts unter demTräger befindet 4 Achten Sie auf Ihren Körper besonders Ihren Kopf halten Sie einen Sicherheitsabstand ein 4 Halten Sie den oberen Rahmen des Fahrradträ gers mit beiden Händen fest und schieben Sie den Fahrradträger kontrolliert zurück 4 1 3...

Страница 14: ... nach vorn schieben Beide Hebel müssen sich nun in der unteren Position befinden siehe Abbildung 6 4 Prüfen Sie ob der Fahrradträger richtig einge rastet ist Rasten Sie den Träger ggf wie zuvor beschrieben ein 4 5 6 Demontage des Fahrradträgers Beim Entfernen des Fahrradträgers gehen Sie anschließend in umgekehrter Reihenfolge der Montage vor Klappen Sie den U Bügel und Rückleuchten zusammen 4 Lös...

Страница 15: ... Kapitel Montage des Fahrradträgers an der Anhänger kupplung beschrieben nicht fest auf der Anhängerkupplung montieren lässt Der Fahrradträger darf nicht dauerhaft ausgezogen verbleiben da sich sonst Staub und Schmutz im Schiebemechanismus sammeln kann was ein sanftes Gleiten des Mechanismus verhindert Bei Verschmutzung der Gleitschienen sind diese sofort mit Wasser zu spülen bzw entsprechend zu r...

Страница 16: ...rsonen ist nicht zulässig 7 Pin 13 Pin 1 L Blinker links gelb 2 54G Nebelschlussleuchte blau 3 31 Masse weiß 4 R Blinker rechts grün 5 58R Schlussleuchte rechts braun 6 54 Bremsleuchten rot 7 58L Schlussleuchte links schwarz 1 Blinker links gelb 2 Nebelschlussleuchte blau 3 Masse weiß 4 Blinker rechts grün 5 Schlussleuchte rechts braun 6 Bremsleuchten rot 7 Schlussleuchte links schwarz 8 Rückfahrl...

Страница 17: ...17 Explosionszeichnung ...

Страница 18: ...chieberohr rechts 1 25 Vorderkappe des unteren Schieberohrs 2 26 Mittelgleitrohr 2 27 Sechskantschraube 4 M6 75 28 Innenschlauch 4 29 Schieberöhrchen mit rückseitiger Kappe 2 30 Kunststoffradhalter rechts 1 31 Hutmutter 6 M5 32 Federscheibe 6 M5 33 Unterlegscheibe 6 M5 Pos Bezeichnung Menge Masse 34 Rechter Lampenschutz 1 35 Rücklicht rechts 1 36 Rundkopfschraube mit Innensechskant 2 M5 35 37 Rund...

Страница 19: ...me holders to the bike carrier___________________________________________________________23 Fitting the bike carrier to the trailer coupling__________________________________________________________23 Mounting bicycles__________________________________________________________________________26 Sliding the bike carrier access to the luggage space_____________________________________________________...

Страница 20: ...n of a potentially harmful situation Failuretoavoidsuchsituationsmayresultindamage to the product or other nearby objects Other instructions Usefultip Makesoperationorfittingoftheproduct easier or gives a better understanding The respective safety symbol used does not replace the text of the safetyinstruction Youmustthereforereadthesafetyinstructionandfollowitexactly fits cleans or disposes of Obl...

Страница 21: ... up to 3 25 inches Slidable Yes Dimensions WxHxD approx 108 x 75 x 60 cm Fit the bicycle carrier only on tow hitches with the following properties Material Min St52steelorGGG52greycastiron Tow ball Ø50mm class A 50 according EC 94 20 or ECE R55 D value 7 6kN Fit the bicycle carrier only on a coupling made of St52 steel GGG52 grey cast iron or better quality 4 Never fit the carrier on a coupling ma...

Страница 22: ...ity permissible bearing load and permissible overall weight of your vehicle Never exceed these specifications 4 Before the start of every journey check the cor rectandfirmattachmentofthestraparoundthe bikesandtheframeholderbracketofthecarrier seeStep8ofchapter Mountingbicycles 4 Beforethestartofeveryjourney checkthatthe straps are not worn or damaged 4 A damaged or worn strap must be replaced with...

Страница 23: ...ate to the bike carrier Fitting the frame holders to the bike carrier Fitting the bike carrier to the trailer coupling Parkyourvehicleonalevelsurfaceandapplythehandbrake WARNING Personal injury or material damage due to damaged bike carrier Damage of the carrier e g by bent parts cracks or scratches prevent the safe operation of the carrier Do not fit the bike carrier if it is damaged in any way 4...

Страница 24: ...bike carrier also impedes its possible loss by theft 4 WARNING Personal injury or material damage due to loss of the bike carrier during the journey A loose connection between the bike carrier and trailer coupling can lead to detachment of the bike carrier Check the bike carrier for secure attachment 4 Repeat steps 1 to 4 in the event of a loose connection If this brings about no impro vement the ...

Страница 25: ...ders If the U tube is not secured properly by the quick releaselevers itcouldfolddownduringthejourney Folddownthequickreleaseleversuntilyoufeel they click into place 4 The wheelholders are extendable To guarantee optimum stability of the bicycles they should always be fully extended before use 4 6 8 7 ...

Страница 26: ...he bicycles can become loose during the journey Remove all parts not firmly attached to the bicycle such as e bike battery bicycle pump bicycle bag bicycle crate bicycle basket child seat bottle or navigation device 4 NOTE In order to improve the driving characteristics of your vehicle mount the heavier bicycle first If carrying only one bicycle this should be mounted in the rail closest to the re...

Страница 27: ...27 2 3 4 5 ...

Страница 28: ...und the rear wheel of the bicycle 4 Tighten the straps if necessary 4 Before the start of every journey check that the straps are not worn or damaged 4 A damaged or worn strap must be replaced with an undamaged one before driving Only strap which are approved by EAL GmbH may be used for this 4 8 WARNING Personalinjuryormaterialdamageduetoloss ofabicycleduringthejourney A loose connection between t...

Страница 29: ...der or in front of the carrier when it is extended may be trapped Make sure that there is nothing under the carrier 4 Keepallbodyparts andparticularlyyourhead clear and maintain a suitable safety distance 4 Hold the upperframe of the carrier with both hands and carefully slide backwards see fig 2 4 1 3 2 4 Hold the upperframe of the carrier with both hands and carefully slide forwards 4 CAUTION Pe...

Страница 30: ...g back the entire bicycle carrier Both levers are in the low position see figure 6 4 Check that the bike carrier is properly secured in this position 4 5 6 Dismantling the bike carrier To dismantle the bike carrier proceed in the reverse order to fitting Unlock the U tube and rearlights and fold it down into the storage position 4 Fold the bike carrier together 4 Remove lighting connector from the...

Страница 31: ...orrosion by a powder coating If this paint coating is damaged please have the damage rectified professionally as soon as possible Please refer to our customer service for the replacement of parts Any modification of original parts and materials or the construction of bike carrier can adversely affect its safety and serviceability Remove the bike carrier from the trailer coupling as described under...

Страница 32: ...n 13 Pin The reversing light is not working via the 7 pin plug 12V Bulb 1 12V 21 5W BAY15d 2 12V 21W BAY 15d orange 3 12V 21W BAY 15d 4 12V C5W 1 L Turn signal light left yellow 2 54G Rear fog light blue 3 31 Earth white 4 R Turn signal light right green 5 58R Taillight right brown 6 54 Brake light red 7 58L Taillight left black 1 Turn signal light left yellow 2 Rear fog light blue 3 Earth white 4...

Страница 33: ...33 Exploded view ...

Страница 34: ... 2 M6 Ø8 85 14 Washer 4 M8 15 Special plastic washer 2 16 U Tube 1 17 Hex socket round head bolt 2 M8 100 18 Hex socket round head bolt 2 M10 105 19 Hex socket round head bolt 4 M6 60 20 Washer 8 M6 21 Quick connector cover 1 22 Quick connector 1 23 Back cap of buttom sliding tube 2 24 Buttom sliding tube right 1 25 Front cap of buttom sliding tube 2 26 Mid sliding tube 2 27 Hex bolt 4 M6 75 28 Li...

Страница 35: ...ort du cadre___________________________________________________________________________39 Montage du porte vélos sur l accouplement de remorque___________________________________________________39 Monter le porte vélos________________________________________________________________________42 Glisser le porte vélos acces au coffre a bagages_________________________________________________________45...

Страница 36: ...es sur les personnes EAL GmbH n endosse aucune responsabilité pour des dommages survenus suite à une utilisation non conforme monte nettoie ou élimine Les instructions comportent les catégories de consignes de sécurité suivantes AVERTISSEMENT PRUDENCE ATTENTION REMARQUE Dommages aux personnes possibles LesremarquesprécédéesdutermeAVERTISSEMENT vous avertissent d un danger imminent possible Si le d...

Страница 37: ...qu à 3 25 pouces Extensible Oui Dimensions LxHxL env 108 x 75 x 60 cm Boule d attelage Ø 50mm class A 50 selon EC 94 20 au ECE R55 Montez le support uniquement sur un accou plement en acier St52 moulage en fonte grise GGG52 ou de meilleure qualité 4 Ne montez jamais le support sur un accouple ment en aluminium d autres métaux légers ou en plastique 4 Déballeztouslescomposantsetvérifiezqu aucunepiè...

Страница 38: ...ivement les données rela tives à la charge utile maximale la charge au point d attelage admissible et le poids total admissible de votre véhicule Ne dépassez en aucun cas ces données 4 Avant chaque départ contrôlez la fixation correcte et solide de la sangle autour des vélos et le support du porte vélo cf étape 8 Monter le porte vélo 4 Avant chaque départ contrôlez si les sangles utilisées sont in...

Страница 39: ... vélos Support du cadre Montage du porte vélos sur l accouplement de remorque Garezvotrevéhiculeàunesurfaceplaneetserrezlefreinàmain AVERTISSEMENT Dommages causés aux personnes ou dégâts matériels en raison d un porte vélo endommagé Un support endommagé par exemple en raison de pièces déformées de fissures ou d éraflures excluent la fonction sûre du support En cas de présence de dommages ne montez...

Страница 40: ...illant vous compliquez aussi un éventuel vol du porte vélo 4 AVERTISSEMENT Dommages causés aux personnes ou dégâts matériels en raison de la perte du porte vélo durant le déplacement Une connexion inadéquate entre le support et l accouplement de remorque peut entraîner le desserrement du porte vélo Contrôlez la bonne fixation du porte vélo 4 Si la connexion n est pas bonne répétez les étapes de tr...

Страница 41: ...rt en U n est pas fixé avec les leviers à dégagement rapide ce support il pourrait se détacher pendant le voyage Rabattez le levier de dégagement rapide jusqu à ce que vous sentiez qu il s enclenche 4 Les supports de roues sont extensibles Pour garantir une stabilité optimale de vos vélos ils doivent toujours être complètement déployés avant utilisation 4 6 7 8 ...

Страница 42: ...vélospeuvent se détacher pendant le déplacement Retirez du vélo toutes les pièces non fixées comme par exemple la batterie du vélo élec trique la pompe à vélo le sac à vélo la caisse à vélo le panier à vélo le siège pour enfant la bouteille d eau ou l équipement de navigation 4 REMARQUE Pour améliorer le comportement routier de votre véhicule ilvautmieuxmonterd abordlapluslourde des vélos En outre...

Страница 43: ...43 2 3 4 5 ...

Страница 44: ...gles 4 Avant chaque départ contrôlez si les sangles utilisées sont intactes et ne sont pas usées 4 Avant de prendre le départ les sangles endommagéesouuséesdoiventêtreéchangées par des sangles en bon état Pour ce faire vous ne pouvez utiliser que des sangles qui sont autorisées par EAL GmbH 4 8 AVERTISSEMENT Dommages causés aux personnes ou dégâts matériels en raison de la perte du porte vélo dura...

Страница 45: ...u devant le porte vélo peuvent être écrasés Assurez vous que rien ne se trouve sous le porte vélo 4 Faites attention à votre corps en particulière ment votre tête respectez une distance de sé curité 4 Lorsque vous glisser le porte vélo maintenez solidement les vélos 4 1 3 2 4 Entfernen Sie alles im Zwischenraum von Träger und Fahrzeug 4 Tenez le cadre supérieur du porte vélos avec les deux mains e...

Страница 46: ...verrouilleà nouveau vous entendrez deux clics Les deux boutons sont en position basse voir photo 6 4 Vérifiez si le porte vélo s est enclenché correctement 4 5 6 Demontage du porte vélos Lorsque vous retirez le porte vélo procédez en sens inverse du montage Déverrouillez le support en U et les feux arrière et tournez en position de rangement 4 Pliez le porte vélo 4 Débrayez le câble d éclairage de...

Страница 47: ...r les parties métalliques et les sangles défectueuses doivent être échangées Pourl échangedespièces veuillez vousadresserànotreserviceclients Toute modification apportée aux pièces et matériaux d origine ou à la constructionduporte vélospeutnuireàsasécuritéetàsonutilisation efficace Retirez le porte vélo de l accouplement de remorque tel que décrit dans la partie démontage 4 Vérifiez si le support...

Страница 48: ...dessous Cette information est destinée seulement à un revendeur spécialisé en cas de transformation Une transformation par des personnes non formées n est pas autorisée 7 broches 13 broches 1 L Clignotant de gauche jaune 2 54G Feu arrière anti brouillard bleu 3 31 Masse blanc 4 R Clignotant de droite vert 5 58R Feu rouge arrière á droite brun 6 54 Feux d arrêt rouge 7 58L Feu rouge arrière á gauch...

Страница 49: ...49 Annexe Aperçu des pièces de rechange ...

Страница 50: ...droit 1 25 Capuchon avant du tube coulissant du bas 2 26 Tube mi coulissant 2 27 Boulon à tête hexagonale 4 M6 75 28 Tube de doublure 4 29 Tube coulissant supérieur à capuchon arrière 2 Pos n Description Nbr Mesure 30 Support de roue en plastique à droite 1 31 Écrou borgne 6 M5 32 Rondelle à ressort 6 M5 33 Rondelle 6 M5 34 Arrière droit 1 35 Boulon à tête ronde à six pans creux 2 36 Boulon à tête...

Страница 51: ...aggio_________________________________________________________________55 Montaggio del portabiciclette sul gancio di traino_______________________________________________________55 Montare le biciclette_________________________________________________________________________58 Portabiciclette spingere via accesso al bagagliaio_______________________________________________________61 Smontare il po...

Страница 52: ...o utile Facilita l uso o il montaggio del prodotto oppure serve per una migliore compren sione Il portabiciclette SD260 serve per il trasporto di max due biciclette Deve essere montato esclusivamente su ganci di traino che soddisfano i requisiti indicati nel capitolo Requisiti del gancio di traino Non superare inoltre mai il carico utile del portabiciclette Dell uso appropriato fa parte anche il r...

Страница 53: ...Zoll Meccanismo scorrevole sì Dimensioni LxAxP ca 108 x 75 x 60 cm Montare il portabici solo su ganci di rimorchio che abbiano le seguenti caratteristiche Materiale min acciaioSt52oghisagrigiaGGG52 Sfera di accoppiamento Ø 50mm classe A 50 secondo EC 94 20 o ECE R55 ValoreD 7 6kN Montare il portabiciclette solo su un gancio in acciaio St52 3 ghisa grigia GGG52 o di qualità migliore 4 Non montare m...

Страница 54: ...rare mai queste indicazioni 4 Prima di ogni corsa controllare la corretta e stretta aderenza della cintura intorno alle biciclette del portapacchi e ai supporti del telaio vedi Figura 8 capitolo Montaggio delle biciclette 4 Prima di iniziare il viaggio assicurarsi che le cinghie utilizzate non siano danneggiate o logorate 4 Primadiiniziareilviaggio lecinghiedanneggi ateologoratedevonoesseresostitu...

Страница 55: ...subire danni Usare eventualmente un terminale di scarico 4 Montaggiodelportatarga Montaggiodeibraccidifissaggio Montaggio del portabiciclette sul gancio di traino Posteggiareilveicolosuunasuperficiepiana Tirareilfrenoamano PERICOLO Danni a persone o cose dovuti a portabiciclette danneggiati Danni al portabiciclette ad es parti deformate incrinature o graffi ne escludono il corretto funzionamento N...

Страница 56: ...lette rende anche più difficile possibile furto del portabici 4 PERICOLO Danni alle persone o alle cose a causa della perdita del portabiciclette durante la guida Una connessione allentata tra il portapacchi e il gancio di traino può causare l allentamento del portabiciclette Controllare che il portabici sia ben fissato 4 Se la connessione è allentata ripetete i passi da 1 a 4 Se non c è alcun mig...

Страница 57: ...l U bolt non è fissato dalle leve a sgancio rapido questo potrebbe allentarsi durante la guida Abbassate le leve di sgancio rapido fino a che non lo sentite innestato 4 I supporti delle ruote sono regolabili Per garantire una stabilità ottimale delle vostre biciclette dovrebbero essere sempre completamente estese prima dell uso 4 6 7 8 ...

Страница 58: ...rsi durante il viaggio Togliere dalle biciclette tutte le parti non collegate saldamente come ad es batteria per e bike pompa borsa valigetta o navigatori 4 NOTA Per migliorare il comportamento su strada del proprio veicolo montare per prima la bicicletta più pesante Se si trasporta una sola bicicletta fissarla nella guida più vicina alla parte posteriore del veicolo NOTA I bracci di fissaggio si ...

Страница 59: ...59 2 3 4 5 ...

Страница 60: ...inghie e quella posteriore con l apposita cinghia 4 Eventualmente tendere ulteriormente le cinghie 4 Prima di iniziare il viaggio assicurarsi che le cinghie utilizzate non siano danneggiate o logorate 4 Prima di iniziare il viaggio le cinghie danneggiate o logorate devono essere sostituite con altre in perfetto stato Utilizzare solo cinghie approvate dalla EAL GmbH 4 8 PERICOLO Danniapersoneocosed...

Страница 61: ...o danni alle cose a causa dello spostamento improvviso del portabi ciclette Parti del corpo e oggetti che durante l abbassa mento si trovano sotto o davanti al portabiciclette possono essere schiacciati Assicurasi che sotto il portabiciclette non ci sia nulla 4 Fare attenzione al proprio corpo specialmente allatesta mantenereunadistanzadisicurezza 4 Tenere il telaio superiore del portabici con ent...

Страница 62: ...chi completamente in avanti Entrambe le leve devono ora essere in posizione abbassata vedi figura 6 4 Controllare che il portabici sia inserito corretta mente Se necessario inserire il portabici come descritto in precedenza 4 5 6 Smontare il portabiciclette Pertogliereilportabiciclette procederepoiinordineinversorispetto a quello di montaggio Ripiegare la staffa a U e le luci posteriori 4 Scollega...

Страница 63: ... portabici sul gancio di traino Il portabiciclette non deve essere lasciato permanentemente esteso altrimenti polvere e sporcizia potrebbero accumularsi nel meccanismo di scorrimento impedendo al meccanismo di scorrere senza problemi Se le guide di scorrimento si sporcano sciacquarle immediatamente con acqua o pulirle di conseguenza Controllare l usura del portabici prima di ogni viaggio Le parti ...

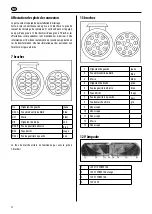
Страница 64: ...esso un azienda specializzata Nonèconsentitaunaconversioneoperatadapersone non istruite 7 poli 13 poli 1 L Indicatore di direzione sinistro giallo 2 54G Luce retronebbia blu 3 31 Massa bianco 4 R Indicatore di direzione destro verde 5 58R Luce di posizione posteriore destra marrone 6 54 Luci di stop rosso 7 58L Luce di posizione posteriore sinistra nero 1 Indicatore di direzione sinistro giallo 2 ...

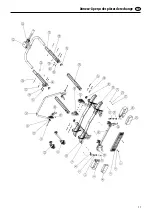
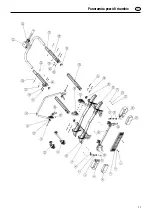
Страница 65: ...65 Panoramica pezzi di ricambio ...

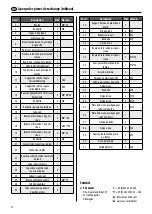
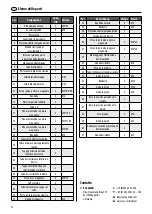
Страница 66: ...appo anteriore della parte inferiore tubo scorrevole 2 26 Tubo di scorrimento centrale 2 27 Vite a testa esagonale 4 M6 75 28 Tubo interno 4 29 Tubo scorrevole con tappo sul retro 2 30 Porta ruota in plastica a destra 1 31 Dado del cappuccio 6 M5 Pos Bezeichnung Menge Masse 32 Rondella a molla 6 M5 33 Rondella 6 M5 34 Protezione della lampada destra 1 35 Luce posteriore destra 1 36 Vite a testa to...

Страница 67: ...67 ...
Страница 68: ...68 EAL GmbH Otto Hausmann Ring 107 42115Wuppertal Deutschland 49 0 202 42 92 83 0 49 0 202 42 92 83 160 info eal vertrieb com www eal vertrieb com ...

Отзывы: