background image

DRAGON

27

English

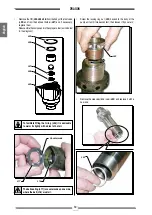
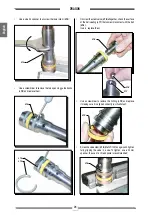
Lower seal

• 

Remove the piston stem (

L11

) and remove the pump unit 

sleeve (

L12

);

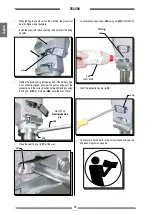
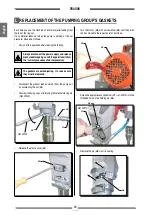
PIT STOP MAINTENANCE

Replacement of upper and lower gaskets 20 minutes.

• 

Lock the pump unit into a vice and unscrew it with a 50mm 
wrench;

• 

Release the pump unit from the body of the suction valve;

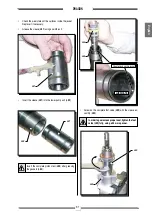
• 

Grip the stem valve (

L13

) in a vice;

• 

Unscrew the pump unit (

L9

) from the frontal flange. (

L10

).

L13

Countersunk 

side

L11

L12

L9

L10

Содержание Zeus

Страница 1: ...UFACTURER DIRECT LINE Tel 39 0341 621256 Fax 39 0341 621234 CUSTOMERS TECHNICAL SERVICE AIRLESS PISTON PUMPS THOR 220V 50Hz long pump unit Rif 20705 THOR 220V 50Hz short pump unit Rif 20700 JOLLY Rif 56501 NEW EXCALIBUR version on trolley Rif 18776 NEW EXCALIBUR top finish Rif 18783 ZEUS Rif K35100 R version on trolley Rif 18776 LIBUR finish Rif 18783 ...

Страница 2: ...ries Short Dragon 220V 50Hz without accessories Long Dragon 220V 50Hz without accessories Rigid Dragon 220V 50Hz without accessories Short petrol powered Dragon without accessories Long petrol powered Dragon without accessories Traction powered Dragon Liner with broken line painter Traction powered Dragon Liner 30183 30182 30185 30181 30180 30184 30187 30186 4650 4600 ...

Страница 3: ...er with long fiber n 1 Roller with medium fiber Flexible hose mt 2 3 16 M16x1 5 PLA 1 4 BASE SUPER FAST CLEAN Art K11446 K11441 K11436 cm 240 180 130 PLA M16x1 5 BASE SUPER FAST CLEAN Art K11445 K11440 K11435 cm 240 180 130 GUN EXTENSION Art 153 cm 30 Art 153 cm 40 Art 155 cm 60 Art 158 cm 80 Art 156 cm 100 ...

Страница 4: ...0 51 52 53 54 55 56 Cover cap Union Seal Package pressing kit Complete tank 100Lt O ring Lower cap seal Nut Chain Ring Cap holding chain Adjustment cylinder Adjustment spring Cap Complete tank Cleaning spatula Screw Spacers Screw Clamp Self tightening nut Complete cap coupling kit Fixing plate Wing nut Circulation hose complete with couplings and dispersion bell Suction tube Complete accessory kit...

Страница 5: ...AGON 60 English 100 LTANK ACCESSORY KIT 8 3 29 A 9 36 47 48 49 4 34 5 35 30 31 6 50 43 11 10 52 51 12 33 8 9 37 38 39 7 13 44 14 32 54 53 45 15 40 41 42 17 18 16 19 20 22 24 21 23 25 26 27 28 55 1 46 2 56 ...

Страница 6: ...DRAGON 59 English KIT KIT KIT Code 30193 COMPLETE GASKET KIT Code 30174 SLEEVE PISTON KIT Code 30160 FOOT VALVE SEAL KIT KIT Art 30194 PUMP REPAIR KIT COMPLETE ...

Страница 7: ...C25 20 SFC25 40 SFC25 60 SFC27 20 SFC27 40 SFC27 60 SFC27 80 SFC29 20 SFC29 40 SFC29 60 SFC29 80 SFC31 40 SFC31 60 SFC31 80 SFC33 40 SFC33 60 SFC33 80 SFC39 40 SFC39 60 SFC39 80 SFC43 40 SFC43 60 SFC43 80 SFC51 40 SFC51 60 SFC51 80 HIGH PRESSURE HOSE 3 8 M16x1 5 max pressure 425 bar Code 18063 7 5 mt Code 18064 10 mt Code 18065 15 mt ANTISTATIC HOSE 3 16 M16x1 5 max pressure 210 bar Code 6164 5 mt...

Страница 8: ...MX 850 MX 1100 MX 1100 ER Code 20101 FILTER PISTON GUNSTOCK FILTERS Code 11039 Green 30M Code 11038 White 60M Code 11037 Yellow 100M Code 11019 Red 200M Code 11000 AT 300 M16x1 5 Code 11090 AT 300 1 4 Code 147 HIGH PRESSURE GAUGE M16X1 5 Code 150 HIGH PRESSURE GAUGE GJ 1 4 Code 10156 SWIVEL CONNECTION FOR PLA 1 4 Code 10159 SWIVEL CONNECTION FOR PLA M16x1 5 ...

Страница 9: ...connection among all the electrical components at least every 200 working hours The length of the brush contact must be higher than 9 mm to guarantee a good working of the rotary group Length of new brush Minimum length of the brush Replace Code Description Brush 220V 50Hz Brush 110V 60Hz Brush holder plug 20280 20281 20282 Q ty 4 4 4 DISCONNECTTHEPOWERSUPPLYBEFORECHE CKING OR REPLACINGTHE BRUSHES...

Страница 10: ...t Clean Sleeve Prick punch complete Trigger gun Safety lever Brake Washer Trigger Pin Pin Pin Nut M3 Washer Gun body Pins Spring Bauer 11x6x0 6 Wedge Sleeve sealing Screw press sleeve Plate M3 nut Spring Adjustment knob Gasket Filter Handgrip Safety for hand 3 screws TSP 3x8 Spring Copper washer Articulated joints M16x1 5 Articulated joints 1 4 See table 18270 18280 11004 11005 11008 11010 11011 1...

Страница 11: ...RAGON 54 English 10 A 1 2 8 3 18 16 9 4 7 17 19 20 21 6 15 11 12 13 14 5 5a 5b 5c 5d 5h 5e 5b 5h 5a 5f 5g 5g O W HIGH PRESSURE GUN AT 300 WARNING Always indicate code and quantity for each part required ...

Страница 12: ...SEMBLY OFTHE CLUTCH UNIT ATTENTION Checkforproperclearance 0 5 0 05mm between the anchor and the rotor when assembling the clutch unit FITTING CLEARANCE 0 5 0 05mm FITTING CLEARANCE 0 5 0 05mm ANCHOR ROTOR FITTING CLEARANCE 0 5 0 05mm ...

Страница 13: ...EMBLY Ref 30175 ASSEMBLY Ref 30679 CARRIAGE ASSEMBLY Ref 30680 WARNING Always indicate code and quantity for each part required Pos Nut Washer Screw Extension cables Filter Code Description 1 2 3 4 5 Q ty 8 4 2 1 1 Pos Code Description Q ty 6 7 8 9 10 Support plate Nut Spacer Washer Screw 1 16 4 22 4 81010 95114 30451 20115 20101 20513 3637 20514 34009 69107 3 10 9 8 7 6 1 2 4 5 1 2 3 ...

Страница 14: ...25 26 27 28 29 30 31 32 33 34 35 36 Screw Tie rods Washer Nut Guard Screw Motor tongue Screw Reduction gear flange Snap ring for holes Radial bearing Hydraulic buffer assembly Support plate Washer Self tightening nut Spacer Screw Box Spacer 1 4 4 8 1 14 1 4 1 1 1 2 1 4 4 4 4 1 2 18186 3637 34009 54004 32005 18491 18492 20531 30682 30683 18463 18935 30656 30684 18490 30659 30686 18192 20508 95114 8...

Страница 15: ...58 Complete Liner box Ref 30689 Dragon Support kit gasoline Ref 30641 Complete reduction gear Ref 30652 Basic clutch unit Ref 30654 21 26 23 3 22 3 23 10 21 6C 15 16 17 20 4 5 6B 14 13 12 10 3 9 8 7 24 6A 5 1 25 11 3 2 3 23 31 32 33 36 2 21 32 31 30 29 39 34 18 19 4 28 27 ...

Страница 16: ... 60 Guard Washer Self tightening nut Alternator belt Screw Alternator pulley Alternator Screw Alternator fulcrum Alternator plate Safety shields Drain pipe 1 collar Washer Washer Safety cover Support plate Screw Support plate Washer Vibration damping pad Support bush Dragon Liner support Self tightening nut Screw Snap ring for holes Radial bearing Fifth wheel Axial roller cage R S bearing unit 1 1...

Страница 17: ... 1A 1B 23 5 21 20 19 18 24 17 18 24 22 5 25 26 24 2 47 35 32 33 5 30 32 33 31 33 32 35 39 25 38 30 40 37 36 11 43 42 46 24 23 48 41 49 50 35 57 56 38 53 55 25 54 25 50 51 35 9 4 44 45 24 23 60 58 59 58 52 6 14 Liner basic support kit Ref 30651 Dragon Liner support kit Ref 30640 Dragon Liner short pumping element Ref 30151 Liner Dragon kit with traction Ref 30653 Dragon Liner gearbox Ref 30652 ...

Страница 18: ...14 Tightening plate Dissipator Anti vibration washers Washer Screw Transparent sheet Knob Technical data label 1 1 3 3 3 1 1 1 30350 30357 5933 20355 20354 96028 20365 18483 18493 20352 8011 34009 34008 20340 20349 30280 O U LINERTYPE MACHINES ATTENTION Checkforproperclearance 0 5 0 05mm between the anchor and the rotor when assembling the clutch unit NOTES ONTHE ASSEMBLY OFTHE CLUTCH UNIT FITTING...

Страница 19: ...N 46 English O ELECTRICAL CONTROL EXPLODED VIEW WARNING Always indicate code and quantity for each part required T Complete 220V 50Hz box Ref 20350 110V 60Hz Ref 20350 110 14 8 5 6 3 12 6 7 2 4 13 1 9 11 12 ...

Страница 20: ...sition Carriage in compact position CARRIAGE Pos Complete carriage Carrying handle Pipe cap Bushing Carriage Code Description 1 2 3 4 Q ty 1 2 2 1 Pos Code Description Q ty 5 6 7 8 Split pin Wheel stop washer Wheel Ø260 mm Pipe cap 2 2 2 2 30300 30301 95159 18914 30302 18902 20305 37238 30304 3 2 4 5 7 6 8 1 ...

Страница 21: ...on tube Dispersion pin Code Description 1 2 3 4 5 6 7 8 Q ty 1 1 1 1 1 1 1 1 Pos Code Description Q ty 9 10 11 12 13 14 15 Bell Tube Tube coupling Complete jointed fi tting Sealing washer Ball seat Delivery pipe assembly 1 1 1 1 1 1 1 30430 33010 3387 20557 18350 37216 20556 18352 18351 20420 20422 20403 8071 30411 20455 WARNING Always indicate code and quantity for each part required 15 14 1 4 5 ...

Страница 22: ...ption Q ty 24 25 26 27 28 29 30 31 32 33 34 35 36 37 38 39 40 41 42 43 44 45 46 Positioning peg Bush Spring Complete rod Ring Or Valve casing Or Filter tank Sieve spring Filter sieve Sieve holder Or Nose union Filter base Nipple Ball seat Manometer Gasket Complete pressure gauge Filter assembly Washer O Ring 1 1 1 1 1 1 1 1 1 1 1 1 1 2 1 1 1 1 1 1 1 3 1 30401 30402 20457 20402 20450 34009 6151 330...

Страница 23: ...RAULIC BLOCK REF 30400 WARNING Always indicate code and quantity for each part required 9 45 40 45 37 42 41 43 39 18 36 35 34 33 32 38 18 37 44 17 14 15 19 13 12 5 11 10 1 7 6 9 45 8 16 31 30 29 22 27 26 25 23 24 20 28 4 46 2 21 3 ...

Страница 24: ...it casing Seal Upper pump unit casing Upper guide band Upper gasket Tightening ring nut Stuffing nut Long jacket assembly Adapter OR Upper guide band Seal Foot valve seal kit Complete seal kit Jacket piston kit 1 1 1 1 1 1 1 1 1 1 1 1 1 1 1 1 11 30100 20101 30130 65150 20148 30273 30132 30133 30158 16120 30165 30166 30119 18482 30107 30146 30120 30109 30110 30111 30112 30138 30139 30114 30113 3014...

Страница 25: ... WARNING Always indicate code and quantity for each part required 25 24 22 23 29 21 27 7 20 19 18 17 15 14 13 11 12 11 10 9 7 6 5 3 2 28 Ref 30100 1 LONG PUMP 4 30 26 16 8 CORRECT FITTING LIP CORRECT FITTING LIP Tightening pin Ref 20144 LIP LIP ...

Страница 26: ... OR Ball guide Closing ball Ball seat holder Seal Assembled valve 90 bend Suction pipefitting Seal sleeve Jacket assembly Stem assembly Foot valve unit Foot valve seal kit Complete seal kit Jacket piston kit Suction circulation hose kit 2 1 1 1 1 1 1 1 1 1 1 30150 30113 30114 30138 30139 30142 30112 95230 30109 30120 30107 18482 30121 30165 30166 16120 30158 30132 30144 30273 20148 65150 8039 3013...

Страница 27: ...te code and quantity for each part required Ref 30150 SHORT PUMPING ELEMENT Coupled to suction circulation hose kit Ref 30175 2 3 4 5 6 7 8 10 11 13 14 15 14 16 18 20 21 24 Tightening pin Ref 20144 CORRECT FITTING CORRECT FITTING 19 9 17 12 22 23 28 29 1 LIP LIP 30 25 27 26 ...

Страница 28: ...gidsuctiontubeforsolvent basedpaint Suctionfilterforsolvent basedpaint Jacket unit Rod unit Suction kit for solvent based paint Suction connector for water based paint Rigid suction tube for water based paint Suction filter for water based paint Suction kit for water based paint Ring Foot valve seal kit Complete seal kit Jacket piston kit 1 1 1 1 1 1 1 1 1 1 1 30190 30113 30114 30138 30139 30142 3...

Страница 29: ...RIGID PUMPING ELEMENT WARNING Always indicate code and quantity for each part required 2 3 5 6 7 8 10 11 13 14 15 14 16 18 20 21 24 Tightening pin Ref 20144 CORRECT FITTING LIP CORRECT FITTING 19 Ref 30190 RIGID PUMPING ELEMENT 9 17 12 22 23 LIP 28 29 4 35 ...

Страница 30: ...2 1 1 1 1 1 2 1 1 2 Pos Code Description Q ty 18 19 20 21 22 23 24 25 26 27 28 29 30 31 32 33 34 35 36 37 38 39 Inspection hatch Tin plate door Screw Reduction unit cover Cover assembly Eyebolt Fixing ring Front sticker Rivet Rubber washer Screws Screws Screws Warning label Protection plate Screws Threaded spacer Plate spacer Tightening ring Screw Fixing ring Pin 1 1 2 1 1 1 1 1 6 1 2 4 1 1 1 1 1 ...

Страница 31: ... COMPLETE ELECTRO MECHANICAL UNIT 21 31 18 26 25 14 14 4 5 22 20 3 15 30 7 6 Plug extractor ref 20213 Earth cable ref 5010 29 5 4 12 13 35 3 2 8 29 1 37 27 33 3 32 34 23 Supplied for lifting 6 7 9 10 11 38 16 24 17 36 28 39 ...

Страница 32: ...riage page 45 Circulation system unit Page 44 Basic hydraulic block ref 30400 Page 42 O M Complete electro mechanical Unit Page 34 O U Liner type machines Page 47 O V Petrol powered Dragon Page 50 O Y Accessories page 57 O O Complete short pumping element Page 38 O P Complete long pumping element Page 40 O Z Versions page 62 O W High pressure gun AT 300 Page 54 ...

Страница 33: ...elivery pipe is not correctly aligned unscrew the pump casing until the connectionisinthecorrectpositionbeforetighteningbyusing the ring nut N35 and the pin N36 supplied Ref 20144 When refitting the pump unit on the machine the stem must be at its highest point possible Insert the stem into the connecting rod and insert the fixing pin L8 Refit the inspection barrier L40 Ref 20144 Closing opening p...

Страница 34: ...rush Insert the sleeve L31 into the lower pump unit L32 Screw on the complete foot valve L29 with the sleeve as sembly L30 Inordertoguaranteeaproperseal tightenthefoot valve L29 fully using a 50 mm spanner Insert the complete piston stem L33 after greasing the gaskets L34 L31 L32 L31 L34 L29 L30 L33 Countersink on the jacket LUBRICATE ...

Страница 35: ...t then loosen it by one turn Remove the sleeve cylinder seal L30 and replace it with a new one RemovetheOR L25 L26 L28 fromthebodyofthefootvalve L29 and from the ball seat holder L27 and if necessary replace them Reassemblethecomponentsintheirproperorder asindicated in the diagram The ball seating L17 is countersunk on one side where the ball L18 must sit L20 L30 L17 L18 L29 L27 L26 L25 L28 Counte...

Страница 36: ...nd L24 located below the seal L23 and insert a new band in the same position The positioning of the seal L23 equires special care during assembly Assistinsertionbyapplyingleveragetotheoutsideofthering L23 pushing from the outside inwards and helping the ring to lodge in the seating while being careful not to damage the ring s contact surfaces Lubricate with grease before fitting Remove the ring L2...

Страница 37: ...er to remove the O Ring L19 and replace it making sure it is aligned correctly as illustrated Use a screwdriver to remove the two open ring guide bands L15 and replace them Use a size 24 spanner to unscrew the lower stem L14 Screwthevalvestem L16 Ref 20139 onagainandtighten fully gripping the valve in a vice To tighten use a 22 mm spanner the use of a thread paste is recommended L15 L15 L15 L14 ...

Страница 38: ...INTENANCE Replacement of upper and lower gaskets 20 minutes Lock the pump unit into a vice and unscrew it with a 50mm wrench Release the pump unit from the body of the suction valve Grip the stem valve L13 in a vice Unscrew the pump unit L9 from the frontal flange L10 L13 Countersunk side L11 L12 L9 L10 ...
Страница 39: ...surebeforegoingonwiththeoperations follow the correct procedure of decompression The gaskets are self adjusting If a leak occurs they must be replaced Disconnect the product feed hose L1 from the pump unit by unscrewing the nut L2 Unscrew the fixing ring nut L3 using the relevant closing pin Ref 20144 Release the plastic cover L4 Turn the motor L6 with a screwdriver L5 until the piston rod has mov...

Страница 40: ...sert the gun clamp K4 Clamp inserted Clamp released Makesurethattheelectricalsystemisearthedand complies with regulations WARNING If the equipment is still under pressure after performing the operations above described because of the nozzle or the flexible hose clogged proceed as follows Loosen very slowly the gun nozzle Release the clamp Point the gun at the container of the product and press the...

Страница 41: ...er of the gun butt is too fine The nozzle is worn The gaskets of the pumping group are worn Suction or delivery valve dirty Drain valve defective Material leaking from the O Ring Check the correct connection to the power supply Check the extension cable Ensure the On Off switch is on the on position and turn clockwise the pressure control knob Verify and replace it if necessary Verify and replace ...

Страница 42: ... box clean in order to guarantee correct heat exchange with the ambient air We suggest cleaning using a jet of compressed air PRESSURE SWITCH SEAL CHECK Check that no material is escaping from the safety hole I6 at the bottom of the protective container If necessary replace the O Ring for the pressure sensor I7 I5 I6 I7 ...

Страница 43: ...ck that it is tightened all the way The supplied pin I3 ref 20144 also serves the purpose of closing and opening the pump unit s locking ring nut I4 This ring nut must always be closed in order to act as a locking counter nut Use the lubricant I1 provided ref 16325 to make it easier to slide the piston inside the seal pack and to substitute the air with oil If the equipment is to be stopped for a ...

Страница 44: ...the rubber hose H7 and take away the bucket of water H6 Now point the spray gun H4 into the container H5 and press the trigger to recover any cleaning liquid left Run the pump s washing cycle until clean water flows out of the circulation hose H10 Close the recirculation safety valve H3 Asthepumpidles pressthe OFF 0 switch H2 tostop the tooling H2 ON H1 H3 Closed H5 H4 ...

Страница 45: ...wn Open the circulation safety valve H3 to discharge the pressure in the circuit Lift the suction hose and replace the bucket of product with an empty bucket H6 Connect a rubber hose H7 to a water tap H8 and fill the bucket H6 Position an empty bucket to collect the water H9 under the circulation hose H10 H2 OFF H3 H8 H7 H10 H9 Open H6 ...

Страница 46: ...uipment Take the cleaning liquid and store it in suitable containers Makesurethatthemachinesucksincleanwashing liquid Allow the cleaning liquid to discharge into anothercontaineranddonotmixitwiththecleaning liquid still to be used We recommend circulating the cleaning liquid for at least 15 minutes Asthepumpidles pressthe OFF 0 switch H2 tostop the tooling CLEANING FOR WATER BASED PRODUCTS Reduce ...

Страница 47: ...ncrete andnottosurfacesthatwillinsulate the container from the earth Hold the spray gun against the edge of the metal contained H5 Makesurethatthemachinesucksincleanwashing liquid Allow the cleaning liquid to discharge into anothercontaineranddonotmixitwiththecleaning liquid still to be used We recommend circulating the cleaning liquid for at least 15 minutes For disposing of the washing liquid se...

Страница 48: ...ay gun trigger down Open the recirculation safety valve H3 to release the pressure in the circuit Lift the suction hose and replace the bucket containing the product with a bucket of cleaning liquid make sure it is com patible with the product you are using Unscrew the nozzle on the spray gun remember to clean it with cleaning liquid Press the switch H2 ON I of the equipment H1 H2 OFF ON H2 Open H...

Страница 49: ... the maximum pres sure available releasing the gun trigger sudden increases of pressure can occur In this case the safety valve G5 opens automatically eliminating part of the product from the recirculating tube G6 Then it closes so as to go back to the first working conditions An irregular and marked spray on the sides indicates a low workingpressure Onthecontrary atoohighpressurecauses a high fog...

Страница 50: ...pen the recirculation safety valve G2 Make sure that the product circulates regularly from the circulation hose G5 Close the recirculation safety valve G2 Themachinecontinuestosuckupproductuntilithasfilledthe hose as far as the spray gun after which it will automatically stop when the set pressure is reached Closed G2 Open G2 ON G3 G4 Circulation and washing G5 ...

Страница 51: ...earth on the pump unit Use the tooling after performing all the SETTING UP ope rations above described Dip the suction pipe G1 into the product tank REMOVE THE FILTER F9 FOR DENSE PRO DUCTS Never use products containing halogen hydrocarbons as methy lene chloride If these products come into contact with aluminium partsoftheequipment canprovokedangerouschemicalreactions with risk of explosion G1 NO...

Страница 52: ...ep away from the pump in order to avoid the contact between the solvent fumes and the electric motor For disposing of the washing liquid see the re quirements laid down in the Standards in force in the country in which the equipment is used and act accordingly The Client is solely responsible for any irregular action taken before during or after disposing of washing liquid or in interpreting and a...

Страница 53: ...ded is positio ned correctly in order to earth the pump unit in the equipment properly Ensure the gun is without nozzle F3 Check the switch F5 is on the OFF 0 position before connecting the cable to the mains Place the pressure control knob F6 on the MIN position turn counterclockwise WASHING OFTHE NEW EQUIPMENT The equipment has already been adjusted at our factory with light mineral oil left ins...

Страница 54: ...be means of a specific clamp F4 in order to protect the operator against any risk of static or electric shock Should anyone use an extension cable between the tooling and the socket it must have the same characteristics as the cable supplied minimum diameter of the wire 4 mm2 with a maximum leng th of 50 mt Higher lengths and lower diameters can provoke excessive voltage falls and also an anomalou...

Страница 55: ...nches is suggested NEVER use sealants on fittings threads It is ADVISED to mount a high pressure manometer at the pump outlet see on page Accessories to read the product pressure Itisrecommendedtousethehoseprovidedwiththestandard kit ref 18036 NEVER use a damaged or a repaired flexible hose NEVER SPRAY OVER FLAMMABLE PRODUCTS OR SOL VENTS IN CLOSED PLACES NEVER USE THE TOOLING IN PRESENCE OF POTEN...

Страница 56: ...the product in the hose can create static electricity through discharges andsparks Itissuggestedtoearththeequipment The pump is earthed through the earth cable of the supply The gun is earthed through the high pressure flexible hose All the conductors near the work area must be earthed KEEPYOUR WORK PLACE CLEAN ANDTIDY DISORDER WHEREYOUAREWORKINGCREATESAPOTENTIALRISK OF ACCIDENTS ALWAYS KEEP PROPE...

Страница 57: ... sure that the machine is earthed Replace it Wait until the equipment has stopped completely before using it for a new job Solution D TRANSPORT AND UNPACKING The packed parts should be handled as indicated in the symbols and markings on the outside of the packing Before installing the equipment ensure that the area to be used is large enough for such purposes is properly lit and has a clean smooth...

Страница 58: ...obeswitchedoffandonagainusing switch 1 Eachtimethemachineisswitchedoff theconden sers remain charged for about 5 minutes Toavoidriskofshock whenremovingtheelectrical box wait until the condensers have discharged altogether FUNCTIONSTABLE Description of function Type of function Function symbol P J Pd c h Working pressure bar Motor current A Pressure setting bar Dissipator temp C Working hours h In...

Страница 59: ...11 Suction filter Pressure gauge Airless manual gun AT 300 Trigger safety clamp Description POS 12 13 14 15 Earth cable with clamp Control equipment ON OFF switch Flexible pipe connection Description 10 11 12 13 9 14 15 9 8 10 11 ...

Страница 60: ...7 DESCRIPTION OFTHE EQUIPMENT Electric motor Pressure transmitter Pumping group High pressure flexible pipe of compen sation Ø3 8 Description Recirculation tube Recirculation safety valve Line filter optional Description 3 4 3 2 1 6 5 5 6 7 ...

Страница 61: ...EL OF THE SOUND PRESSURE MINIMUM WIDTH MINIMUM HEIGHT MAXIMUM HEIGHT MINIMUM ENCUMBRANCE 230V C A 50Hz 9 Kw casynchronous 2 4 kW 230 bar 5 L min M16 x 1 5 M 66 Kg 60dB A A 560 mm B 945 mm C 1040 mm D 790 mm Available on request with special voltages Parts of the pump in contact with the material Stainless Steel AISI 420B Teflon PTFE Aluminium Galvanised steel C A B D ...

Страница 62: ...ump outlet and then sent to the gun through the flexible hose An electronic device located next to the reduction box is used to regulateandcontrolthepressureofthematerialleavingthepump When the pump reaches the set value the motor stops and starts again when the value decreases Asafetyvalveavoidingoverpressure guaranteesthetotalreliability of the equipment Indoor Outdoor Industrial buildings Indus...

Страница 63: ...icates wound and finger squashing risk due to movable parts in the equipment Tenersi lontano dalle parti in movimento Do not use the equipment without the proper protection Before any inspection or maintenance of the equipment carry out the decompression procedure explained in this manual and prevent any risk of the equipment starting unexpectedly Report any risk of chemical reaction or explosion ...

Страница 64: ...o ring p 23 PROBLEMS AND SOLUTIONS p 24 CORRECT PROCEDURE OF DECOMPRESSION p 25 REPLACEMENT OF THE PUMPING GROUP S GASKETS p 26 Pit stop maintenance p 27 Lower seal p 27 Upper seal p 29 SPARE PARTS COMPLETE ELECTRO MECHANICAL UNIT p 34 COMPLETE RIGID PUMPING ELEMENT p 36 COMPLETE SHORT PUMPING ELEMENT p 38 COMPLETE LONG ELEMENT p 40 BASIC HYDRAULIC BLOCK REF 30400 p 42 CIRCULATION SYSTEM UNIT p 44...

Страница 65: ... manual without prior notice This manual is to be considered as an English language translation of the original manual in Italian The manufacturer shall bear no responsibility for any damages or inconveniences that may arise due to the incorrect translation of the instructions contained within the original manual in Italian ...

Страница 66: ...OPERATING AND MAINTENANCE INSTRUCTION OPERATING AND MAINTENANCE INSTRUCTION ENGLISH P A I N T S P R A Y I N G E Q U I P M E N T Ed 007 11 11 ELECTRIC PISTON PUMP ...

Отзывы: