background image


28


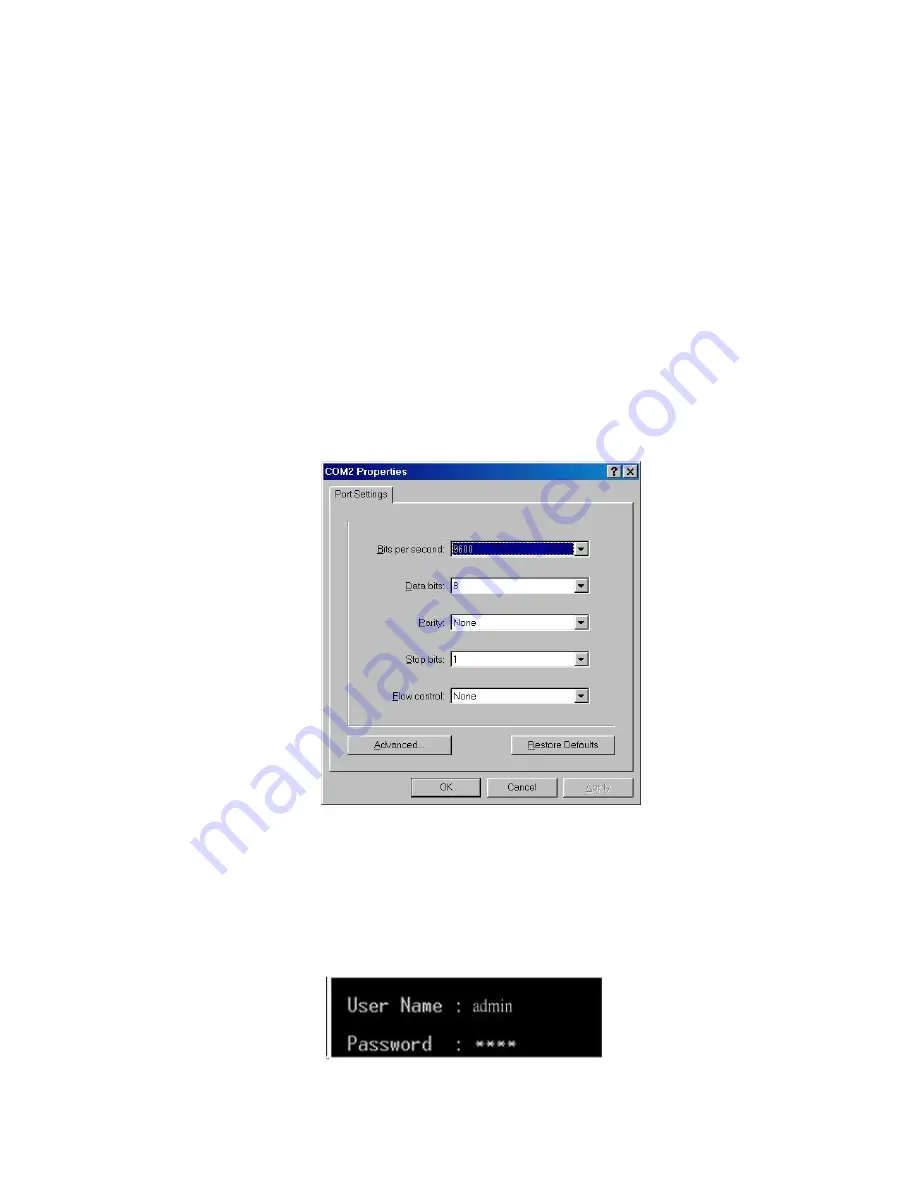
5.2  Login in the Console Interface   


When  the  connection  between  Switch  and  PC  is  ready,  turn  on  the  PC  and  run  a 

terminal  emulation  program


or 

Hyper  Terminal

  and  configure  its 

communication 

parameters

 to match the following default characteristics of the console port: 


Baud Rate:115200 bps 

Data Bits: 8 

Parity: none 

Stop Bit: 1 

Flow control: None 


  The settings of communication parameters 


Having  finished  the  parameter  settings,  click 

OK

’.  When  the  blank  screen  shows  up, 

press Enter key to have the login prompt appears. Key in 

admin

’ (default value) for both 

User  name  and  Password  (use 

Enter

  key  to  switch),  then  press  Enter  and  the  Main 

Menu of console management appears. Please see below figure for login screen. 


Console login interface

Содержание IES-3208C

Страница 1: ...IES 3208C 3307C IPES 3208C 3307C IPES 3208CB 3307CB 8 7 10 100Tx 2 3 10 100 1000T Dual Speed SFP Combo and 8 7 PoE at af Mode A Mode B Industrial Managed Switch w ITU G 8032 Ring User Manual Mar 2014...

Страница 2: ...consent of Lantech Communications Global Inc Products offered may contain software which is proprietary to Lantech Communications Global Inc The offer or supply of these products and services does no...

Страница 3: ...occur in a particular installation If this equipment does cause harmful interference to radio or television reception which can be determined by turning the equipment off and on the user is encourage...

Страница 4: ...are installation 14 3 2 DIN Rail Mounting 15 3 3 Wall Mount Plate Mounting 17 3 4 Wiring the Power Inputs 18 3 5 Wiring the Fault Alarm Contact 19 3 6 Cabling 20 Chapter 4 Network Application 23 ITU G...

Страница 5: ...35 6 4 6 SNMP Configuration 39 6 4 7 Fault Relay Configuration 40 6 4 8 Digital Input Output 42 6 5 Event Log 44 6 5 1 View Logs 44 6 5 2 Events 45 6 5 3 DDM event 46 6 5 4 Actions 47 6 5 5 Event Act...

Страница 6: ...dress Tables 73 6 10 2 Access Control List 74 6 10 3 IEEE 802 1X Radius Server 75 6 10 4 IP Security 76 6 11 VLAN 77 6 11 1 802 1Q VLAN Config 77 6 11 2 Status 79 6 12 MVR 80 6 12 LLDP 81 6 12 1 LLDP...

Страница 7: ...5 6 Bridge status of all ports 100 6 16 Aggregation 101 6 16 1 Aggregation Configuration 101 6 16 2 LACP Port Status 102 6 17 G 8032 ERPS 104 6 17 1 G 8032 Ethernet Ring Protection Configuration105 6...

Страница 8: ...ery Protocol CDP and LLDP for Ciscoworks to detect the switch info to be shown on L2 map topology The user friendly UI innovative auto topology drawing and topology demo makes Lantech Full gigabit ser...

Страница 9: ...p and restore Network Cable 10 100Tx 2 pair UTP STP Cat 5 5E 6 cable EIA TIA 568 100 ohm 100m Protocol CSMA CD LED Per unit Power 1 Green Power 2 Green FAULT Red Ethernet port Link Activity Green 100T...

Страница 10: ...EN61000 4 8 CE EN61000 4 11 CE EN61000 4 12 CE EN61000 6 2 CE EN61000 6 4 Stability Testing IEC60068 2 32 Free fall IEC60068 2 27 Shock IEC60068 2 6 Vibration Software Features Management SNMP v1 v2c...

Страница 11: ...ping PoE Management IPES series PoE Detection to check if PD is hang up then restart the PD PoE scheduling to On Off upon routine time table Per port PoE status include voltage current and watts VLAN...

Страница 12: ...queues IP Security Supports 10 IP addresses that have permission to access the switch management and to prevent unauthorized intruder Login Security Supports IEEE802 1X Authentication RADIUS Port Mir...

Страница 13: ...P Server and 6 e mail accounts for receiving event alert Relay Alarm Provides one relay output for port breakdown power fail Alarm Relay current carry ability 1A DC24V SNMP Trap 1 Topology Change 2 Po...

Страница 14: ...7 ifAlias Each port allows an alphabetic string of 128 byte assigned as its own unique name via the SNMP or CLI interface...

Страница 15: ...2 Hardware Description In this paragraph it will describe the Industrial switch s hardware spec port cabling information and wiring installation 2 1 Physical Dimension Metal case IP 30 74 W x 105 D x...

Страница 16: ...9...

Страница 17: ...t access to hazardous parts e g electrical conductors moving parts and the ingress of solid foreign objects Level Object size protected against Effective against 0 No protection against contact and in...

Страница 18: ...est duration 10 minutes Water equivalent to 3 mm rainfall per minute 3 Spraying water Water falling as a spray at any angle up to 60 from the vertical shall have no harmful effect Test duration 5 minu...

Страница 19: ...f at least 1 m measured at bottom of device and at least 15 cm measured at top of device 8 Immersion beyond 1 m The equipment is suitable for continuous immersion in water under conditions which shall...

Страница 20: ...tch PWR1 Green On Power 1 is active Off Power 1 is inactive PWR2 Green On Power 2 is active Off Power 2 is inactive FAULT Red On Power or port failure Off No failure P1 P8 3208 P1 P7 3307 Link Ack On...

Страница 21: ...ow to wire the power The power LED on the Industrial switch will light up Please refer to the LED Indicators section for indication of LED lights 5 Prepare the twisted pair straight through Category 5...

Страница 22: ...l is screwed on the industrial switch when out of factory If the DIN Rail is not screwed on the industrial switch please see the following pictures to screw the DIN Rail on the switch Follow the steps...

Страница 23: ...sert the top of DIN Rail into the track 2 Then lightly push the DIN Rail into the track 3 Check if the DIN Rail is tightened on the track or not 4 To remove the industrial switch from the track revers...

Страница 24: ...s to remove the DIN Rail 2 Place the wall mount plate on the rear panel of the industrial switch 3 Use the screws to screw the wall mount plate on the industrial switch 4 Use the hook holes at the cor...

Страница 25: ...and 2 for power 1 or 5 and 6 for power 2 Tighten the wire clamp screws for preventing the wires from loosing 3 The PoE Mode B only support Power Input 1 PWR1 if you only connect PWR2 with switch it w...

Страница 26: ...e switch will detect the fault status of the power failure or port link failure available for managed model and then forms an open circuit The following illustration shows an application example for w...

Страница 27: ...sceiver used in optical communications for both telecommunication and data communications The SFP slots supporting Gigabit speed up to 1000Mbps DSFP DFT models support dual speed 100M or 1000Mbps They...

Страница 28: ...21 Transceiver Inserted Second insert the fiber cable of LC connector into the transceiver LC connector to the transceiver...

Страница 29: ...follow the steps shown below First press the upper side of the LC connector to release from the transceiver and pull it out Remove LC connector Second push down the metal loop and pull the transceive...

Страница 30: ...munication Unit G 8032 v2 draft The benefits of G 8032 are 1 50ms recovery time when failover 2 G 8032 has defined the protocol scheme parameters functions test measures to be unified that the users c...

Страница 31: ...24 Multiple Rings...

Страница 32: ...25 Dual Homing Chain...

Страница 33: ...26...

Страница 34: ...or Attach the end of RS 232 connector to PC or terminal and the other end of RJ 45 connector to the console port of the switch The connected terminal or PC must support the terminal emulation program...

Страница 35: ...e port Baud Rate 115200 bps Data Bits 8 Parity none Stop Bit 1 Flow control None The settings of communication parameters Having finished the parameter settings click OK When the blank screen shows up...

Страница 36: ...nagement supports Internet Explorer 6 0 or later version And it is applied for Java Applets for reducing network bandwidth consumption enhance access speed and present an easy viewing screen 6 2 Prepa...

Страница 37: ...n will appear right after 4 Key in the user name and password The default user name and password are the same as admin 5 Press Enter or click the OK button and then the home screen of the Web based ma...

Страница 38: ...be a minus sign The allowed string length is 0 to 255 Description Display the description of switch The allowed string length is 0 to 255 Location The physical location of this node e g telephone clos...

Страница 39: ...formation User can find the system name description location and contact personnel to identify the switch The version table below is a read only field to show the basic information of the switch 6 4 3...

Страница 40: ...the DHCP server IP Address Assign a static IP address to the switch from the subnet address range that the network is using If DHCP client function is enabled this switch is configured as a DHCP clie...

Страница 41: ...ftware keeps track of IP addresses rather than requiring an administrator to manage the task This means that a new computer can be added to a network without the hassle of manually assigning it a uniq...

Страница 42: ...ynamic IP will not been occupied for a long time or the server doesn t know that the dynamic IP is idle And then click Apply 6 4 5 System Time SNTP Simple Network Time Protocol is a simplified version...

Страница 43: ...e lists the different location time zone for your reference Local Time Zone Conversion from UTC Time at 12 00 UTC November Time Zone 1 hour 11am Oscar Time Zone 2 hours 10 am ADT Atlantic Daylight 3 h...

Страница 44: ...USSR Zone 2 3 hours 3 pm ZP4 USSR Zone 3 4 hours 4 pm ZP5 USSR Zone 4 5 hours 5 pm ZP6 USSR Zone 5 6 hours 6 pm WAST West Australian Standard 7 hours 7 pm CCT China Coast USSR Zone 7 8 hours 8 pm JST...

Страница 45: ...o use the service from SNTP server the system time will follow the SNTP server disable is to use local time without any SNTP server information note that the network should be enabled to have system r...

Страница 46: ...s or change notices from network devices implementing SNMP Agent Version Select the SNMP version V1 V2c or V3 that you want to use And then Click Apply to switch to the selected SNMP version mode Here...

Страница 47: ...ap version IP Address Enter the IP address of the trap manager Community Enter the community string for the trap station Version Select the SNMP trap version type v1 or v2c Click Add To remove the com...

Страница 48: ...e port failure occurs certainly the check box beside the port must be ticked first Please refer to the segment of Wiring the Fault Alarm Contact for the failure detection Power Failure Tick the check...

Страница 49: ...n is enabled first Digital Input DI0 and second Digital Input DI1 will then be available respectively Digital Input Choose the transition type to trigger DI0 DI1 Low High Having focused this radio but...

Страница 50: ...er or not to send the events via digital output with the event about port fail or power fail or both Action Choose the transition type of DO0 DO1 Low High When switch receive the event about port fail...

Страница 51: ...44 6 5 Event Log 6 5 1 View Logs This will show you the log in local interface you can press or F5 to refresh the web page and get the newest event log...

Страница 52: ...vent here for example if you set the blue bar in the range from 20V to 50V when the voltage of power input is over 50VDC or lower than the 20VDC it will trigger the event system Note This function onl...

Страница 53: ...ove including SFP temperature input voltage TX bias TX dBm and RX dBM You can set the trigger range of each event here for example when you set the blue bar in the range from 45 C to 90 C if the worki...

Страница 54: ...47 6 5 4 Actions 6 5 4 1 Local Log Action Save to Local Save log to local file 6 5 4 2 Remote Syslog Action Log to Remote Syslog Server Save log to Syslog Server...

Страница 55: ...48 6 5 4 3 Email Action Email Alert Sent log via Email 6 5 4 4 SMS Action SMS Alert Sent log via SMS service The must connect with internet and define the SMS server before using this function...

Страница 56: ...ed by Lantech in Taiwan 6 5 4 5 SNMP Trap Action SNMP Trap Action The setting page of this function will be redirect to SNMP TRAP 6 5 3 6 DOut Action DOUT Action The setting page of this function will...

Страница 57: ...n Map 6 5 5 1Event Actions A Choose the event which you want to active B You will find the event which you select will be display as below then choose forwarding method to define how to forward this e...

Страница 58: ...51 C You can set the forwarding method of port break event in here...

Страница 59: ...switch port Flow Control Whether or not the receiving node sends feedback to the sending node is determined by this item When enabled once thedevice exceeds the input data rate of another device the...

Страница 60: ...er Type Displays the current speed of connection to the port Link The status of linking Up or Down State It s set by Port Control When the state is disabled the port will not transmit or receive any p...

Страница 61: ...monitored by one specific port which means traffic goes in or out monitored source ports will be duplicated into mirror destination port Destination You can set which switch port will be responsible f...

Страница 62: ...tion type All the ports support port egress rate control For example assume port 1 is 10Mbps users can set it s effective egress rate is 1Mbps ingress rate is 500Kbps The switch performs the ingress r...

Страница 63: ...ng Protection frames Enable Loop Protection Control whether loop protections is enabled as a whole Interval The interval between each loop protection PDU sent on each port valid values are 1 to 10 sec...

Страница 64: ...sive injectors use a transformer on the data pins to allow power and data to share the cable and is typically compatible with 802 3af Mode A In the common passive PoE system the injector does not comm...

Страница 65: ...58 6 7 1 Configuration PoE Mode A Maximum Power Available This function will limit the total power consumption and cannot exceed 250W...

Страница 66: ...Set the priority of power supply if the total power consumption of all PoE ports was over the value of maximum power available the switch will offer the power to the high priority PoE port and stop t...

Страница 67: ...onnection status of each PoE port State The PoE state of the end device Unknown means the end device is none PD device Temperature Temperature of PoE chipset Current Output current of each PoE port Vo...

Страница 68: ...ve 25 50W 54VDC 6 7 3 Detection The PoE detection function is to detect whether the connected PD is still alive by pinging the IP address Should the PD is not responding the switch can be set for cons...

Страница 69: ...the connected PD Interval How frequent the switch will ping the IP address of PD Retry Time How many times of ping failure the switch will define the PD as dead or failure Failure Log Failure times of...

Страница 70: ...PoE port always Restart Once only restart the PoE power one time Reboot time To set the reboot time of PD in order for the switch to check PD connection after PD is completely boot up 6 7 4 Schedulin...

Страница 71: ...64 6 7 5 Configuration PoE Mode B Port No The number of each PoE port Enable Enable disable the PoE function of each PoE port Scheduling This PoE port will be managed by scheduling function...

Страница 72: ...each PoE port Voltage Output Voltage of each PoE port Power Power consumption of each PoE port 6 7 7 Detection Mode B The PoE detection function is to detect whether the connected PD is still alive by...

Страница 73: ...the connected PD Interval How frequent the switch will ping the IP address of PD Retry Time How many times of ping failure the switch will define the PD as dead or failure Failure Log Failure times of...

Страница 74: ...port always Restart Once only restart the PoE power one time Reboot time To set the reboot time of PD in order for the switch to check PD connection after PD is completely boot up 6 7 8 Scheduling Mo...

Страница 75: ...g can show the backup path with the dot line for overall picture please remember to enable LLDP function before you use this function Topology Status Text View Display each switch in your network by t...

Страница 76: ...ew Display each switch connection in the network by graphic You can see the topology diagram which is assorted by the LLDP information Physical display the physical connection of network Ring Beside t...

Страница 77: ...70 Demo Demo display each topology in different connection...

Страница 78: ...is a limited resource for example in cellular data communication In the absence of network congestion QoS mechanisms are not required 6 9 1 QoS Policy Using the weight fair queue scheme tThe switch wi...

Страница 79: ...licy for each port Tos ToS priority the system provides 0 63 ToS priority level Each level has 8 type of priority 0 7 The default value is 1 priority for each level When the IP packet is received the...

Страница 80: ...ain You can add modify delete a static MAC address MAC Address Enter the MAC address of the port that should permanently forward traffic regardless of the device network activity VLAN ID Entering the...

Страница 81: ...to enable the ACL function Direction Let the switch check the destination address or source address of packet Address assign the MAC address which you want to deny Mask set the mask to filter the MAC...

Страница 82: ...ing the IEEE 802 1X function you can configure the parameters of this function Server IP Assign the RADIUS Server IP address Server Port Set the UDP destination port for authentication requests to the...

Страница 83: ...e available Enable Web Server When this check box is checked the IP addresses among IP permit list will be allowed to access via web service Enable Telnet Server When this check box is checked the IP...

Страница 84: ...traffic so only the members of the same VLAN will receive traffic from the ones of the same VLAN Basically creating a VLAN on a switch is logically equivalent of reconnecting a group of network device...

Страница 85: ...ding of tagged frame the column field of Tagged VID is not available 2 Trunk Link A segment which provides the link path for one or more VLAN aware devices switches A Trunk Port connected to the trunk...

Страница 86: ...nk Type is set as Access Link and Hybrid Link Assign a number in the range between 1 and 4094 Tagged VID This column field is available when Link Type is set as Trunk Link and Hybrid Link Assign a num...

Страница 87: ...criber port which is a switch port configured as an MVR receiver port When a subscriber selects a channel the set top box or PC sends an IGMP join message to Switch A in order to join the appropriate...

Страница 88: ...the data link layer only allowing two systems running different network layer protocols to learn about each other 6 12 1 LLDP Configuration Enabled Enabled The switch will send out LLDP information an...

Страница 89: ...ation and will analyze LLDP information received from neighbors 6 12 2 LLDP Neighbor This page provides a status overview for all LLDP neighbors The displayed table contains a row for each port on whi...

Страница 90: ...hone 7 DOCSIS cable device 8 Station only 9 Reserved When a capability is enabled the capability is followed by If the capability is disabled the capability is followed by Management Address Managemen...

Страница 91: ...entries added since switch reboot Neighbours Deleted Shows the number of new entries deleted since switch reboot Frames Discarded If an LLDP frame is received on a port and the switch s internal tabl...

Страница 92: ...Aged Out Shows the number of entries deleted due to Time To Live expiring Neighbors Added Shows the number of new entries added since switch reboot Neighbors Deleted Shows the number of new entries de...

Страница 93: ...port TLVs Discarded Each LLDP frame can contain multiple pieces of information known as TLVs TLV is short for Type Length Value If a TLV is malformed it is counted and discarded TLVs Unrecognized The...

Страница 94: ...P information received from neighbors Tx Interval secs The switch periodically transmits CDP frames to its neighbours for having the network discovery information up to date The interval between each...

Страница 95: ...om neighbors 6 13 3 CDP Status Statistics Total Packets Output The number of CDP frames transmitted on the switch Total Packets Input The number of CDP frames received on the switch Neighbors The disp...

Страница 96: ...fication of the neighbor s CDP frames Platform Platform is the description advertised by the neighbor unit Software Version Software Version is the software version advertised by the neighbor unit Add...

Страница 97: ...switch support IP multicast you can enable IGMP protocol on web management s switch setting configuration page then the IGMP snooping information displays IP multicast addresses range are from 224 0 0...

Страница 98: ...itch know how to process the Multicast data stream which was unregistered with IGMP Query 6 14 1 2 Port Related Configuration Port The switch port number of the logical port Router Port Specify which...

Страница 99: ...uerior status is ACTIVE or IDLE DISABLE denotes the specific interface is administratively disabled Queries Transmitted The number of Transmitted Queries Queries Received The number of Received Querie...

Страница 100: ...ed The number of Received V2 Leaves IGMP Groups Entries in the IGMP Group Table are shown on this page VLAN ID VLAN ID of the group Multicast Addresses Group address of the group displayed Port Member...

Страница 101: ...ation Mode Show the STP protocol version setting Valid values are STP RSTP and MSTP Name The name identifying the VLAN to MSTI mapping Bridges must share the name and revision see below as well as the...

Страница 102: ...e 6 to 40 seconds and MaxAge must be FwdDelay 1 2 Maximum Hop Count This defines the initial value of remaining Hops for MSTI information generated at the boundary of an MSTI region It defines how man...

Страница 103: ...96 6 15 2 3 Remember to press Apply 6 15 1 4 Save setting...

Страница 104: ...forms a Bridge Identifier 6 15 3 2 Port Port No The switch port number of the logical STP port Enabled STP Control whether STP is enabled on this switch port Path Cost Controls the path cost incurred...

Страница 105: ...or forced either true or false Transition to the forwarding state is faster for point to point LANs than for shared media 6 15 4 MSTP MSTI Settings Instance No VLANs The list of VLANs mapped to the MS...

Страница 106: ...dge Root Port The switch port currently assigned the root port role Root Cost Root Path Cost For the Root Bridge it is zero For all other Bridges it is the sum of the Port Path Costs on the least cost...

Страница 107: ...P port Role The current STP port role of the port The port role can be one of the following values AlternatePort BackupPort RootPort DesignatedPort Disabled State The current STP port state of the por...

Страница 108: ...single logical channel All the ports within the logical channel or so called logical aggregator work at the same connection speed and LACP operation requires full duplex mode 6 16 1 Aggregation Confi...

Страница 109: ...down Backup means that the port could not join the aggregation group but will join if other port leaves Meanwhile it s LACP status is disabled System ID The ID of each Trunking group Port Members Eac...

Страница 110: ...103...

Страница 111: ...d never form loops which would fatally affect network operation and service availability 6 18 1 Ring Mode Auto All switches will define its role if ITU Ring automatically At beginning all switches wil...

Страница 112: ...hbor Type Type of Protection ring It can be either major ring or sub ring Ring Port 0 This will create a Port 0 of the switch in the ring Ring Port 1 This will create Ring Port 1 of the switch in the...

Страница 113: ...with G 8032 protocol PS in this case we will use the port9 and port10 of each switch to build a ring Enter edit mode There are 3 roles in the ring of G 8032 owner neighbour and none remember 3 roles...

Страница 114: ...ocked at first To be safe we suggest to finish all the settings of G8032 before connecting physically if the user is not familiar with the ring G8032 function The setting of owner switch Because we on...

Страница 115: ...108 The setting of none switch 6 18 Dual Homing...

Страница 116: ...his function was designed to connect ITU Ring with the other 3rd party switches while maintaining redundant path ID the ID of Dual Homing connection Enable enable the Dual Homing function of this port...

Страница 117: ...intenance 6 19 1 Save Configuration Save setting of switch 6 19 2 Config backup restore Settings Backup You can download the backup configuration of the switch Settings Restore You can copy the backup...

Страница 118: ...the configuration of the switch on this page Only the IP configuration is retained The new configuration is available immediately which means that no res tart is necessary 6 19 3 Restart device Reboot...

Страница 119: ...are Upgrade Update the switch with the firmware file which on your desktop 6 19 5 Diagnostics PING Address Set the IP address which you want to ping Count Set the times of Ping Packet Size set the siz...

Страница 120: ...find the MAC address of each IP you have ping via this switch in here DDM You can monitor the status of SFP module via DDM function Note Only the SFP module which support DDM spe can offer the DDM in...

Страница 121: ...114 Hide Thresholds hide the thresholds information and only display the status information Event setup will be redirected to DDM event please reference to page47...

Страница 122: ...115...

Страница 123: ...ady turn on the PC and run a terminal emulation program or Hyper Terminal and configure its communication parameters to match the following default characteristics of the console port Baud Rate 115200...

Страница 124: ...Main Menu of console management appears Please see below figure for login screen Notice if you forgot the password you can access the switch via console port and input lantech lantech to restore the p...

Страница 125: ...et utility to access switch IP and make sure the socket was set as 23 all the commands under Telnet mode were the same as the Console mode 3 Commands 3 1 System Command system Parameter N A Descriptio...

Страница 126: ...119 3 1 1 Command system configuration Parameter N A Description show the information of switch Example...

Страница 127: ...e contact windows to jacky lantechcom tw 3 1 3 Command system name Parameter N A Description display or fix the system name Example 3 1 4 Command system location Parameter N A Description display or f...

Страница 128: ...system DHCP server Parameter enable disable enable or disable DHCP server range_low range_high set the IP range netmask set submask gateway set gateway dns set DNS server lease_time set the lease time...

Страница 129: ...ess Example 3 1 10 Command system netsettingIPv4 Parameter IpAddr set IP address netmask set netmask gatewayip set gateway dnsip set DNS server Description set the IP detail of switch Example 3 1 11 C...

Страница 130: ...all but keep original IP address and account keep_ip restore all but keep original IP address keep_account restore all but keep original account Description restore the setting of switch to factory de...

Страница 131: ...ress Example 3 1 18 Command system memory Parameter N A Description display the status of used switch memory Example 3 1 19 Command system configaccess Parameter export import export or import the set...

Страница 132: ...irmware file support TFTP and FTP and HTTP protocol Description update switch firmware Example 3 2 LLDP Command LLDP Parameter N A Description Enter the LLDP mode Example 3 2 1 Command LLDP configurat...

Страница 133: ...LLDP information of the dedicated port enabledRxTx enable Tx and Rx of LLDP function with dedicated port enabledTxOnly enable Tx only of LLDP function with dedicated port enabledRxOnly enable Rx only...

Страница 134: ...tion set the interval time of LLDP Example 3 2 5 Command LLDP timetolive Parameter N A Description display the alive time of LLDP information Example 3 2 6 Command LLDP info Parameter N A Description...

Страница 135: ...128 3 2 7 Command LLDP statistics Parameter N A Description display the detail information of LLDP settings Example 3 3 Port Command port Parameter N A Description Enter the port mode Example...

Страница 136: ...3 3 1 Command port configuration Parameter N A Description display the setting of each port Example 3 3 2 Command port status Parameter N A Description display the connection status of each port Exam...

Страница 137: ...port_list choose which port you want to enable or diasble enable disable enable disable Description enable or disable switch port Example 3 3 4 Command port description Parameter N A Description disp...

Страница 138: ...iption display the speed of each port Example 3 3 6 Command port flowcontrol Parameter port_list choose which port you want to enable or diasble enable disable enable disable Description enable or dis...

Страница 139: ...which port you want to set the ingress rate rate kbps set the ingress rate of these packet as below broadcast multicast unicast broad_uni broad_multi multi_uni uni_broad_multi Description set the ing...

Страница 140: ...oose which port you want to set the ingress rate rate kbps set the ingress rate Description set the egress rate of the dedicated port Example 3 3 9 Command port statistics Parameter N A Description di...

Страница 141: ...134...

Отзывы: