background image

Sub Transmission Mode

67

4

B

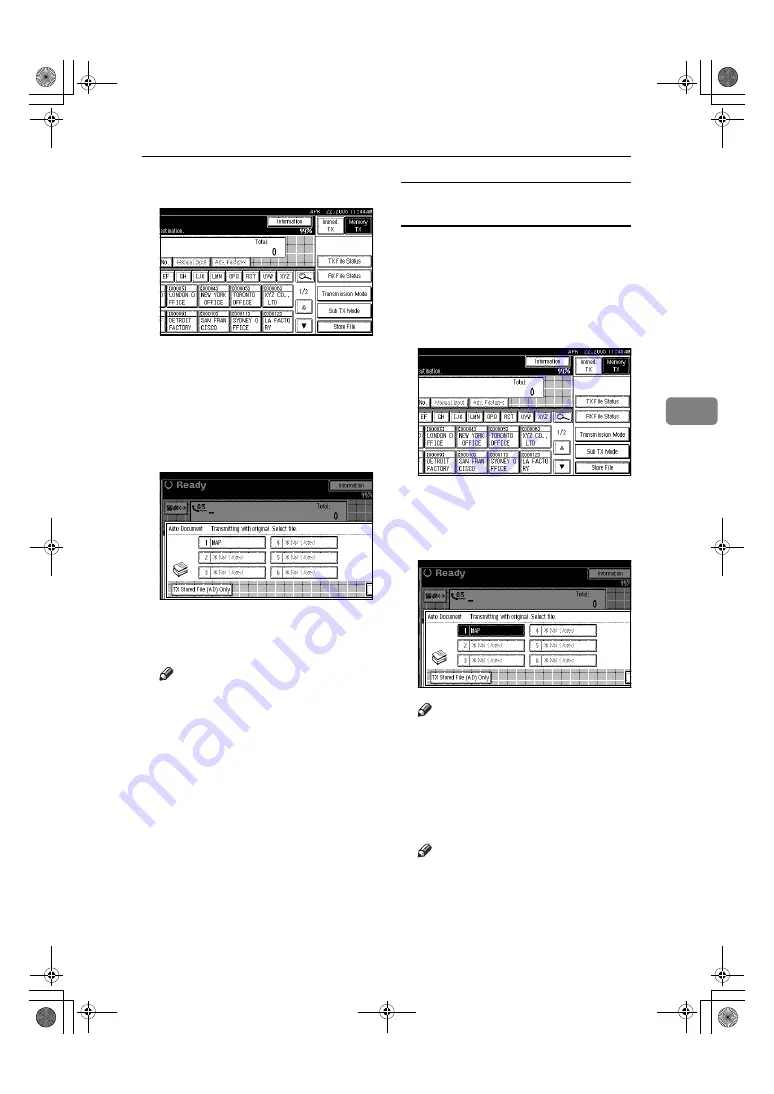
Press 

[

Sub TX Mode

]

.

C

Press 

[

Auto Document

]

.

D

Select an Auto Document file, and
then press 

[

OK

]

.

When you fax an Auto Document
by itself, press 

[

TX Stored File (AD)

Only

]

, and then press 

[

OK

]

.

The selected file name is shown
above the highlighted 

[

Auto Docu-

ment

]

.

Note

Programmed Auto Documents
are shown in the keys.

To cancel the Auto Document,
press 

[

Cancel

]

. The display re-

turns to that of step 

C

.

E

Press 

[

OK

]

.

F

Specify the destination, and then
press the 

{

Start

}

 key.

Printing documents stored as Auto 
Documents

This function is used for printing doc-
uments stored as Auto Documents.
This function is very convenient as it
can be used for checking the contents
of stored files.

A

Press 

[

Sub TX Mode

]

.

B

Press 

[

Auto Document

]

.

C

Select an Auto Document file to be
printed, and then press 

[

Print File

]

.

Note

To cancel the Auto Document,
press 

[

Cancel

]

. The display re-

turns to that of step 

B

.

D

Press the 

{

Start

}

 key.

Once printing is completed, the
display returns to that of step 

C

.

Note

To cancel printing after pressing
the 

{

Start

}

 key, press 

[

Stop Print-

ing

]

. The display returns to that

of step 

C

.

RussianC4-EN_Combine-F_FM.book  Page 67  Tuesday, April 5, 2005  8:22 PM

Содержание 8025

Страница 1: ...tructions Facsimile Reference Advanced Features Read this manual carefully before you use this machine and keep it handy for future reference For safe and correct use be sure to read the Safety Information in the General Settings Guide before using the machine Transmission Mode Checking and Canceling Transmission Files Communication Information Other Transmission Features Reception Features Fax vi...

Страница 2: ...ows and Windows NT are registered trademarks of Microsoft Corporation in the United States and or other countries Adobe and Acrobat are registered trademarks of Adobe Systems Incorporated Ethernet is a registered trademark of Xerox Corporation Other product names used herein are for identification purposes only and might be trademarks of their respective companies We disclaim any and all rights to...

Страница 3: ...chine from unauthorized use Also refer to this man ual for the procedures for registering administrators as well as setting user and administrator authentication Network Guide PDF file CD ROM 1 Provides information about configuring and operating the printer in a net work environment and using software This manual covers all models and therefore contains functions and settings that may not be avai...

Страница 4: ...tions This guide is added to the Start menu when DeskTopBinder Lite is installed Auto Document Link Guide PDF file CD ROM 2 Describes operations and functions of Auto Document Link installed with DeskTopBinder Lite This guide is added to the Start menu when Desk TopBinder Lite is installed Other manuals PostScript 3 Supplement PDF file CD ROM 1 Unix Supplement Available from an authorized dealer o...

Страница 5: ...ions 22 Changing the Transmission Time 22 Changing the SMTP Server Setting 23 Printing a File 24 Resending a File 25 Printing a List of Files in Memory Print TX File List 26 3 Communication Information Printing the Journal 27 Journal 29 Checking the Transmission Result TX File Status 31 Checking the Reception Result RX File Status 32 Displaying the Memory Status 33 Printing Deleting Received and S...

Страница 6: ... Auto Document 66 Printing documents stored as Auto Documents 67 Sending a Stored File 68 Sending stored documents 68 Printing stored documents 70 Stamp 73 Transmission Options 73 Fax Header Print 74 Label Insertion 74 Reduced Image Transmission 75 Auto Reduce 75 Default ID Transmission 75 Selecting transmission options for a single transmission 76 More Transmission Functions 78 If Memory Runs Out...

Страница 7: ... Sided Printing 98 180 degree rotation printing 99 Multi Copy Reception 99 Image Rotation 100 Combine Two Originals 100 Page Separation and Length Reduction 101 Reverse Order Printing 102 Page Reduction 102 TSI Print Transmitting Subscriber Identification Print 103 If There Is No Paper of the Correct Size 103 Setting priority trays 104 Just size printing 104 Having incoming documents printed on pa...

Страница 8: ...ation from Web Browser 125 Delivering Files Received by Fax 127 7 Simplifying the Operation Programs 129 Registering and Changing Keystroke Programs 129 Registering a priority function using a program 130 Changing a program name 131 Deleting a Program 131 Using a Program 132 Using the Document Server 133 Storing a Document 134 Changing Stored Document Information 136 Deleting a Stored Document 138...

Страница 9: ...ed 174 Memory Lock 175 Paper Tray 175 Programming Changing Special Senders 175 Programming Initial Set Up of a Special Sender 178 Deleting a Special Sender 180 Printing the Special Sender List 181 Box Settings 181 Programming changing Personal Boxes 182 Deleting Personal Boxes 184 Programming changing Information Boxes 185 Deleting Information Boxes 187 Programming changing Transfer Boxes 188 Dele...

Страница 10: ... to a Telephone Line and Telephone 205 Connecting the Telephone Line 205 Selecting the Line Type 206 Connecting the Optional Handset or an External Telephone 207 Optional Equipment 208 Expansion Memory 32MB DIMM 208 Handset 208 Extra G3 Interface Unit 208 Specifications 209 Compatible Machines 212 Acceptable Types of Originals 212 Acceptable original sizes 212 Original Sizes Difficult to Detect 21...

Страница 11: ...ns all of which are included in Safety Informa tion General Settings Guide The statements above are notes for your safety Important If this instruction is not followed paper might be misfed originals might be damaged or data might be lost Be sure to read this Preparation This symbol indicates information or preparations required prior to operating Note This symbol indicates precautions for operati...

Страница 12: ...hine s major functions are referred to in this manual as follows Internet Fax by specifying an e mail address Internet Fax Internet Fax by specifying an IP address IP Fax RussianC4 EN_Combine F_FM book Page 2 Tuesday April 5 2005 8 22 PM ...

Страница 13: ...urned on Use this report to identify lost documents Limitation This function is unavailable with Im mediate Transmission Use Memo ry Transmission Note You can specify up to 23 hours and 59 minutes If the current time shown is not cor rect changeit See Timer Settings General Settings Guide Set the Economy Transmission Time to coincide with off peak call charge time See p 146 Program Economy Time Yo...

Страница 14: ...ning Ifyoumakeamistake press Clear or the Clear Stop key before pressing OK and then try again To cancel Send Later press Can cel The display returns to that of step C E Press OK The standby display appears Note Tocheckthesettings press Trans mission Mode F Specify a destination and then press the Start key Note You can cancel the transmission setup for Send Later See p 19 Canceling a Transmission...

Страница 15: ...ged in user s e mail address You can program one of the Quick Operation keys with operations for Sender Settings Quick Operation keys allow you to omit step B See p 145 General Settings Adjust ment You can use Communication Result Report etc to check usage status by specified users If user authentica tion is set you can check usage by logged in users See p 162 Print ing Journal IfUserIDissettosend...

Страница 16: ...il address is registered you can specify whether or not to send the transmission re sult by e mail to the sender If you enable this function the transmis sion result is sent to the registered mail address Note If a user logs in with User ID the transmission result is sent by e mail to the logged in user You can confirm transmission results by using both the E mail TX Results function which sends t...

Страница 17: ...splayed in up to 14 characters followed by an ellipsis H Press OK The standby display appears Note Tocheckthesettings press Trans mission Mode I Specify the destination and then press the Start key Note TocanceltheSenderSettings cancel the transmission See p 19 Can celing a Transmission RussianC4 EN_Combine F_FM book Page 7 Tuesday April 5 2005 8 22 PM ...

Страница 18: ... there is already a document stored with this function or a transmission in progress your document is sent after that document is transmitted A Place the original and then select the scan settings you require Reference p 15 Placing Originals Fac simile Reference Basic Features p 34 Scan Settings Facsimile Reference Basic Features B Press Transmission Mode C Press Priority TX and then press OK The ...

Страница 19: ...nt Limitation The destination machine must be of the same manufacturer and have the Confidential Reception function The destination machine must have enough memory available This function is not available with Internet Fax Note It is recommended that you program the Confidential ID in this machine beforehand See p 192 Program ming a Confidential ID An ID can be any 4 digit number except 0000 If th...

Страница 20: ...hown above the highlighted Confidential TX Note If you make a mistake press Clear or the Clear Stop key before pressing OK and then try again To cancel Confidential Trans mission press Cancel The display returns to that of step C E Press OK The standby display appears Note Tocheckthesettings press Trans mission Mode F Specify the destination and then press the Start key Note You can cancel the tra...

Страница 21: ...ID overrides the ID stored in the machine The user must supply this ID when they poll your ma chine If the IDs match the docu ment is sent Make sure in advance the other end knows the ID you are using Limitation Polling Transmission is allowed only if the receiver s machine has the Polling Reception function Usually only machines of the same manufacturer that support Polling Reception can perform ...

Страница 22: ... on the Polling Trans mission mode use one of the fol lowing procedures Free Polling Transmission A Check that Free Polling TX is se lected Default ID Transmission A Select Default ID TX ID Override Transmission A Select ID Override Transmission B Specify a 4 digit ID using the number keys and A B C D E and F Note A Polling ID may be any four numbers 0 to 9 and charac ters A to F except 0000 and F...

Страница 23: ...ters are set to allow the stored originals to be repeated ly sent Save See p 167 User Pa rameters switch 11 bit 7 Note You can turn this function on or off with the User Parameters See p 167 User Parameters switch 03 bit 6 You can have a portion of the sent image printed on the report with theUserParameters See p 167 User Parameters switch 04 bit 7 You can check the result of Polling Transmission ...

Страница 24: ...nsmitting machine that have matching ID s If no ID s match any documents that do not require IDs are received Free Polling Limitation Polling Reception requires that the other machine is capable of Polling Transmission Usually you can only receive doc uments with a Polling ID from ma chines of the same manufacturer that support the polling function However if the other party s fax machine supports...

Страница 25: ...cep tion B Specify a 4 digit ID using the number keys and A B C D E and F and then press OK ID Override and the entered Polling ID are shown above the highlighted Polling RX Note A Polling ID may be any four numbers 0 to 9 and charac ters A to F except 0000 and FFFF If you make a mistake press Clear or the Clear Stop key before pressing OK and then try again To cancel Polling Reception press Cance...

Страница 26: ...f E mail TX Results is programmed in a Quick Operation key you can se lect whether a report e mail is sent after reception See p 146 Quick Operation Key Note You can also check the result of a Polling Reception with the Journal See p 27 Printing the Journal You can turn this function on or off with the User Parameters See p 167 User Parameters switch 03 bit 4 To view the report without text dis ru...

Страница 27: ...smission Send Later Sender Settings Priority Transmission Confidential Transmission Polling Reception Polling Transmission Transfer Request Note If there are no files being sent or stored by Memory Transmission Change Stop TX File does not appear on the display You cannot check or edit a file being sent Also a Confidential Transmission file or stored file to be printed as a report cannot be checke...

Страница 28: ...t a file to check Note Ifmultipledestinationswerespec ified only the destination select ed first appears Ifmultipledestinationswerespec ified only the number of destina tions forunsentdocumentsappears D Confirm a transmission and then press Exit E Press Exit The standby display appears RussianC4 EN_Combine F_FM book Page 18 Tuesday April 5 2005 8 22 PM ...

Страница 29: ... is received at the other end If the transmission finishes while you are carrying out this procedure transmission cannot be canceled A Press Change Stop TX File B Make sure Stop Transmission is se lected C Select a file whosetransmissionyou want to cancel Note To display only the files being sent press Files under TX Ifmultipledestinationswerespec ified only the number of desti nations for unsent ...

Страница 30: ...nge for the destination you want to delete Note Pressing switches the des tination between fax number Internet Fax address and IP Fax address E Press Clear to delete the destina tion Note Pressing Clear deletes by single digits the fax number or IP Fax address entered using the number keys The Internet Fax address can be entirely deleted at once by pressing Clear F Press Exit Note To delete anothe...

Страница 31: ...on between fax number Internet Fax address and IP Fax address E Specify the destination using the number keys or soft on screen keys Note To add an e mail address press Manual Input and then specify the destination You canalso program aSUB Code or SEP Code by pressing Adv Features F Press Exit Note Repeat steps C through E if you want to add another destina tion G Press Exit The standby display ap...

Страница 32: ...e or cancel the transmis sion time D The recipient appears E Press Change TX Time F Press Clear and then re enter the transmission time using the number keys or select Economy Time and then press OK Note If you select Economy Time the economy time already specified is entered See p 145 General Settings Adjustment If you press Transmit Now the file is transmitted immediately However ifthereisafileo...

Страница 33: ...Features A Press Change Stop TX File B Press Check Change Settings C Select a file whose SMTP server set ting you want to change D Press Change E Press SMTP F Select Yes or No and then press Exit G Press Exit Note Repeat from step C to change the SMTP server settings of other recipients H Press Exit The standby display appears RussianC4 EN_Combine F_FM book Page 23 Tuesday April 5 2005 8 22 PM ...

Страница 34: ...e C Select the file you want to print Note Ifmultipledestinationswerespec ified only the number of desti nations for unsent documents appears If you want two sided printing optional press Print 2 Sides To cancel printing press Cancel The display returns to that of step C D Press the Start key Note To cancel printing after pressing the Start key press Stop Print ing The display returns to that of s...

Страница 35: ...itch 24 bit 1 A Press Change Stop TX File B Press Transmit Failed File C Select the file you want to resend TX failed is displayed for files that could not be sent Note Ifmultipledestinationswerespec ified only the destination you specify first appears Ifmultipledestinationswerespec ified only the number of destina tions forunsentdocumentsappears To add a destination press Add and then specify the...

Страница 36: ... be printed See p 24 Printing a File You can display a sender name with the User Parameters See p 167 Us er Parameters switch 04 bit 5 A Press Change Stop TX File B Press Print List Note To cancel printing before press ing the Start key press Can cel The display returns to that of step B C Press the Start key Note To cancel printing after pressing the Start key press Stop Print ing The display ret...

Страница 37: ...ints only the results of commu nications specified by file number Print per User Prints the results of communica tions by individual senders Note The sender name column of the Jour nal is useful when you need to pro gram a special sender See p 172 Special Senders to Treat Differ ently You can set whether the Journal is automatically printed after every 50 communications in User Param eters See p 1...

Страница 38: ...user is not registered The display returns to that of step C Press Clear to return to the previous screen if a wrong user name is selected C Press OK aftercheckingtheuser name shown on the display Note Press Cancel if a wrong user name is selected The display returns to that of step C D Press the Start key Note To cancel a file printing press Stop Printing The display re turns to that of step C E ...

Страница 39: ...x destinations Shows the name for display pro grammed by the other end Shows the programmed fax number if the name for display was not programmed If neither name nor fax number was programmed by the other end an entered fax number or a name pro grammed in a destination list is shown for transmissions Note To prioritize a fax number or name programmed in the destination list contact your service re...

Страница 40: ... appears in alpha betical letters or symbols Outgoing e mail set for Reception Notice of E mail Options is indicated by a Q where as A appears with reception notice e mails For IP Fax transmissions and receptions After and T for outgoing faxes or R for incoming faxes the com munication mode appears in alpha betical letters or symbols For forwarding to the folder destinations Shows folder mark 7 Co...

Страница 41: ... the key allows you to omit step A See p 145 Gen eral Settings Adjustment A Press Information B Select TX File Status C Check the transmission results Transmission results are displayed fromthelatestresultdown ingroups of six Note When a fax is sent Destination shows the Own Fax Number or Fax Header information of the receiver The e mail address and name programmed in the destination list appears ...

Страница 42: ...he latest result exit RX File Status and then try again You can program one of the Quick Operation keys with operations for this function Using the key allows you to omit step A See p 145 Gen eral Settings Adjustment A Press Information B Press RX File Status C Check the reception results Reception results are displayed from the latest result in groups of six Note When a fax or IP Fax is received ...

Страница 43: ...atus C Check the memory status Note Others is displayed when storing attachment files See p 66 Sending an Auto Docu ment storing Reception Request files See p 52 Transfer Station storing originals in the Informa tion Boxes See p 42 Storing Documents in Information Boxes sending to the Personal Box See p 41 Printing Personal Box Documents If you made the machine save re ceived documents on the hard...

Страница 44: ...ress See p 196 Reception Report e mail You can store up to 400 received documents on the hard disk You can view and print received and stored documents using a Web Image Monitor or DeskTop Binder See p 123 Viewing Fax In formation Using a Web Browser or the DeskTopBinder s manuals and Help Printing Received and Stored Documents Use the following procedure to print documents saved on the hard disk ...

Страница 45: ...ting Received and Stored Documents Use the following procedure to delete documents stored on the hard disk Note You cannot delete a document while another person is previewing or printing it using a Web Image Monitor or DeskTopBinder You can specify and delete multi ple documents You can specify a maximum of 30 documents at one time A Press Information B Press Print Delete Stored RX File C Select ...

Страница 46: ...port is printed so you can confirm which documents have been deleted See p 202 Turning Off the Main Pow er In the Event of Power Failure Limitation You must program the Confiden tial ID for Confidential Reception to work This function is not available with Internet Fax Note You can program one of the Quick Operation keys with operations for this function Using the key allows you to omit step B See...

Страница 47: ...d then try again E Press Exit The standby display appears If you cannot print confidential files even if the Confidential File i indicator is lit The Confidential File indicator also lights if the machine received a docu ment with a SUB Code Check the Personal Boxes Note Print from the Personal Box when a file is sent from another party with a SUB Code attached See p 41 Printing Personal Box Docu ...

Страница 48: ...t of Power Failure Note If Memory Lock and received doc ument storage are both set to on Memory Lock is unavailable and received documents become stored documents For details see p 195 Storing or Printing Received Doc uments and p 34 Printing De leting Received and Stored Documents Print Delete Stored RX File Even when Memory Lock is avail able if free memory is insufficient reception is not possi...

Страница 49: ...ss the Start key Note If the Memory Lock ID does not match the message Speci fied code does not corre spond to programmed Memory Lock ID appears Press Exit and retry after checking the Mem ory Lock ID E Press Exit The standby display appears RussianC4 EN_Combine F_FM book Page 39 Tuesday April 5 2005 8 22 PM ...

Страница 50: ...ing stored in memo ry incoming documents with this SUB Code appended are forwarded directly to the destination you speci fy You can specify a fax number e mail address or IP Fax destination as the receiver See p 182 Program ming changing Personal Boxes for details about programming receivers For details about the SUB Code see p 181 Box Settings To be able to receive documents into a Personal Box y...

Страница 51: ...t in advance Note The password is programmed in Administrator Tools See p 182 Programming chang ing Personal Boxes A Enter the password and then press OK Note If you make a mistake press Clear or the Clear Stop key before pressing OK and then try again To cancel entering a password press Cancel The display returns to that of step D E Press the Start key Note To stop printing press Stop Print ing T...

Страница 52: ... When an SEP Code Polling Recep tion request is made by another party the SEP Code they specify is matched against the SEP Codes programmed in that Information Boxes If a code matches the docu ment stored in the Information Box is sent to the other party automati cally See p 50 SEP Code You can check the contents of In formation Boxes with Store De lete Print Information Box File See p 44 Printing...

Страница 53: ...l entering a password press Cancel The display returns to that of step C D Place the original and then select the scan settings you require Note You can also select the following settings Book Fax 2 Sided Original The option al ADF is required Stamp The optional ADF is required Reference p 15 Placing Originals Fac simile Reference Basic Features p 34 Scan Settings Facsimile Reference Basic Feature...

Страница 54: ...or the Clear Stop key before pressing OK and then try again To cancel entering a password press Cancel The display returns to that of step D E Press the Start key Note If you want two sided printing optional press Print 2 Sides before pressing the Start key To stop printing before pressing the Start key press Cancel The display returns to that of step D To stop printing after pressing the Start ke...

Страница 55: ...A Enter the password and then press OK Note If you make a mistake press Clear or the Clear Stop key before pressing OK and then try again To cancel entering a password press Cancel The display returns to that of step D E Press Delete Note To stop deleting press Do not De lete The display returns to that of step D F Press Exit Note Repeat from step D to delete an other stored file in another box G ...

Страница 56: ...Communication Information 46 3 RussianC4 EN_Combine F_FM book Page 46 Tuesday April 5 2005 8 22 PM ...

Страница 57: ...e number keys E Press the Start key Redial The machine stores the last 10 desti nations specified in each transmission method This function saves time when you are sending to the same destination repeatedly as you do not have to enter the destination again Limitation The following kinds of destinations are not stored Destinations specified using the destination list Destinations specified as a gro...

Страница 58: ...nt to redial to Note When the date and time the origi nal was scanned appears as a key select by pressing it When you press ProgDest you can register a selected recipient in the destination list See p 45 Registering Entered Destina tions to the Address Book Fac simile Reference Basic Features RussianC4 EN_Combine F_FM book Page 48 Tuesday April 5 2005 8 22 PM ...

Страница 59: ...you are send ing You can store IDs in the destina tion list and Programs See Fax Destination General Settings Guide See p 129 Registering and Changing Keystroke Programs The SUB Code is printed on all re ports This is possible only if the SUB Code is specified in Adv Fea tures using the number keys A Place the original and then select the scan settings you require Reference p 15 Placing Originals ...

Страница 60: ...le only if the SID Code is specified in Adv Fea tures using the number keys SEP Code Normally you can only use Polling Reception to receive faxes from ma chines that have the Polling Reception function and the same manufacturer However if a machine of another manufacturer supports Polling Re ception you can receive fax docu ments from the other party using this method instead You can receive docum...

Страница 61: ... cel or the Clear Stop key be fore pressing OK and then try again F To enter a password press Pass word PWD G Enterthepasswordusingthenumber keys and then press OK H Press Exit I Press Transmission Mode J Press Polling RX K Press Default ID Free Polling RX and then press OK Note To cancel Polling RX press Can cel The display returns to that of step J L Press OK The standby display appears M Press ...

Страница 62: ...Adv Fea tures using the number keys Transfer Request Transfer Request allows fax machines that have this function to automati cally transfer incoming documents to multiple fax destinations This func tion helps you save costs when you send the same document to more than one place in a distant area and saves time since many documents can be sent in a single operation The following diagram may make t...

Страница 63: ...ceivers per Transfer Station If you specify a Transfer Station s Group the Group counts as a single receiver When a Transfer Request is sent by e mail as soon as the Transfer Sta tion completes transfer to all Re ceiving Stations it sends back a Transfer Result Report by e mail See p 89 Transfer Result Report transfer request by e mail When a Transfer Request is sent by e mail to a computer or fac...

Страница 64: ...is sent by e mail e mail options can be set See steps B and C on p 63 Sending Internet Fax Docu ments Facsimile Reference Ba sic Features Reference p 39 Entering a Fax Number Facsimile Reference Basic Fea tures p 41 Entering an E mail Ad dress Facsimile Reference Basic Features p 43 Entering an IP Fax Desti nation Facsimile Reference Ba sic Features p 45 Using the Destination List to Specify Singl...

Страница 65: ... to see the Receiving Stations already entered You can select a Re ceiving Station from this list and remove it by pressing Clear or the Clear Stop key H When you have specified all the Receiving Stations press OK I Press Exit The Transfer Stations and Receiv ing Stations are displayed J Press the Start key With transfer requests set in the System Settings menu You can program a Destination key wi...

Страница 66: ...he destination list this machine sends a Transfer Request to the programmed Transfer Station This function allows fax documents to be transferred via multiple stations and makes fax doc ument transfer more efficient You can program up to 30 Receiving Stations per Transfer Station For more information contact your ser vice representative RussianC4 EN_Combine F_FM book Page 56 Tuesday April 5 2005 8...

Страница 67: ...ill hear a low tone from the internal speaker Note If you want to cancel this oper ation press the On Hook Dial key again C Dial The machine immediately dials the destination Note You can adjust the volume of the on hook sound by pressing Higher or Lower in the upper right hand corner of the display The volume can also be prepro grammedin Gen Settings Ad just See p 91 Adjusting the Volume Facsimil...

Страница 68: ...ax machine you can speak with the other party when you hear a voice If you hear a voice before pressing the Start key pick up the external tele phone and tell the receiver you want to send a fax document ask them to switch to facsimile mode RussianC4 EN_Combine F_FM book Page 58 Tuesday April 5 2005 8 22 PM ...

Страница 69: ...n select the scan settings you require Reference p 15 Placing Originals Fac simile Reference Basic Features p 34 Scan Settings Facsimile Reference Basic Features B Pick up the handset You will hear a dial tone C Dial The machine immediately dials the destination Note If you make a mistake replace the external telephone and then try again from step B D When the line is connected and you hear a high...

Страница 70: ...3 1 G3 2 G3 3 or G3 Auto depending on the number of the installed unit Multi port When the extra G3 interface unit is installed communications can take place simultaneously through three lines at once The following list shows protocol combinations available for each line type Note A maximum of three simulta neous communications are pos sible You cannot perform three Immediate Transmissions si mult...

Страница 71: ...e you want to use When one optional extra G3 unit is installed Note If you select G3 Auto the ma chine will use any available line This increases efficiency C Press Exit The standby display appears RussianC4 EN_Combine F_FM book Page 61 Tuesday April 5 2005 8 22 PM ...

Страница 72: ...width Originals larger than A4 are re duced to A4 width See p 15 Plac ing Originals Facsimile Reference Basic Features If the receiver is T 37 full mode compliant originals are sent at the width specified in the Address Book See p 61 T 37 Full Mode Facsimile Reference Basic Features A Place the original on the exposure glass and then select the scan set tings you require Reference p 15 Placing Ori...

Страница 73: ...y after each page After scanning the last original press If is not pressed the ma chine will automatically start sending the documents 60 sec onds after the last original has been scanned Two Sided Transmission Double Sided Transmission The optional ADF is required Use this function to send two sided originals Note Originals placed on the exposure glass cannot be sent The front and back of the sca...

Страница 74: ...eneral Settings Ad justment A Place the original in the ADF and then select the scan settings you require Reference p 15 Placing Originals Fac simile Reference Basic Features p 34 Scan Settings Facsimile Reference Basic Features B Press Sub TX Mode C Press 2 Sided Original D Specify the original position Check the orientation of the placed document and then press or Note Make sure that the specifi...

Страница 75: ...e first original sent There are four types of standard mes sages Confidential Urgent Please phone and Copy to corres section You can also program other messages Note While this function is in use the third line of the Label Insertion is not printed See p 74 Label Inser tion When there is an image around the area where the standard message is to be stamped that image is de leted To program a standa...

Страница 76: ...uto Document Note You can attach one Auto Document to each transmission Youcanstoreupto6AutoDocuments See p 158 Storing Changing and Deleting an Auto Document Files with Auto Documents are sent by Memory Transmission When sending an Auto Document with other files the Auto Document is sent first Storing Auto Documents reduces the amount of free memory slight ly Unless you delete the document free m...

Страница 77: ... Printing documents stored as Auto Documents This function is used for printing doc uments stored as Auto Documents This function is very convenient as it can be used for checking the contents of stored files A Press Sub TX Mode B Press Auto Document C Select an Auto Document file to be printed and then press Print File Note To cancel the Auto Document press Cancel The display re turns to that of ...

Страница 78: ...te Stored RX File You can program one of the Quick Operation keys with operations for this function Using the Quick Op eration keys allows you to omit step A See p 145 General Settings Ad justment Sending stored documents The machine sends documents stored in the Document Server The documents stored in the Docu ment Server can be sent again and again until they are deleted Once sent documents are ...

Страница 79: ...oc uments in order by programmed user name Press Date to place the documents in order of programmed date Specifying documents from the file list A Press UPrev or TNext to dis play the documents to be sent B Select the file Specifying documents by User Name A Select Search by User Name B Select the user name of the pro grammed document and then press OK Note To search by directly enter ing a user n...

Страница 80: ...Origi Stored File is pressed the machine sends the originals and then stored files When Stored file R Origi is pressed the machine sends the stored files and then originals The added originals are not stored F Press OK twice Note To add an original to stored docu ments place the original and then select any scan settings you require G Specify the destination and then press the Start key Printing s...

Страница 81: ... programmed date To see details of the selected docu ment press Detail To return to the display in step C press Se lect File Selecting a document from file list A Select the file Note Press UPrev or TNext to display the document to be sent Specifying a document from the User Name A Select Search by User Name B Press the user name of the docu ment to be sent and then press OK Note To search by dire...

Страница 82: ... all the pages When Print 1st Page is pressed the ma chine prints only the first page Limitation When Print 1st Page is selected originals larger than A4 size are printed after they are reduced to A4 size The machine can print up to 30 files using the Print 1st Page function Note To print both sides optional press Print 2 Sides To cancel printing press Cancel F Press the Start key Note When only t...

Страница 83: ...tamp can easily be turned off for any single transmission by press ing Stamp See p 145 General Set tings Adjustment A paper jam during Parallel Mem ory Transmission may cause the transmission to fail even if stamp ing is performed You cannot turn the Stamp function on or off while an original is being scanned A Place the original and then select the scan settings you require Reference p 15 Placing...

Страница 84: ...t In the USA law requires that your fax number be included in the Fax Header Program the fax number and switch on Fax Header Print with User Parameters See p 167 User Parameters Label Insertion With this function you can have the receiver s name printed on the docu ment that is received at the other end The receiver s name is printed as fol lows Receiver s name printed at the top of the page and p...

Страница 85: ... Important If you turn this function off the scale of the original is maintained and some parts of the image may be deleted when printed at the oth er end Default ID Transmission If you turn this function on transmis sion will only take place if the desti nation s Polling ID is the same as yours This function can stop you ac cidentally sending information to the wrong place Preparation You need to...

Страница 86: ... ceed to step E Tocanceltheoptionsettings press Cancel Programming the Fax Header Print A Press On for Fax Header Print Programming the Label Insertion A Press Programmed Name for La bel Insertion Note Press Off if you do not want to insert a destination Programming the Reduced Image Transmission A Press On in for Reduced Image TX Note Press Off if you do not want to do a reduced transmission Prog...

Страница 87: ...fault ID Transmission A Press On for Default ID TX Note Press Off if you do not want to use ID transmission E Press OK twice F Specify the destination and then press the Start key RussianC4 EN_Combine F_FM book Page 77 Tuesday April 5 2005 8 22 PM ...

Страница 88: ...Parallel Memory Transmission in the following cases When the line is busy and could not be connected to With Send Later When you store an original for Memory Transmission while an other communication is in progress When two or more destinations are specified When you send only an Auto Document When an original is placed on the exposure glass and then sent When yousend documentsstored in the Docume...

Страница 89: ...ion is not available with Internet Fax and IP Fax Note You can turn this function on or off with the User Parameters See p 167 User Parameters switch 14 bit 2 The originals to be transmitted at a specific time is sent at that time If fax memory is overloaded docu ments may not be sent in the order they were scanned Dual Access The machine can scan other docu ments into memory even while send ing a...

Страница 90: ...face unit if you set the line se lection as G3 Auto beforehand the machine will use whichever G3 line is not busy This increases effi ciency JBIG Transmission If you use JBIG Joint Bi level Image Experts Group compression you can send photographic originals faster than with other methods of compres sion Reference p 35 Original Type Facsimile Ref erence Basic Features Limitation You can only use th...

Страница 91: ...al If the Journal fails to be transmit ted in e mail format the Journal is printed out The name of an attached CSV file is JOURNAL year month date hours minutes For example the file name transmitted in 14 40 12 on 20th December 2004 is JOURNAL20041220144012 csv The subject of a Journal sent by e mail begins with Journal Journal by e mail If the setting is made so that the Jour nal is transmitted a...

Страница 92: ...t printed Use it to keep a record of failed transmissions so you can send them again Note You can select whether the Com munication Failure Report and Transfer Result Report are auto matically printed using the User Parameters See p 167 User Pa rameters switch 04 bit 1 This report is only printed if the Communication Result Report is turned off and a document could not be successfully transmitted ...

Страница 93: ...ving important fax doc uments it is recommended that you confirm the contents of the re ceived documents with the senders Note The machine may not be able to re ceive fax documents when free memory space is low If free memory reaches 0 during Immediate Reception any further reception becomes impossible and the current communication is ter minated Reception resolution This machine supports Standard...

Страница 94: ...ed on Use this report to identify lost documents The machine may not be able to re ceive large numbers of documents or documents with high data con tent In such cases it is recom mended that you switch off the above functions or install the op tional expansion memory Limitation The machine may not be able to re ceive fax documents when free memory space is low Note If the free memory space reaches...

Страница 95: ...tute Reception any further reception becomes impossible and the current communication is terminated When a fax document is received after Store is selected for Reception File Set ting in the Facsimile Features menu the Receive File indicator lights The Receive File indicator may light even when receiving documents using Immediate Reception Receiving documents unconditionally If one of the conditio...

Страница 96: ...r has not programmed their Own Name or Own Fax Number the machine may fail to receive an important fax document It is recommended that you ask important senders to program an Own Name or Own Fax Number in advance Free The machine switches to Substitute Reception regardless of whether or not the sender has programmed their Own Name or Own Fax Number Polling ID match The machine switches to Substitu...

Страница 97: ...rations Program each Transfer Station number in this machine Trans fer Station and in the Requesting Party itself See p 192 Transfer Report Program the same Polling ID in both this machine Transfer Sta tion and the Requesting Party See p 193 Programming a Poll ing ID TheRequestingParty sfaxnumber must be programmed in the destination list of this machine Transfer Station The registra tion number m...

Страница 98: ...ty s own dial number 001813 11112222 Transfer Station s Destination key 03 11112222 Transfer Result Report Preparation Program the Requesting Party fax number into a Destination key in the Transfer Station this machine in advance Program your own fax number See p 192 Transfer Report Program the Polling ID See p 193 Programming a Polling ID This reports whether transmission to the Receiving Station...

Страница 99: ...ress is programmed the Transfer Result Report e mail is for warded to that address Note Unprogrammed indicates that the document could not be sent be cause the end receiver s address is incorrect or not programmed indicates that the Internet Fax document was sent to the mail serv er programmed in this machine When using multistep transfer the Transfer Result Report e mail is sent to the last Trans...

Страница 100: ...Forwarding destination in advance See p 162 For warding If you want to forward documents to a different destination depending on the sender see p 172 Special Senders to Treat Differently You can select whether the machine prints out the documents it forwards with User Parameters switch 11 bit 6 For details see p 167 User Parame ters You can set whether or not the Folder Transfer Result Report is t...

Страница 101: ... you can use the forward feature to send all received transmissions to a specific e mail address See p 162 Forwarding Preparation You must set the Personal Box and register a delivery destination beforehand See p 182 Programming changing Personal Boxes Limitation This function is not available when you set received documents to be deliv ered to the network delivery server Documents cannot be route...

Страница 102: ...Station as receivers re ceived documents are sent in an e mail format to the receivers Preparation Transfer Boxes and Receiving Stations must be set up in order to transfer re ceived documents See p 188 Programming changing Transfer Boxes Note Transfer Results are not sent back to the Requesting Party You can transfer data received from any fax machine regardless of manufac turer RussianC4 EN_Comb...

Страница 103: ... not be received and the machine reports an error if SMTP reception is not set Also the SMTP server sends an error notification to the originator If an error occurs while receiving e mail reception is aborted the e mail is de leted and Error Report is printed Also the SMTP server will send an error notification to the originator When the SMTP server attempts to route received documents to this mac...

Страница 104: ...n may not be available Note If an e mail transfer request is received when the SMTP RX File Delivery Set tings is Off this machine responds with an error message to the SMTP server You can make settings that limit transfer to specified originators See p 148 E mail Settings Using this function you can also send documents from your e mail applica tion to e mail addresses and G3 fax machines destinat...

Страница 105: ...ogrammed in the destination list fax registration number of 5 digits or less host name of this machine do main name Example to transfer to the destination number 00001 fax 00001 abc company com Group destination programmed in the destination list fax registration number of 5 digits or less host name of this machine do main name Example to transfer to the destination programmed under Group number 0...

Страница 106: ...n be set to shut down automatically if no one has used it for a while In these situations even though the operation switch is off the machine can still receive incoming documents as long as the main power switch is on Important Reception is not possible if both the operation switch and main power switch are turned off Note You can set whether documents areprintedassoonastheyarereceived Immediate R...

Страница 107: ...the first page of fax documents to help you separate them Note You can turn this function on or off using Reception Setting See p 147 Reception Settings Center Mark When this function is enabled marks are printed halfway down the left side and at the top center of each page received This makes it easy for you to position a hole puncher correctly when you file received documents Note The Center Mar...

Страница 108: ...heet You can turn this function on or off using Reception Settings See p 147 Recep tion Settings Limitation To use this function all pages of the received document must be of the same size inform the sending party of this beforehand if neces sary You must also have paper set in the machine of the same size as that sent by the sending party In Two Sided Printing this machine will correctly receive ...

Страница 109: ...ulti Copy Reception If you switch this function on multi ple copies of each incoming fax docu ment is printed You can also select to have multiple copies made of docu ments from particular senders See p 172 Special Senders to Treat Dif ferently See p 147 Reception Set tings Note The maximum number of copies that can be made for each document is 10 When using the Multi copy func tion with specified...

Страница 110: ...ation are received con secutively they are printed on a sin gle sheet when you turn this function on This can help you economize on paper Two A5K documents are printed side by side on a sheet of A4L Two B5 JISK documentsareprinted side by side on a sheet of B4 JISL Two A4K documents are printed side by side on a sheet of A3L Two 81 2 51 2 K documents are printed side by side on a sheet of 81 2 11 ...

Страница 111: ...nction uses Memory Reception Page Separation and Length Reduction If the size of a received document is longer than the paper loaded in the machine each page of the document can be split and printed on several sheets or reduced and printed on a single sheet For example this func tion splits the document if the docu ment length is 20 mm 0 79 or longer than the paper used The document is reduced if ...

Страница 112: ...f you receive a document that is longer than the paper in the tray the ma chine usually prints it on two pages If you turn this function on the ma chine reduces the width and length of the received image so that it will fit on one page If A4L paper is loaded and a document of B4 JISL size is re ceived the machine will reduce the document to a single A4L sheet Note You can turn this function on or ...

Страница 113: ... size based on the paper available Note Thedocumentissplitovertwosheets of paper depending on the paper size Paper placed in the bypass tray is not usually selected for printing a received document However you can use this tray if you select the bypass tray as the main paper tray using Reception with Specified Senders See p 172 Special Send ers to Treat Differently Widths that this machine can rec...

Страница 114: ...ting If you enable this function received documents are printed on the sheet that has the highest priority This function is enabled with User Param eters See p 167 User Parameters switch 05 bit 5 If the paper tray is not stocked with paper of a suitable size to print a re ceived document a message appears on the display prompting you to load paper of the required size When you have loaded new pape...

Страница 115: ...neral Features General Settings Guide Note Youcanloadamaximumof100sheets of standard paper in the bypass tray You can use a size of paper not loaded inthepapertray s in the bypass tray The machine can detect A4L A3L 81 2 11 L 11 17 L paper siz es When you load any other size specify the paper size However if the specified paper size and size of paper set in the bypass tray do not match paper jams ...

Страница 116: ...o use this function specify the port and destination using Specify Tray for Lines See p 147 Reception Set tings Tray Shift The optional finisher or shift sort tray unit is required When the optional finisher unit is se lected for fax output you can use the Tray Shift function whenever a fax or report is printed This is useful for separating faxes stacked in the finisher output tray For example if ...

Страница 117: ...stinations In addition to sending faxes the LAN Fax Driver allows this machine to be used for printing out documents prepared on a computer for proof checking To use the LAN Fax Driver connect this machine to a LAN and make the nec essary network settings and then install the LAN Fax Driver and the related utilities on your computer Important Errors occurring when the machine is used as a LAN Fax ...

Страница 118: ...ersforvariousdrivers and utilities launch automatically as Auto RunprogramswhenyouinserttheCD ROM If your operating system is Windows 2000 XP Windows Server 2003 or Win dows NT 4 0 installing a printer driver us ing Auto Run requires Administrator permissions When you install LAN Fax DriverusingAutoRun logonusinganac countthathasAdministratorpermissions Note If the plug and play function starts cl...

Страница 119: ... D Click LAN Fax Driver The software license agreement window appears E Read all of the terms and if you agree select I accept the agree ment and then click Next Note If you select I don t accept the agree ment youcannotcompletethein stallation F Selectthe LAN Fax Driver checkbox and then click Next G Confirm that the Printer Name LAN Fax M7 check box is selected and then click Continue Note Selec...

Страница 120: ...ditor helps you edit LAN Fax cover sheets Operating systems Microsoft Windows 95 98 Me Microsoft Windows 2000 XP Microsoft Windows Server 2003 Microsoft Windows NT 4 0 Setting LAN Fax Driver Properties Note If your operating system is Win dows NT 4 0 Windows 2000 XP or Windows Server 2003 log on using an account that has Admin istrator rights Setting print properties This section describes how to ...

Страница 121: ... Make settings for optional units in stalled in this machine Note If the options on this machine are not configured as instructed LAN Fax functions may fail When this machine is connected to a network option configuration is automatically performed For de tails see LAN Fax Driver s Help A Perform steps A and B in Setting print properties B Click the Accessories tab and then make the settings for t...

Страница 122: ...nd then perform the following procedure For details see Help Limitation When using SmartDeviceMonitor for Client you cannot send docu ments to this machine using more than one LAN Fax at the same time A On the File menu click Print B Select LAN Fax M7 in the Name list C Click OK The LAN Fax dialog box appears Note The setting method may differ depending on the application you are using In all case...

Страница 123: ...u To use a desti nation list that did not appear click Browse and then se lect the file C Select Contact or Group in the Name dropdown menu as the display format Note Destination list contents change as follows depending on the option selected Contact Individual name company name department name fax number Group Group name If you selected Group from the Name dropdown menu proceed to step E D Selec...

Страница 124: ...ep B Pause is not avail able Reference p 39 Entering a Fax Num ber Facsimile Reference Ba sic Features p 41 Entering an E mail Ad dress Facsimile Reference Basic Features p 43 Entering an IP Fax Destination Facsimile Refer ence Basic Features D Specify settings according to type of fax transmission Note Specify settings according to the type of fax transmission selected in step B as follows If you...

Страница 125: ... check box and then specify a transmission time B Click Send To print a sender stamp A Selectthe Print Fax Header check box B Click Send To attach a cover sheet A Select the Attach a Cover Sheet check box to attach a cover sheet to the document you are send ing Note Click Edit Cover Sheet to edit the cover sheet See p 120 Editing Fax Cover Sheets B Click Send To specify two sided printing The opti...

Страница 126: ...seconds G Enter a file name Note You can also change the fold er in this step H Click Save The image file is saved in the specified folder To store the fax document on the Document Server A Select the Send to Document Serv er check box and then enter a user name file name and pass word Note If Hard Disk Unit is not select ed in Accessories on the printer properties dialog box you cannot select Doc...

Страница 127: ...omplete or if an er ror occurs during communication be tween this machine and a computer Note You can confirm transmission results using the E mail TX Results function and the Communication Result Report Youcansetwhethertousebothofthese togetherinUserParameters See p 167 User Parameters switch 10 bit 6 If there be any insufficient configura tions in the e mail menu on this ma chine or if Auto Spec...

Страница 128: ...n document you want to print or create a new docu ment and then perform the following procedure For details see Help Note You can select the length of time the machine keeps document data in memory if print failed due to problems such as paper shortage or paper jams See p 167 User Pa rameters switch 20 bit 2 3 4 5 A On the File menu click Print B Select LAN Fax M7 in the Name list and then click O...

Страница 129: ...ate line type G3 G3 2 G3 3 G3 Dir Auto G3 PABX Auto or I G3 To bypass the SMTP server underthe E mail address box selectthe Do not use SMTP serv er check box For Protocol under IP Fax ad dress select H 323 or SIP B Click Add The destination is added to the destination list Editing programmed destinations A Select the destination you want to edit so it is highlighted in the list B Edit the data C C...

Страница 130: ...ed using SmartDeviceMonitor for Admin that contain user codes Managing facsimile functions using SmartDeviceMonitor for Admin You can check information about this machine s fax functions using a com puter and save files on a computer us ing SmartDeviceMonitor for Admin Note For details about SmartDeviceMon itor for Admin and its installation see Printer Reference For details see Network Guide and ...

Страница 131: ...D Select a cover sheet file from the drop down list or after clicking Browse in Select Cover Sheet Note The selection made in Select Cover Sheet is not canceled un less you select another file If you want to change only desti nation information omit this step and proceed to step E E Select the type of information from To Note Youcanselect Use Address Book To Whom It May Concern Edit Names or None ...

Страница 132: ...an be entered The number of destinations specified exceeds the maxi mum possible The maximum number of destinations that can be specified at one time is 500 LAN Fax has already been launched Cannot launch it again The LAN Fax dialog box is already open Quit LAN Fax once and then start it up again Failed to allocate memo ry Available memory on the computer is insufficient Quit applications currentl...

Страница 133: ...r from a Computer Reference Using Web Image Monitor Net work Guide Viewing Printing andDeleting Received Fax Documents Using a Web Image Monitor Use the following procedure to view and or print received fax documents using a Web Image Monitor Viewing received fax documents using a Web browser A Start a Web browser B Enter the machine s IP address in the Address field C Click Fax Received File in t...

Страница 134: ...firmation win dow to appear Note The method for downloading differs depending on the select ed format For more informa tion see Help on the Web Image Monitor Printing fax information using a Web browser A Start a Web browser B Enter the machine s IP address in the Address field C Click Fax Received File in the left pane The list of received fax documents appears D Click and select the check box be...

Страница 135: ...returns to that of step D Programming Destination Information from Web Browser If the receiving machine is compliant with T 37 full mode Internet Fax you can program the receiver s properties from Web Image Monitor You can program the following properties Compression type Paper size Character size Note For a detailed description see Help for Web Image Monitor When a receiver that is programmed as ...

Страница 136: ...d new receiver A Click Add The Add User page appears B Check that User is selected in the dropdown menu C Enter the registration number name and e mail address then set the necessary properties Note You can set the Internet Fax data format after entering the e mail address D Click Full Mode under Internet Fax Data Format and set the properties according to the re ceiver s properties Note If you ch...

Страница 137: ... no Confi dential ID for ID Override Confidential Transmission SUB Code Own Name or Own Fax Number are saved in the deliv ery server inbox You can also set it so that the received docu ments are stored in the specified delivery server inbox according to the line used for reception You can check or download re ceived documents stored in the delivery server inbox using Desk TopBinder Lite or DeskTop...

Страница 138: ...Fax via Computer 128 6 RussianC4 EN_Combine F_FM book Page 128 Tuesday April 5 2005 8 22 PM ...

Страница 139: ...r Req 2 Sided Original Enter Text Recept Notice BCC TX Protocol Store File Options Program name up to 20 characters Limitation Destinations and polling transmis sion cannot be registered in pro gram No 1 as Keystroke Programs Note The maximum number of programs you can register is 100 Use the same procedure to register and change programs In step E select the program number you want to change Them...

Страница 140: ...ancel a program press Can cel The display returns to that of step E Reference Entering Text General Set tings Guide Registering a priority function using a program You can select whether or not the func tion registered in program No 1 is set after the power is turned on or the Clear Modes key is pressed After registering a function in pro gram No 1 select Program No 1 for Change Initial Mode on th...

Страница 141: ...cel tocancelthechange and proceed to step F F Press Exit The standby display appears Deleting a Program A Make sure that the machine is in fac similemodeandthestandbydisplay is shown Note Ifthestandbydisplayisnotshown press the Facsimile key B Press the Program key C Press Delete D Selecttheprogramnumberyouwant to delete E Press Yes Note Press No not to delete the pro gram The display returns to t...

Страница 142: ...and the standby display is shown Note Ifthestandbydisplayisnotshown press the Facsimile key B Place the original C Press the Program key D Confirm that Recall is selected and press the registered program number The standby display appears Then the programmed fax number is shown Transmission Mode is selected E Press the Start key The fax number and specified time are shown on the display and the ma...

Страница 143: ...he manufactur er is not responsible for any damage that might result from the loss of data Note Stored documents are not deleted even if there is a power failure or the main power switch is turned off You can specify whether or not the machine automatically deletes documents from the Document Server after a certain number of days The delete function is pre configured with the software and automati...

Страница 144: ...e that the machine is in facsimile mode and the standby display is shown If the standby display is not shown press the Facsimile key B Place the original and then select the scan settings you require Reference p 15 Placing Originals Fac simile Reference Basic Features p 34 Scan Settings Facsimile Reference Basic Features C Press Store File D Select Store Transmit or Store only Select Store Transmi...

Страница 145: ...title key to switch between titles To set a non programmed user name press Non programmed Name and then enter the name User names entered by pressing Non programmed Name are not programmed into the user code Reference Entering Text General Set tings Guide C Press OK Setting a file name A Press File Name B Enter the file name and then press OK Reference Entering Text General Set tings Guide C Press...

Страница 146: ... only proceed to step H H Press the Start key Changing Stored Document Information Youcanchangethefilename username and password of stored documents To change a stored document delete the document you no longer need and then reprogram the new docu ment See p 138 Deleting a Stored Document Note You can program one of the Quick Operation keys with operations for this function Using the key allows yo...

Страница 147: ... user name and then press OK Note Press the title word keys to switch between titles To set a non programmed user name press Non programmed Name and then enter the name User names entered by press ing Non programmed Name are not programmed into the user code Reference Entering Text General Set tings Guide Changing the file name A Press Change File Name B Press Backspace or Delete All and then re e...

Страница 148: ... appears Deleting a Stored Document Usethisfunctiontodeletestoreddocuments Note You can program one of the Quick Operation keys with operations for this function Using the key allows you to omit step A See p 145 Gen eral Settings Adjustment A Press Sub TX Mode B Press Select Stored File C Press Manage Delete File D Select the document you want to delete Note You can also delete multiple doc uments...

Страница 149: ...ents EasyViewer Displaying document properties Prop erties Deleting documents Delete Copying documents to a computer Copy Printing documents Print from Doc ument Server Exporting documents as files Ex port Document Importing documents into a com puter Import Document For more information see DeskTop Binder s manual and Help Limitation If you use a link in Auto Document Link the versions earlier th...

Страница 150: ...the Document Server can be viewed using a Web Im age Monitor on a network computer These fax documents can also be downloaded to the computer s hard disk See p 123 Viewing Fax Infor mation Using a Web Browser RussianC4 EN_Combine F_FM book Page 140 Tuesday April 5 2005 8 22 PM ...

Страница 151: ...is turned on settings specified here are selected p 145 General Settings Adjustment Memory Immed Transmission Switch Text Size Priority Original Type Priority Auto Image Density Adjust Scan Density Select Title Change Initial Mode Adjust Sound Volume p 91 Adjusting the Volume Facsimile Refer ence Basic Features Program Fax Information p 83 Initial Settings and Adjustments Fac simile Reference Basi...

Страница 152: ...Two Sided Printing RX Reverse Printing p 102 Reverse Order Printing Paper Tray p 178 Paper Tray Specify Tray for Lines p 106 Specifying Tray for Lines Checkered Mark p 97 Checkered Mark Center Mark p 97 Center Mark Print Reception Time p 98 Reception Time Description Reference Internet Fax Settings Max E mail Size SMTP RX File Delivery Settings p 148 E mail Settings Description Reference Enable H ...

Страница 153: ...ption Reference Program Change Delete Standard Message Store Change Delete Auto Document Program Change Delete Scan Size Print Journal Transmission Page Count Forwarding Memory Lock RX ECM Parameter Setting Program Special Sender Box Setting Transfer Report Program Confidential ID Program Polling ID Program Memory Lock ID Select Dial Push Phone Reception File Setting Stored RX File User Setting Me...

Страница 154: ...sing the Clear Modes key Reference For the items that can be changed using System Settings see User Tools System Settings General Settings Guide A Press the User Tools Counter key The User Tools main menu appears B Press Facsimile Features The Facsimile Features menu ap pears C Select the item that you want to change The corresponding setting display appears Reference p 141 Function List D Follow ...

Страница 155: ...tle to be shown on the destination list Title 1 Title 2 Title 3 Change Initial Mode Use this function to select whether contents registered in program No 1 are to be used as the initial settings after the power is turned onorthe Clear Modes keyispressed Standard Program No 1 Note You cannot select Program No 1 if program No 1 has not been programmed with pri ority functions Adjust Sound Volume Use...

Страница 156: ...s Quick Operation Key Frequently used functions pro grammed as Quick Operation keys are shown on the menu immedi ately after the power is turned on The Quick Operation keys can be programmed with the following functions Journal TX File Status Transmission File Status Print Conf RX Print Confiden tial Reception Print Memory Lock Stored File Send Later Auto Document 2 Sided Original Closed Network P...

Страница 157: ...tion File Print Quantity Specify the number of copies to be printed for each fax document re ceived 1 to 10 set s 2 Sided Print Available only with the optional duplex unit and HDD Specify whether or not received fax documents are to be printed on both sides of the paper On Off RX Reverse Printing Reception Re verse Printing Specify whether or not received fax documents are to be printed from the ...

Страница 158: ...r mark is to be printed halfway down the left side and at the top center of each page received On Off Print Reception Time Specify whether or not the received date time and file number are printed at the bottom of received fax documents On Off E mail Settings Internet Fax Settings You can select to display or not When you want to send an In ternet Fax set ON to display the icon On Off Max E mail S...

Страница 159: ...eived via SMTP See p 94 Rout ing e mail received via SMTP On Off When an authorized e mail ad dress is set e mail received from addresses that do not match the authorized address is discarded and an error message is returned to the SMTP server The authorized e mail address is compared with the addresses of e mail originators as illustrated by the following examples When the authorized e mail ad dr...

Страница 160: ...ddresses from the network ad ministrator Enable H 323 Specify whether or not H 323 is used for IP Fax transmission On Off Enable SIP Specify whether or not SIP is used for IP Fax transmission On Off H 323 Settings Set the IP address and alias tele phone number of the gatekeeper For details see p 151 Configuring the H 323 gatekeeper Gatekeeper Address Main Gatekeeper Address Sub Own Fax No SIP Sett...

Страница 161: ... step B D Press OK Configuring the SIP server Note If you select On using the User Parameters you can use the SIP server See p 167 User Parame ters switch 34 bit 1 A Press SIP Settings B Press Change for each property Note A proxy server relays call re quests and responses A redirect server processes re quest destination inquiries A register server registers loca tion information of user agents wh...

Страница 162: ...r and then enter a new pre fix For documents sent using a gate way to G3 Fax prefixes can be used If the first several digits of IP Fax number and the gate way specific prefix are identical documents can be transmitted using the registered digits of the gateway For example if both 03 and 04 have been registered as gateway number while 0312345678 is also specified documents can be transmitted via a...

Страница 163: ...ing a gateway A Press Program Change Delete Gate way B Press Delete and then select a gateway to delete C Press Delete on the confirmation message Note If you do not want to delete the gateway you have selected press Do not Delete The screen returns to that of step B D Press Exit Note To delete another gateway repeat steps B and C RussianC4 EN_Combine F_FM book Page 153 Tuesday April 5 2005 8 22 P...

Страница 164: ...Facsimile Features 154 8 RussianC4 EN_Combine F_FM book Page 154 Tuesday April 5 2005 8 22 PM ...

Страница 165: ... frequently used scan sizes p 160 Programming Chang ing and Deleting a Scan Size Print Journal Prints a Journal p 162 Printing Journal Transmission Page Count Checks the transmission and reception and totals on the display p 162 Counters Forwarding Transfers received documents to a programmed receiver forwarding destination p 162 Forwarding Memory Lock RX Switches the Memory Lock on or off To use ...

Страница 166: ...le in some areas p 194 Selecting Dial Push Phone Reception File Setting Selects whether received doc uments are saved on the hard disk to be printed later or printed immediately without being saved p 195 Storing or Printing Re ceived Documents Stored RX File User Setting Set the password to view re ceived and stored documents using a Web Image Monitor or DeskTopBinder Lite p 197 Setting a User for...

Страница 167: ...nd change your messages A Press the User Tools Counter key B Press Facsimile Features C Press Administrator Tools D Press Program Change Delete Stan dard Message Programming or changing standard messages A Check Program Change is select ed B Program or change the message Select the message you want to program or change C Enter a new message Reference Entering Text General Set tings Guide D Press O...

Страница 168: ...e per file Scan settings resolution original type and image density Irregular scan area Document name 16 characters max imum Important When about one hour passes after power to the machine is turned off all fax documents stored in memo ry are lost If any documents have been lost for this reason a Power Failure Report is automatically printed when the operation switch is turned on Use this report t...

Страница 169: ...en select any scan settings you require Note You can also specify a scan size See p 17 Setting a Scan Area Facsimile Reference Basic Fea tures G Press the Start key The machine starts to scan and completes scanning Note To cancel scanning press Stop Scanning H Press Exit I Press the User Tools Counter key The standby display appears Deleting an Auto Document Note You cannot delete an Auto Docu men...

Страница 170: ...ram a custom size in advance To change an existing scan size just use the same procedure Important When programming or changing a scan size it is recommended that you make a record of the new size Note You can program up to two sizes You can edit boxes in the same way you program them You can specify a horizontal length from 128 to 1200 mm or from 5 5 to 47 inches A Press the User Tools Counter ke...

Страница 171: ...dif fers depending on the selected unit When mm is selected Au to Detect 210 mm A4 257 mm B4 JIS 297 mm A3 216 mm 8 1 2 and 279 mm 11 are shown When inch is selected Auto Detect 8 3 inch A4 10 1 inch B4 JIS 11 7 inch A3 8 5 inch and 11 0 inch are shown To cancel a scan size press Can cel H Press Exit I Press the User Tools Counter key The standby display appears Deleting a scan size A Press the Us...

Страница 172: ...he standby display appears Forwarding This function allows you to have doc uments printed on the machine and sent to a specified End Receiver This is useful if for example you are visiting another office and would like a copy of your documents to be sent to that office You can also specify a folder as the forwarding destination Preparation To use this function set Forward ing under Reception Setti...

Страница 173: ...n a destination is changed a document is transmitted to the new destination If there is no des tination of the specified type you can set which destination to be used as an alternative destination See p 167 User Parameters switch 32 bit 0 You can program one of the Quick Operation keys with operations for this function See p 145 General Settings Adjustment If you have specified a folder for forwar...

Страница 174: ...olders General Settings Guide If you have specified a folder for forwarding you can specify the file format used for forwarding See p 167 User Parameters switch 21 bit 3 If you make a mistake press Clear before pressing OK and then try again G Press OK H Press the User Tools Counter key The standby display appears Quitting the forwarding function A Press the User Tools Counter key B Press Facsimil...

Страница 175: ...ter the Memo ry Lock ID A user without the ID can not print the document This prevents unauthorized users from seeing the document Preparation To use Memory Lock program the Memory Lock ID and then switch Memory Lock on See p 194 Pro gramming a Memory Lock ID Limitation This function is not available with Internet Fax Note To store incoming documents from Special Senders only in Memory Lock progra...

Страница 176: ...nction is not available with Internet Fax Note If you turn ECM off you cannot use the following functions JBIG Transmission Super G3 Communication A Press the User Tools Counter key B Press Facsimile Features C Press Administrator Tools D Press ECM E Select On or Off and then press OK Note To cancel this setting press Can cel The display returns to that of step D F Press the User Tools Counter key...

Страница 177: ... User Parameter List User Parameter Switches are outlined in the following table Switch 02 0 0 1 1 1 0 1 1 7 6 5 4 3 2 1 0 Switch Bit Item 0 1 02 0 Forwarding Mark Off On 3 TSI Print Off On 03 0 Automatic printing of the Communication Result Re port Off On 2 Automatic printing of the Memory Storage Report Off On 3 Automatic printing of the Polling RX Reserve Report Off On 4 Automatic printing of t...

Страница 178: ...r is received 10 Enabled for Polling ID match 11 Disabled Reception off 5 Print sheet is limited to that which has highest priority Off On 7 Empty tray alert Paper Emp ty Warning even when one paper tray is empty Off On 06 6 First page scanned for book originals From the left page From the right page 07 2 Parallel Memory Transmis sion Off On 08 2 Authorized Reception Type Receive from spec ified s...

Страница 179: ...ss ing the Start key 18 0 Print date with Fax Header Off On 1 Print transmitter origin with Fax Header Off On 2 Print file number with Fax Header Off On 3 Print page number with Fax Header Off On 19 0 Use paper delivery shift func tion Offset Print Off On 1 Sort Journal by line type Off On 20 0 Automatic printing of the LAN Fax Result Report Off On 5 4 3 2 Reprinting time of stored documents in me...

Страница 180: ...t On 2 Detect a dial tone before send ing faxes when using the tele phone line LINE3 Not detect Off Detect On 24 0 Store documents that could not be transmitted in memory Off On 1 Length of time documents that could not be transmitted are stored in memory 24 hours 72 hours 25 4 RDS Off On 32 0 Select which order of priority to be used to select an alterna tive destination when there is no destinat...

Страница 181: ...ools Counter key B Press Facsimile Features C Press Administrator Tools D Press Parameter Setting E Select the switch number you want to change F Select the bit number you want to change When the bit number is pressed the current value switches between 1 and 0 Note Repeat from step F to change another bit number for the same switch G Press OK Note Tocancelthesesettings press Can cel The display re...

Страница 182: ...dvance you can set the following function for each sender Authorized RX Forwarding Reception File Print Qty Print 2 Sided Memory Lock Paper Tray UsetheOwnNameorOwnFaxNumber to program your senders If the sender has a machine of the same manufacturer program an Own Name that has al ready been programmed as a sender If the machine is not of the same man ufacturer use Own Fax Number You can apply the...

Страница 183: ...nders using the specified sender list See p 27 Printing the Journal See p 181 Printing the Special Sender List To use Forwarding Print 2 Sided or Paper Tray with Internet Fax re ception program the sender s e mail address If you select Off for the Special Sender function in Initial Set Up the settings will be the same as the Reception Settings See p 147 Re ception Settings Authorized Reception Use...

Страница 184: ...rs the machine transfers all incoming documents to the other end receivers specified in Specify End Receiver You can set the fax destination In ternet fax destination IP Fax desti nation or folder destination as a forward destination Set folder destinations using the Address Book Management func tion under System Settings See Registering Folders General Set tings Guide If you have specified a fold...

Страница 185: ... the ma chine prints the documents from Spe cial Senders on the blue paper and prints the documents from other senders on the white paper making it easy for you to separate the two If you do not program any Special Senders the machine outputs docu ments received from all senders using the default paper tray Limitation For Polling Reception you cannot select the paper tray Note If the machine recei...

Страница 186: ...that of step E Authorized RX Authorized Reception A Select Authorized RX B Press On or Off andthenpress OK Note After you perform step K set Authorized RX of Recep tion Settings to On See p 147 Reception Settings Forwarding A Select Forwarding B Select On or Off If you select Off proceed to step D Note Selecting Same as Basic Set tings will result in the same setting made for Forward ing under Adm...

Страница 187: ...table causes the settings of the for ward destination to be delet ed so they must be registered again When a destination is changed a document is trans mitted to the new destina tion If there is no destination of the specified type you can set which destination to be used as an alternative desti nation See p 167 User Pa rameters switch 32 bit 0 D Press OK E Press OK Note After you perform step K s...

Страница 188: ...ant to use and then press OK Note Selecting Same as Basic Set tings will result in the same setting made for Paper Tray of Reception Settings See p 147 Reception Settings J Press OK A Special Sender is programmed Note To program another sender re peat the procedure from step F K Press Exit L Press the User Tools Counter key The standby display appears Programming Initial Set Up of a Special Sender...

Страница 189: ...to Detect pro ceed to steps B and G If you select Standard Size pro ceed to steps B C and G If you select Custom Size pro ceed to steps B and D to G B Select the size you want to pro gram Note If you select Auto Detect the machine recognizes the pa per size automatically The machine will detect the paper size for the by pass tray as the short edge of the paper is inserted into the machine Even if ...

Страница 190: ... size from 148 mm 5 9 to 600 mm 23 7 You cannot enter a size smaller than 148 mm or larger than 600 mm Each time you press mm or inch the units switch be tween mm and inch If you enter a length and change the units by pressing mm or inch it is converted auto matically fractions are round ed off G Press OK G Press Exit H Press the User Tools Counter key The standby display appears Deleting a Specia...

Страница 191: ...following functions are for deliv ery and transfer of documents Personal Box Information Box Transfer Box Reference For details about how to set up these functions p 182 Programming chang ing Personal Boxes p 185 Programming chang ing Information Boxes p 188 Programming chang ing Transfer Boxes For details about how to print out and delete documents stored in boxes p 40 Personal Boxes p 42 Informa...

Страница 192: ... Fax destination and IP Fax destination as the transmission destination The Fax Header is not printed on delivered documents If a document cannot be delivered a Communication Failure Report is printed and the document is saved as a Confidential Reception docu ment You can edit boxes in the same way you program them However boxes that are being used cannot be edited If a destination in the destinat...

Страница 193: ...eat from step H J Specify the settings you require If you do not want to program a password or receiver proceed to step K Programming a password A Press Password B Enter a password and then press OK Note If you make a mistake press Clear or the Clear Stop key before pressing OK and then try again C Re enter the password and then press OK Note If you make a mistake press Clear or the Clear Stop key...

Страница 194: ...ress K Press OK L Press Exit M Press the User Tools Counter key The standby display appears Deleting Personal Boxes This section describes how to delete Personal Boxes Limitation If documents were programmed in the box you cannot delete the box A Press the User Tools Counter key B Press Facsimile Features C Press Administrator Tools D Press Box Setting E Press Delete and then select the box you wa...

Страница 195: ... be composed of digits 0 9 and spaces the first character can not be a space When programming a password a mark is displayed before the Box name Note You can edit boxes in the same way you program them However box es that are being used cannot be edited If a destination in the destination list is deleted after being registered de livery is not performed and the set tings of the delivery destinatio...

Страница 196: ... then try again To change the box name press Box Name and then repeat the procedure from step H J Press Password Note If you do not want to program a password proceed to step N K Enter a password and then press OK Note If you make a mistake press Clear or the Clear Stop key be fore pressing OK and then try again L Re enter the password and then press OK Note If you make a mistake press Clear or th...

Страница 197: ...atures C Press Administrator Tools D Press Box Setting E Press Delete and then select the box you want to delete With a programmed password A Enterapasswordusingthenumber keys and then press OK Note If you make a mistake press Clear or the Clear Stop key and then try again F Press Delete Note To cancel deleting a box press Do not Delete The display re turns to that of step E G Press Exit H Press t...

Страница 198: ...l Up to 20 characters long and can be composed of digits 0 9 and spaces the first character can not be a space Note When programming a password a mark is displayed in front of the Box name End Receiver required You can store five End Receivers destinations to which documents are forwarded for each box Spec ify End Receivers using a single or group destination programmed in the destination list bef...

Страница 199: ...D Press Box Setting E Check that Program Change is se lected F Select the box to program When programming a new box press Not Programmed Note Tochangeaboxalreadyprogrammed press it and then proceed to step I G Press Transfer Box H Enter a Box name and then press OK Reference Entering Text General Set tings Guide I Enter a SUB Code Note To change the SUB Code press Clear or the Clear Stop key and t...

Страница 200: ...ss Password B Enter a password and then press OK Note If you make a mistake press Clear or the Clear Stop key before pressing OK and then try again C Re enter the password and then press OK Note If you make a mistake press Clear or the Clear Stop key before pressing OK and then try again To change the password after pressing OK press Change and repeat steps B and C or press Cancel and repeat from ...

Страница 201: ...owing procedure to print alistshowingthecurrently programmed Personal Boxes Information Boxes and Transfer Boxes A Press the User Tools Counter key B Press Facsimile Features C Press Administrator Tools D Press Print List next to Box Set ting E Press the Start key After printing the list you can then start from step D Note To cancel printing a list before pressing the Start key press Cancel or the...

Страница 202: ...r Request if the telephone number of their ma chine is not programmed into that machine Up to 16 digits are available for G3 A Press the User Tools Counter key B Press Facsimile Features C Press Administrator Tools D Press Transfer Report E Specify the fax number Programming a G3 Fax Number A Press G3 Fax No Dir B Enter your facsimile number us ing the number keys and then press OK Note If you mak...

Страница 203: ... The standby display appears Programming a Polling ID Program a Polling ID to use the Trans fer Request Transfer Station Default ID Polling Transmission and Default ID Polling Reception functions When you use ID Transmission program the same ID as the one programmed on the sender s machine Reference p 11 Polling Transmission p 14 Polling Reception p 52 Transfer Request p 76 Selecting transmission ...

Страница 204: ...ator Tools D Press Program Memory Lock ID E Enter an ID using the number keys and then press OK Note A Memory Lock ID can be any four digit number except 0000 If you make a mistake press Clear or the Clear Stop key be fore pressing OK and then try again To cancel programming an ID press Cancel The display re turns to that of step D F Press the User Tools Counter key The standby display appears Sel...

Страница 205: ...each time they are received Limitation If using System Settings you have set the machine to distribute re ceived faxes to the delivery server the documents cannot be saved on the hard disk Note You can use User Parameters switch 10 bit 5 to set whether or not to print stored received docu ment See p 167 User Parame ters If Store is selected and a destina tion for notification is specified notifica...

Страница 206: ... this machine Otherwise the Web browser may not open and an er ror may occur A Press the User Tools Counter key B Press Facsimile Features C Press Administrator Tools D Press Reception File Setting E Select Print or Store and then press OK Note To cancel your selection press Cancel The display returns to that of step D When Store is selected you can select whether or not to send notice of receptio...

Страница 207: ...mmended that you use a Web Image Monitor running un der the same network environment as this machine Otherwise the Web browser may not open and an error may occur If the programmed user code was deleted using the Address Book Management function under Sys tem Settings you cannot view re ceived and saved documents using a Web Image Monitor Select Off in step E or reprogram the user code A Press the...

Страница 208: ...when fold ers are programmed as the forward ing destinations to which documents are sent from all senders or Special Senders Preparation You must first register the destina tion for the Folder Transfer Result Report in the destination list See Fax Destination General Settings Guide Note Specify agroup destination to transfer documents to multiple destinations See Fax Destination General Set tings ...

Страница 209: ...F Press the Destination key of the e mail address for notification and then press OK G Check the selected destination and then press OK H Press the User Tools Counter key The standby display appears Folder Transfer Result Report by e mail When forwarding is completed if documents are sent from all senders or Special Senders this report is sent to the e mail address set as the desti nation for noti...

Страница 210: ...Administrator Setting 200 9 RussianC4 EN_Combine F_FM book Page 200 Tuesday April 5 2005 8 22 PM ...

Страница 211: ...k the sender to resend the document Note If an error happens frequently con tact your service representative The Page column gives the total number of pages The Page not sent or Page not received col umn gives the number of pages not sent or received successfully You can display a destination with the User Parameters See p 167 Us er Parameters switch 04 bit 4 You can display a sender name with the...

Страница 212: ... Do not turn off the main power switch while the power indicator is lit or blinking If you do the hard disk and memory may be damaged and failure could result Turn off the main power switch be fore pulling out the plug If you pull out the plug with the switch on the hard disk and memory may be damaged and failure could re sult Make sure that 100 is shown on the display before you unplug the machin...

Страница 213: ...fication cannot be sent the Error Report E Mail is printed by the machine If an error occurs when an e mail is received via SMTP the SMTP server sends an error e mail to the originator of the document Error Report E Mail The Error Report E Mail is printed by the machine when it is unable to send an Error Mail Notification Server Generated Error E mail The transmitting server sends this error e mai...

Страница 214: ...Solving Operation Problems 204 10 RussianC4 EN_Combine F_FM book Page 204 Tuesday April 5 2005 8 22 PM ...

Страница 215: ... phone system See p 83 Initial Settings and Adjustments Facsimile Reference Basic Features Make sure the connector is the correct type before you start Where to connect the machine 1 External telephone connector 2 G3 interface unit connector 3 Extra G3 interface unit connector To reduce the risk of fire use only No 26 AWG or larger telecommunica tion line cord Pour réduire le risque d incendie uti...

Страница 216: ...ch the machine is connected There are two types tone and pulse dial Note This function is not available in some areas Select the line type using Administrator Tools See p 194 Selecting Dial Push Phone RussianC4 EN_Combine F_FM book Page 206 Tuesday April 5 2005 8 22 PM ...

Страница 217: ...tion When you use the optional handset or an external telephone with the On Hook Dial key for telephone calls you can not talk with the other party with out pressing the On Hook Dial key after taking off the receiver Specifying the handset line type The switch on the handset should be in the appropriate position TT Tone Di aling or DP Pulse Dialing Adjusting the handset bell volume Adjust the hand...

Страница 218: ...Fine If you require this option consult your service representative See p 216 Maxi mum Values Handset You can make or receive calls by installing the optional handset and dialing manually Reference p 59 Manual Dial Extra G3 Interface Unit This option provides one extra G3 line connection A maximum of two G3 interface units can be installed RussianC4 EN_Combine F_FM book Page 208 Tuesday April 5 20...

Страница 219: ...ution JBIG transmission 2 seconds Data compression method MH MR MMR JBIG Maximum original size Standard size A3 11 17 Maximum scanning size Standard size 297 432 mm 11 17 Irregular size 297 1200 mm 11 47 Print process Printing on standard paper using a laser Transmission speed G3 33 600 31 200 28 800 26 400 24 000 21 600 19 200 16 800 14 400 12 000 9 600 7 200 4 800 2 400bps auto shift down system...

Страница 220: ...ls Transmission SMTP TCP IP Reception POP3 SMTP IMAP4 TCP IP E mail format Single Multi part MIME Conversion Attached file forms TIFF F MH MR 1 MMR 1 compres sion Authentication method SMTP AUTH POP before SMTP A POP Internet communication Send and receive e mail with a computer that has an e mail address E mail send functions Automatic conversion of sent documents to e mail format and e mail tran...

Страница 221: ... Standard A3 297 mm 432 mm Irregular 297 mm 1200 mm Transmission protocol Recommended T 38 Annex TCP UDP IP communication SIP RFC 3261 compliant H 323 v2 Compatible machines IP Fax compatible machines IP Fax transmission function Specify an IP address and send faxes to an IP Fax compatible fax through a network Also capable of sending faxes from a G3 fax connected to a telephone line via a VoIP ga...

Страница 222: ...ype Image tiff Multipart mixed text plain Image tiff attached file forms Data format Profile TIFF Profile S Coding MH MR 1 MMR 1 Original size A3 1 A4 B4 1 81 2 11 1 81 2 14 1 Resolution dpi 200 100 200 200 204 98 204 196 200 400 or 400 400 Where original is set Acceptable original size Maximum number of sheets Paper thickness Exposure glass Up to A3 297 420 mm 11 17 279 432 mm 1 ADF one sided doc...

Страница 223: ...A3 11 17 on the exposure glass only an A3 11 17 area is scanned Note Even if an original is correctly placed on the exposure glass or in the ADF a margin of 3 mm 0 1 around each edge of the original may not be sent If the receiver uses paper of a smaller width than the original the image is re duced to fit that paper See p 75 Auto Reduce RussianC4 EN_Combine F_FM book Page 213 Tuesday April 5 2005...

Страница 224: ...Normally a length of about 420 mm 16 5 can be scanned however it is only possi ble to specify a scanning size up to 432 mm 17 Maximum scan area The following shows the maximum scan area Memory Transmission 297 1200 mm 11 47 W L from the ADF Immediate Transmission 297 1200 mm 11 47 W L from the ADF Note During Immediate Transmission the length of the scanning range can become narrower than 1200 mm ...

Страница 225: ...r drawings originals that contain areas of solid print originals that have solid print around their edges originals with glossy surfaces bound originals of more than 10 mm 0 3 in thickness such as books The following paper sizes are automatically detected in facsimile mode Metric Version b Auto detect Unable to auto detect Inch Version b Auto detect Unable to auto detect Paper size where original ...

Страница 226: ...0 Number of destinations you can specify for all files 500 500 Number of destinations you can program 1 500 500 Number of groups you can program 100 100 Number of destinations you can program in a group 500 500 Number of digits for fax numbers 128 128 Number of Programs you can register 100 100 Number of Auto Documents you can pro gram 6 6 Number of Standard Message Stamps you can program 3 3 Numb...

Страница 227: ...document information 136 Changing the line port 60 Changing the SMTP server setting 23 Changing the transmission time 22 Changing the User Parameters 171 Check Change Settings 18 Checkered Mark 97 148 Checking and canceling transmission files 17 Checking the reception result RX File Status 32 Checking the transmission result TX File Status 31 Combine Two Originals 84 100 Communication Failure Repo...

Страница 228: ...Name 135 Folder Transfer Result Report 198 Folder Transfer Result Report by e mail 199 Forwarding 90 147 155 162 174 176 Forwarding Mark 165 Forwarding received documents 90 Free Polling Transmission 11 12 Free Polling TX 12 From First Page 63 From Second Page 63 Full Agreement 176 Full Partial agreement 172 Function list 141 G General Settings Adjustment 145 Group Dial 55 H H 323 Settings 150 Han...

Страница 229: ...ut Tray 106 P Page Reduction 102 Page Separation and Length Reduction 101 Paper Tray 147 178 Parallel Memory Transmission 78 Parameter Setting 155 Partial Agreement 176 Password 135 183 Pause Redial key 47 Personal Boxes 40 182 184 Changing 182 Deleting 184 Printing 191 Programming 182 Polling ID 193 Polling Reception 14 Polling Reception Reserve Report 16 Polling Reception Result Report 16 Pollin...

Страница 230: ...87 Receiving Statn 54 Reception 83 Reception features 83 Reception File Print Quantity 147 Reception functions 87 Reception Reverse Printing 147 Reception Settings 147 Reception Time 98 Reception features 83 Reception File Setting 196 Reception functions 87 Reception Report e mail 196 Reception Result RX File Status 32 Reception Settings 147 Redial 47 Reduced Image Transmission 75 Registering and ...

Страница 231: ...Store Transmit 134 Storing a document 134 Storing documents in Information Boxes 42 Storing or printing received documents 195 SUB Code 49 91 Substitute Reception 85 Sub transmission mode 62 Sub TX Mode 62 136 Switches and Bits 167 Switch Reception Mode 147 T Telephone line 205 Text Size Priority 145 Top to Bottom 64 Top to Top 64 Transfer Boxes 188 Changing 188 Deleting 190 Printing 191 Programmi...

Страница 232: ...inder 139 Using the Document Server 133 V Viewing fax information using a Web browser 123 W Web Image Monitor Programming destination information 125 Viewing printing and deleting received fax documents 123 Where incoming documents are delivered output tray 106 With transfer requests set in the System Settings menu 55 RussianC4 EN_Combine F_FM book Page 222 Tuesday April 5 2005 8 22 PM ...

Страница 233: ...223 MEMO RussianC4 EN_Combine F_FM book Page 223 Tuesday April 5 2005 8 22 PM ...

Страница 234: ...224 EN USA B766 8511 MEMO RussianC4 EN_Combine F_FM book Page 224 Tuesday April 5 2005 8 22 PM ...

Страница 235: ...ows and Windows NT are registered trademarks of Microsoft Corporation in the United States and or other countries Adobe and Acrobat are registered trademarks of Adobe Systems Incorporated Ethernet is a registered trademark of Xerox Corporation Other product names used herein are for identification purposes only and might be trademarks of their respective companies We disclaim any and all rights to...

Страница 236: ...tructions Facsimile Reference Advanced Features Read this manual carefully before you use this machine and keep it handy for future reference For safe and correct use be sure to read the Safety Information in the General Settings Guide before using the machine Transmission Mode Checking and Canceling Transmission Files Communication Information Other Transmission Features Reception Features Fax vi...

Отзывы: