background image

ADJUSTMENT

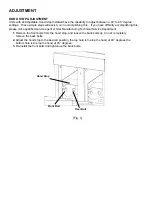
HOOD STOP ADJUSTMENT

Units with an Adjustable Hood Stop Installed have the capablity to adjust between a 40° to 45° degree 
settings.  These simple steps will assist you in accomplishing this.   If you have dif

fi

 culty accomplishing this, 

please call a quali

fi

 ed service agent or Star Manufacturing Technical Service Department.

1. 

Remove the front bolts from the hood stop, and loosen the back bolts up, do not completely 
remove the back bolts.

2. 

Adjust the hood stop to the desired position, the top hole is to stop the hood at 40° degrees the 
bottom hole is to stop the hood at 45° degrees.

3. 

Re-install the front bolts and tighten up the back bolts.

(Fig. 1)

Hood Stop

Front Bolt

Rear Bolt

Содержание Electric Clamshell CSE12-208VCD

Страница 1: ...O 63143 3800 Part Number 2M W363 Ph 800 438 5264 Fax 314 781 2714 Rev C www langworld com June 15 2011 Installation Operation and Maintenance Instructions Electric Clamshell Model CSE12 208VCD CSE12A...

Страница 2: ...ITUATION WHICH IF NOT AVOIDED MAY RESULT IN MINOR OR MODERATE INJURY NOTICE Helpful operation and installation instructions and tips are present FOR YOUR SAFETY DO NOT STORE OR USE GASOLINE OR OTHER F...

Страница 3: ...BACK TO FRONT BY AT LEAST BEFORE COOKING The data plate is located behind the Clamshell between the two pivot arms The Clamshell voltage wattage serial number wires size and clearance specifications a...

Страница 4: ...tured to rigid standards This equipment is approved by a certifying agency to conform to safety and sanitation standards The presence of safety equipment control and interlocks on an appliance and att...

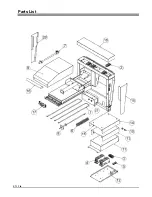
Страница 5: ...le 68964 Rev A2007 5 Chapter Page Safety 2 General Information 6 Installation 7 Initial Start Up 8 Cleaning 9 Hood Stop Adjustment 10 Parts List 11 12 CSE12A 1G thru CSE12A 6G Exploded View Parts List...

Страница 6: ...e which does not become apparent until the merchandise has been unpacked Make a written request for inspection upon unpacking and finding concealed damage within 15 days of delivery Keep all packing m...

Страница 7: ...Y AT LEAST BEFORE COOKING NOTICE The data plate is located behind the Clamshell between the two pivot arms The Clamshell voltages wattage serial number wire size and clearance specifications are on th...

Страница 8: ...and climate changes during shipment the unit can absorb moisture Check griddle for moisture and allow the unit to dry before placing the unit into full operation Prior to putting any unit into full t...

Страница 9: ...THE CLEANER TO BE USED Daily Cleaning The CSE12 broiler is a self cleaning device When the hood is in the down position it will bake off any debris that may accumulate during normal business operatio...

Страница 10: ...lease call a qualified service agent or Star Manufacturing Technical Service Department 1 Remove the front bolts from the hood stop and loosen the back bolts up do not completely remove the back bolts...

Страница 11: ...Parts List ETL File 68964 Rev A2007 11 Parts List...

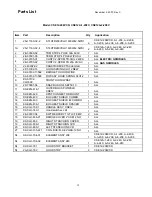
Страница 12: ...102 XLH609 FRONT HOOD WRAP 1 ALL 10 2K 70801 04 SNAP BUSH 3 4 SB750 10 1 ALL 11 K9 EZG 418 1 OUTER BOX SPOTWELD CSE12 1 ALL 12 K9 EZG 429 SPOT CONNECTOR MOUNT 1 ALL 13 K9 EZG 430 BOX HEAT SHIELD COMBO...

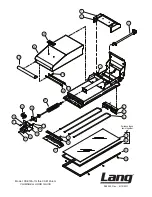
Страница 13: ...SK2522 Rev 6 15 2011 Model CSE12A 1G thru CSE12A 6G CLAMSHELL HOOD GLASS Purchase these items together 1 2 3 1 25 26 27 22 23 24 4 5 7 8 9 1 13 15 1 19 20 21 16 17 14 12 11 10 6 18...

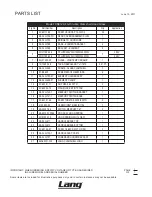
Страница 14: ...13 2C 20301 11 NUT HEX 8 32 PLTD 2 14 2C 20202 12 WSHR LOCK 8 INT STAR 2 15 K9 XLH 742 1 MERCURY SWITCH BRACKET 1 16 K9 XLH 741 1 MERCURY SWITCH BASE 1 17 2C 20101 28 SCRW THD MS 8 32X3 8 PLTD 2 18 2I...

Страница 15: ...Wiring Diagram ETL File 68964 Rev A2007 13 Wiring Diagram...

Страница 16: ...STAR INTERNATIONAL HOLDINGS INC COMPANY Star Holman Lang Wells Bloomfield Toastmaster 10 Sunnen Drive St Louis MO 63143 U S A 314 781 2777 www star mfg com...

Отзывы: