


1P124-2306
3-9
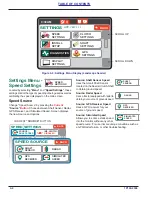
Seed Box Seed Rate
Adjustment
WARNING
NOTE
To avoid Seed Meter damage, if there is seed in the
Meters, decrease rate in small increments. Decrease rate
no more than one nut revolution and rotate Seed Shaft to
purge seed from Meters. Continue adjustment as needed.
NOTE
Before filling with seed be sure Seed Shaft turns freely
and Seed Meters are free of any foreign matter.
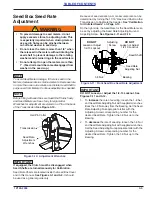
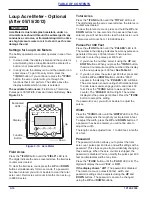
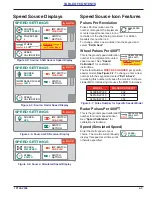
Wrenches for adjustment are stored on a Pin at the back
of the Transmission.
Figure 3-10: Adjustment Wrenches
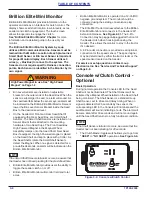
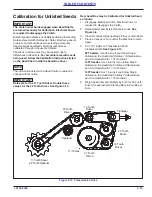
IMPORTANT
If equipped, the Clutch must be disengaged when
Seed Shafts are turned manually for Calibration.
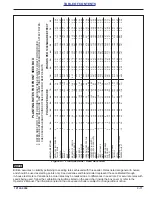
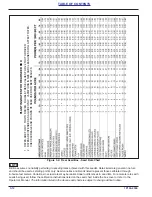
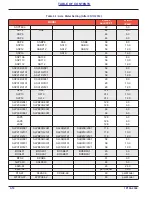
Seed Rate Charts are located inside the Seed Box Cover
and in this manual.
and
It should
be used as a general guide only.
Because of seed variation, a more accurate rate can be
determined by turning the 11/16" Hex Seed Shaft on the
Transmission to Calibrate the Seeder.
for Unlisted Seeds” on Page 3-13.
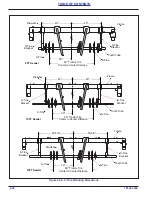
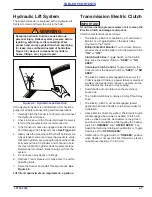
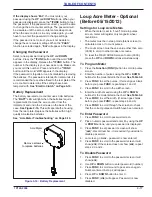
On the right side, the Seed Rate for the Seed Meters can
be set by adjusting the Seed Rate Adjusting Nut and
Adjusting Screw.
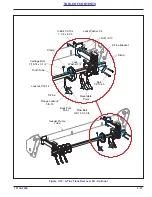
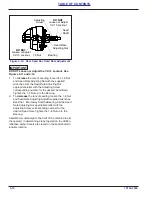
Figure 3-11: Front Seed Box Seed Rate Adjustment
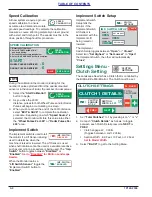
IMPORTANT
DO NOT Loosen or Adjust the 1/2-13 Locknut. See
Figures 3-11 and 3-12.
1. To
increase
the rate of seeding, loosen the 1-8 Nut
and Seed Rate Adjusting Nut with supplied wrenches.
Back the 1-8 Nut away from the Bearing. Set the Seed
Rate Adjusting Nut appropriate letter with the
Adjusting Screw corresponding number for the
desired Seed Rate. Tighten the 1-8 Nut up to the
Bearing.
2. To
decrease
the rate of seeding, loosen the 1-8 Nut
and Seed Rate Adjusting Nut with supplied wrenches.
Set the Seed Adjusting Nut appropriate letter with the
Adjusting Screw corresponding number for the
desired Seed Rate. Tighten the 1-8 Nut up to the
Bearing.
•
To prevent damage to seed meters, do not
apply excessive force to adjusting nuts. This
is especially important when closing meters
as seed in flutes can be pinched between
cut-off and washer in seed cup.
• Do not close the meters more than 1/8" when
there is seed in the meters without rotating the
seed shaft to prevent damage to the rotating
washers and retainer rings in the seed meters.
• Do not attempt to open the meters more than
1". (Feed rolls could become disengaged from
washer in the seed cup.)
Hair Pin Cotter
Transmission
Seed Rate
Adjustment
Wrenches
DO NOT
Loosen or Adjust
1/2-13 Locknut
Seed Rate
Adjusting Nut
1-8 Nut
Adjusting
Screw
Seed Shaft
Bearing
DO NOT
Loosen or Adjust
1/2-13 Locknut
Содержание Brillion Turfmaker III Series
Страница 4: ......
Страница 14: ...1 6 1P124 2306 TABLE OF CONTENTS Figure 1 4 Decal Placement Hitch SL2 HitchDecals 1 9 1 9 3...
Страница 18: ...1 10 1P124 2306 TABLE OF CONTENTS Table provided for general use NOTES...
Страница 45: ...1P124 2306 2 27 TABLE OF CONTENTS Table provided for general use NOTES...
Страница 49: ...1P124 2306 2 31 TABLE OF CONTENTS Table provided for general use NOTES...
Страница 57: ...1P124 2306 2 39 TABLE OF CONTENTS Table provided for general use NOTES...
Страница 74: ...3 14 1P124 2306 TABLE OF CONTENTS Table provided for general use NOTES...
Страница 102: ...6 4 1P124 2306 TABLE OF CONTENTS Table provided for general use NOTES...


