2.
Align the front axle using the method
outlined in
Section 4-8.2a.
3.
After proper alignment has been obtained,
tighten the suspension pivot bolt nut to the
torque listed in the table in
Section 4-7.1
4.
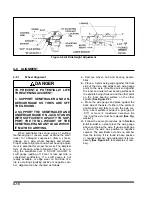
Align the rear axle to the front axle. Locate
the rear axle equalizer beam pivot bolt in
hanger at front end of driver’s side rear axle
equalizer beam. Loosen the suspension
pivot bolt lock nut. Rotate the head of the
pivot bolt. For axle alignment forward, rotate
bolt head clockwise. For axle alignment
rearward, rotate the bolt head
counter-clockwise. The rear axle should be
parallel with the front axle, with the
dimensions Y and Y1 being the same.
5.
Tighten the suspension pivot bolt nut to the
torque listed in the table in
Section 4-7.1
4-9 BRAKE SYSTEM MAINTENANCE
CAUTION
USE GREAT CARE IF WHEELS OR
BRAKE DRUMS MUST BE HANDLED.
THEY MAY BE VERY HOT AND CAN
CAUSE INJURY.
4-9.1
General
.
a.
Check air hoses for chafing, bends, kinks,
or damaged fittings. Replace defective hoses.
b.
Check the brake system for loose, missing,
deformed, or corroded fasteners. Replace
and tighten defective hardware.
c.
Check brake linings for excessive wear or
distortion.
d.
Drain air reservoir daily. A drain cock on the
bottom of each air reservoir vents the tank to
drain collected water and oil. If held open, air
pressure in the tanks is relieved, causing the
emergency or parking brakes to be applied
(See Figure 4-10).
4-9.2
Spring Air Brake
Check for faulty units. Check the condensation
holes on the underside of the brake chambers to
make sure they are open. The spring brake has
two brake chambers, a service chamber and and
an emergency chamber or spring chamber
(See
Figure 4-10).
Service brake chambers should be
disassembled and cleaned at 50,000 miles or
yearly. The diaphragm and any marginal parts
should be replaced. When replacing the service
diaphragm, replace the corresponding parts for the
other chamber on the same axle (to aid in even
brake application and release). Examine yoke pin
for wear and replace as necessary. The spring
chamber should not be serviced. Replace entire
unit (both service and spring chamber) if spring
chamber becomes faulty.
4-13
Figure 4-10 Drain Cock Locations
Содержание 336C
Страница 3: ...MODEL 336C CAR CARRIER OPERATOR S MANUAL PURCHASED FROM DATE ADDRESS PHONE NO SERIAL NO...
Страница 8: ......
Страница 24: ...3 12 Figure 3 7 Lining Up the Over the Cab Deck Figure 3 8 Loading the Over the Cab Deck...
Страница 28: ...3 16 Figure 3 11 Loading the Lower Deck...
Страница 32: ...3 20 Figure 3 13 Rear Impact Guard and Antilock Brake System...
Страница 40: ...4 6 Figure 4 3 336C Wiring Diagram...
Страница 45: ...4 11 Figure 4 7 Checking Axle for Bend Figure 4 8 Examples of Camber...
Страница 50: ...4 16 Figure 4 12 Axle and Brake Assembly...
Страница 54: ...4 20 Figure 4 14 Outboard Mount Hub and Drum Figure 4 15 Inboard Mount Hub and Drum...
Страница 59: ...4 25 Figure 4 19 Mounting Tires and Wheels Figure 4 20 Stud Tightening Sequence...
Страница 70: ...NOTES 5 10...


