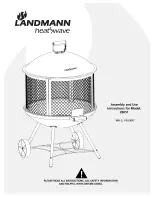


Congratulations on your purchase of the Heatwave Outdoor Fireplace! At Landmann USA,
we strive to provide you with an easy to use, easy to assemble product. However, in the
unlikely event your package should have a missing or defective part,
please contact us at:
[email protected]
-OR-1-800-321-3473 M-F 8-5 ET.
Proof of purchase may be required. Thank you!
Landmann® Limited
Distributed by Landmann® USA
Fairburn, GA 30213
www.landmann-usa.com
Made in China
© 2016 Landmann® USA
HELPFUL HINTS FOR THE PORCELAIN
LID AND FIREBOWL
Porcelain finishes are very durable and provide excellent resistance to heat.
Proper care will provide many seasons of carefree use. Follow these rules for
long life.
• Do not drop the lid on the ground, this will cause the
porcelain finish to chip.
• Avoid excessive poking, rubbing or striking to the
porcelain finish as it will cause chipping.
• Do not pour water directly onto a hot firebowl or lid,
this could cause the porcelain to chip, craze or pit.
• The porcelain finishes can be cleaned with a mild
cleaner and a strong stream of water.
HELPFUL HINTS
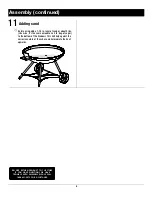
• ADDING 5 LBS OF SAND TO THE BOTTOM OF THE FIREBOWL WILL EXTEND
THE FIREBOWL LIFE.
• KEEP OUT OF THE WEATHER AND ELEMENTS.
• STORE IN A DRY LOCATION OUT OF THE WEATHER.
• DO NOT LET THE FIREBOWL FILL WITH WATER.
• DO NOT DUMP ASHES WHERE THEY COULD START A FIRE.
• DISPOSE OF ASHES IN PROPER RECEPTACLE ONLY AFTER
ASHES HAVE COOLED.
Содержание Heatwave 28051
Страница 1: ......
Страница 2: ......
Страница 3: ......
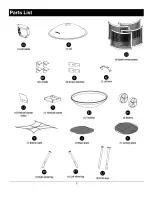
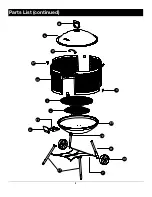
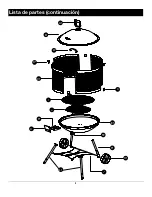
Страница 4: ...B C1 J I T1 L1 F2 W D1 X U E1 F1 H1 Y A1 4 Parts List continued...
Страница 7: ......
Страница 9: ......
Страница 11: ......
Страница 12: ......
Страница 13: ......
Страница 14: ...B C1 J I T1 L1 F2 W D1 X U E1 F1 H1 Y A1 4 Lista de partes continuaci n...
Страница 17: ......
Страница 19: ......


