background image

2

Assembly Instructions

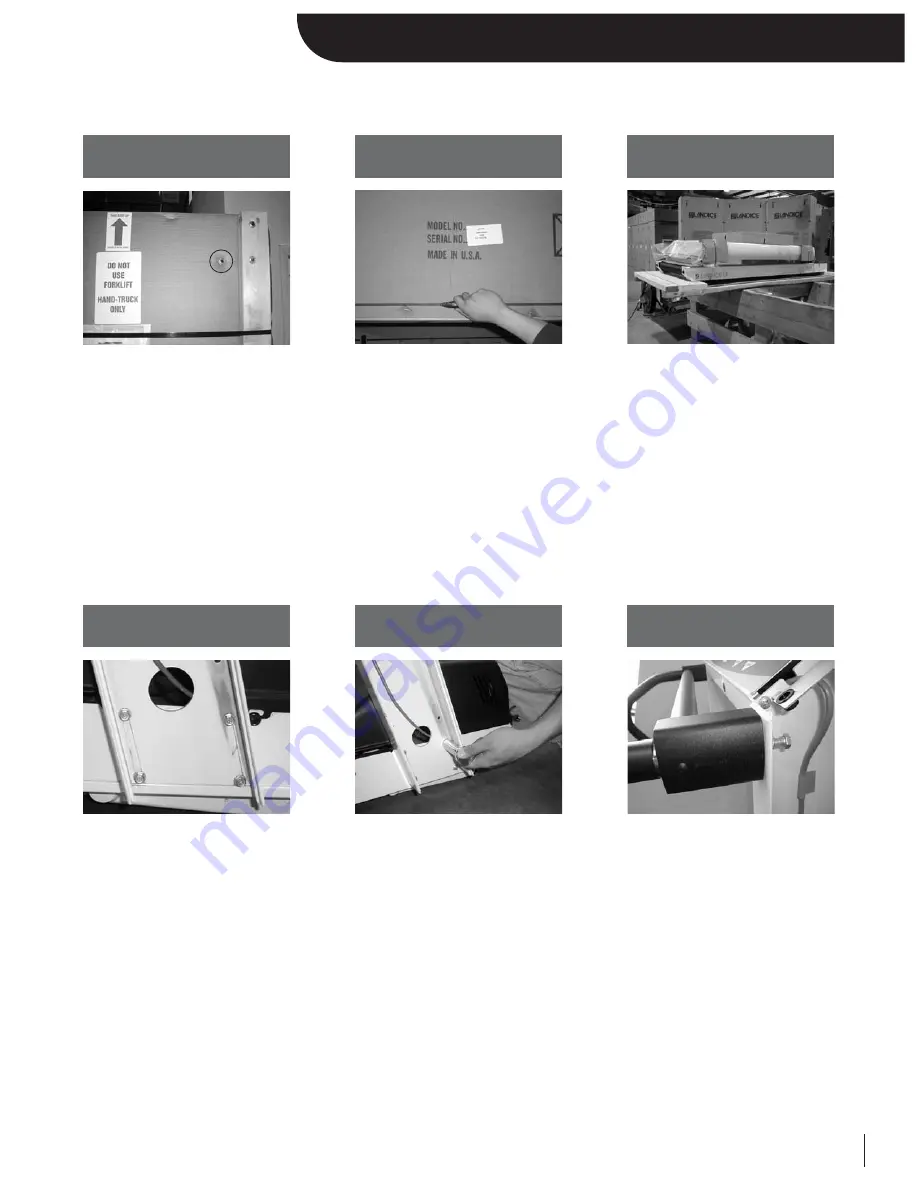
• On L7 treadmills it is necessary

to remove the bolts which hold
the treadmill to the pallet.

• Start by removing the top bolts.
• Lay the treadmill on the ground,

and then remove the bottom 
bolts by placing the treadmill on
your toolbox.

• With the bolts removed, the 

treadmill will be free to move 
around in the box.

• Remove the metal strapping 

around the box.

• Using a razor blade knife, cut the

box just above the bottom row 
of brass staples along all sides of
the box.

• DO NOT cut through the center

of the box, as you could hit the
treadmill.

• Remove the box and discard.

• The treadmill components are

held together with plastic
strapping.

• Carefully cut and remove the

strapping. Remove the tread-
mill upright and motor cover
from treadmill. Lift the tread-
mill off the pallet.

• Carefully remove the upright

side cover from the upright 
assembly.

• Slide the upright down onto

the 8-side frame bolts. Be sure 
the washers are located on the 
outside of the upright and 
against the head of the bolt.

• Tighten bolts with a 7/16”

extended socket.

If installing an L9 or medrails,

turn to the appendix for installa-
tion instructions.

• The rail mounting bolts have 

been threaded into the rails for 
shipping. Remove them.

• Attach the U-shaped handrails 

by first hand-starting the bolts 
and then using a 1/2” socket 
until snug.

(Do not over-tighten.)

STEP 1:

Unbolt treadmill from pallet

STEP 2:

Cut the box off the pallet

STEP 3:

Unstrap the treadmill

STEP 4:

Mount the upright

STEP 5:

Secure upright to frame

STEP 6: (

L9 — see page 15)

Prepare to install hand rail

Содержание Pro Sports Trainer

Страница 1: ...Crafting the World s Finest Treadmills Pro Sports Trainer Owner s Manual PART NUMBER 72047 REVISION 2 0...

Страница 2: ...any time to choose the statistic that best suits your workout To use the built in workout programs Press the PROGRAMS button at anytime and choose the program that best suits your desired workout the...

Страница 3: ...de rail until the belt starts moving 5 Always wear the emergency stop safety strap securely around your wrist while exercising Failure to do so can result in severe injuries should you accidentally fa...

Страница 4: ...grounding provides a path of least resistance for electric current to reduce risk of electric shock This product is equipped with a cord having an equipment grounding conductor and a grounding plug Th...

Страница 5: ...6 Control Functions Manual Mode 7 Built In Programs 8 User Programs 10 Getting The Most Out of Your Workouts Should You Walk or Run 11 Expectations For Success 11 Optimizing Your Workouts 12 Maintena...

Страница 6: ...Your treadmill was a smart purchase but you already knew that so let s move on and get started INSTRUCTION MANUAL Be sure to familiarize yourself with this manual Look it over carefully Be sure you u...

Страница 7: ...remove the strapping Remove the tread mill upright and motor cover from treadmill Lift the tread mill off the pallet Carefully remove the upright side cover from the upright assembly Slide the upright...

Страница 8: ...restraint clip pro vided Plug connector into circuit board until it snaps into place The treadbelt is tracked and tensioned via the take up screws located at the back of the treadmill Check the tensio...

Страница 9: ...onger than 2 seconds causes the speed to increase at a faster rate Hold the SLOW button down to decrease speed Holding the SLOW button depressed for longer than 2 seconds causes the speed to decrease...

Страница 10: ...through a predetermined twenty segment speed and elevation profile but at the same time allow you to customize the program to your specific needs TWO USER DEFINED PROGRAMS User programs allow you to c...

Страница 11: ...will start moving at 0 5 mph The treadmill will ask you to enter your weight by repeatedly pressing the display button Holding the display button depressed for longer than 2 seconds causes your displ...

Страница 12: ...to option by using the Scan mode Press and hold the DISPLAY button for 3 seconds to enter the Scan mode When in the Scan mode the display will advance by itself every five seconds Press the DISPLAY bu...

Страница 13: ...om 10 to 99 minutes and a maximum Speed Once set the treadmill will not go above the maxi mum number unless you manually override it The following figures represent the four built in programs in the P...

Страница 14: ...ct a program time from 10 99 min This will scale the 20 segments of the program equally throughout your selected time Once maximum speed and program time are selected you will have 4 seconds to press...

Страница 15: ...PROGRAMS DISPLAY START START SELECT PROGRAM By pressing the PROGRAMS button you can select one of two USER programs Continue to press the PROGRAMS button to scroll through both USER programs Once you...

Страница 16: ...in comfort Avoid being sore and discouraged After you ve reached your target weight reevalu ate If you like walking and want to stick with it terrific On the other hand if some running is appealing tr...

Страница 17: ...Breathing is an excellent way to gauge intensity because you don t have to stop to take a measure you re aware of it all the time If you want more guidance and precision determining your safe exercis...

Страница 18: ...er cushion the impact of your feet on the moving surface AFTER YOUR WORKOUT Drink a large glass of water you ll recover faster Congratulate yourself for completing the workout Do some light stretching...

Страница 19: ...and is screwed to a hook which is attached to the motor bracket By turning the nut clockwise you will tighten the nut pulling down the motor bracket and tightening the drive belt DO NOT OVER TIGHTEN...

Страница 20: ...soft mallet to firmly set the rails inside the clamp Use a 3 16 allen wrench to tighten the rail clamp bolts Line up the upright leg side covers and firmly snap them into place Place the plastic endca...

Страница 21: ...ut inside treadmill and use 3 16 allen wrench to tighten Line up the upright leg side covers and firmly snap them into place Place the plastic endcaps on the top corners of the control panel Use the t...

Страница 22: ...nue Randolph NJ 07869 1 800 LANDICE Tel 973 927 9010 Fax 973 927 0630 www landice com Crafting the World s Finest Treadmills Leave a fitness legacy Life time War ran ty Life time War ran ty noun The p...

Страница 23: ......
Страница 24: ...Crafting the World s Finest Treadmills 111 Canfield Avenue Randolph NJ 07869 1 800 LANDICE Tel 973 927 9010 Fax 973 927 0630 www landice com...

Отзывы: