background image

PART NUMBER 72070 • REVISION 2.0

Worldwide excellence for over 40 years

Executive Trainer

Ownerʼs Manual

Содержание Cardio Trainer L8

Страница 1: ...PART NUMBER 72070 REVISION 2 0 Worldwide excellence for over 40 years Executive Trainer Ownerʼs Manual ...

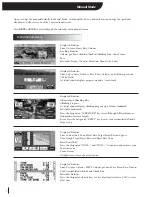
Страница 2: ...mill will shut off and all current statistical information will be cleared To change speed Hold speed key down to increase speed Holding speed key depressed for longer than 2 seconds causes the speed to increase at a faster rate Hold speed key down to decrease speed Holding speed key depressed for longer than 2 seconds causes the speed to decrease at a faster rate To change grade Hold grade key do...

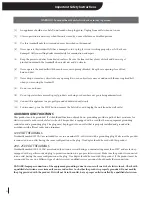
Страница 3: ...de rail until the belt starts moving 5 Always wear the emergency stop safety strap securely around your wrist while exercising Failure to do so can result in severe injuries should you accidentally fall while exercising 6 Test the emergency stop safety key on a regular basis by pulling on the cord and ensuring that the treadbelt comes to a complete stop 7 Always remove the safety key from the trea...

Страница 4: ... grounding provides a path of least resistance for electric current to reduce risk of electric shock This product is equipped with a cord that has an equipment grounding conductor and a grounding plug The plug must be plugged into an outlet that is properly installed and grounded in accordance with all local codes and ordinances 120 VOLT TREADMILLS Treadmills marked 120 VAC are intended for use in...

Страница 5: ...grams 14 Specialty Programs Specific Goal Programs 15 Race Mode 16 Fitness Tests Protocols Overview 17 Taking a Fitness Test 18 Taking a Fitness Protocol 19 Client Mode Creating a Client 20 Fitness Calendar 21 Setup System Settings 22 Self Diagnostics 23 Heart Rate Monitoring Overview 24 My Target Heart Rate Zone 25 Heart Monitors Wireless and AccuTrack 26 Getting The Most Out of Your Workouts Sho...

Страница 6: ... purchase but you already knew that so let s move on and get started INSTRUCTION MANUAL Be sure to familiarize yourself with this manual Look it over carefully Be sure you understand the control panel operation before using the treadmill WARRANTY INFORMATION Fill out your warranty registration card and mail it in today Landice backs your treadmill with a strong warranty For the factory to respond ...

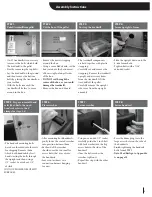
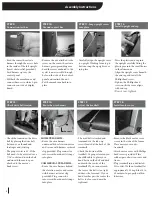
Страница 7: ...nting bolts have been threaded into the rails for shipping Remove them Attach both handrails by first hand starting the bolts through the upright and then using a 1 2 socket Leave about 1 8 of slack DO NOT TIGHTEN FLUSH TO SURFACE After mounting both handrails gently lower the curved crossbar into position between them Each end of the crossbar should cover the two smaller access holes that are cut...

Страница 8: ...neath the end cap and install the Phillips head screw Tighten the Phillips head screw until side cover aligns with endcap Do not over tighten STEP 12 Install upright end cap HOME TREADMILL Route the wire harness underneath the elevation motor and secure with harness restraint clip provided Plug connector into circuit board until it snaps into place COMMERCIAL TREADMILL Route the wire harness behin...

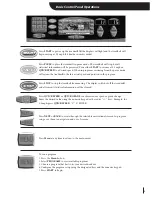
Страница 9: ...displays will shut off the treadmill and all current statistical information will be cleared Press QUICK SPEED or QUICK GRADE to achieve instant speed or grade change Enter the desired value using the numeric keypad or the center keys Example for 5 0 mph press QUICK SPEED 5 0 ENTER Press NEXT or BACK to rotate through the selectable motivational screens In program setups use them to navigate in an...

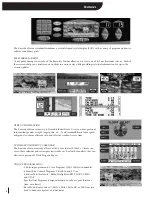
Страница 10: ...ght target pulse etc and treadmill limits max speed and grade to ensure efficient safe and effective workouts every time AUTOMATED WORKOUT CALENDAR The Executive Trainer records all user activity over the last 8 Weeks Clients can access their calendar and review previous workouts For further analysis they can also view a personal 8 Week Progress Report UNIQUE PROGRAMMING 5 Built in programs and 5 ...

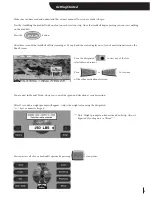
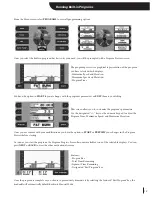
Страница 11: ...ivational screens the Road Screen Press the designated to view any of the five selectable road screens Press or to view any of the other motivational screens You are now in Manual Mode where you control the speed and elevation at your discretion After 12 seconds a weight prompt will appear Adjust the weight value using the designated keys or numeric keypad Note Weight prompt can be deactivated in ...

Страница 12: ...e Climbing Progress A virtual runner displays climbing progress up a famous landmark Selectable Landmark Press the designated LANDMARK key to scroll though different famous landmarks of various heights Reset Press the designated RESET key to reset your accumulated altitude Trips to top Displayed Statistics Time in Heart Rate Zone Heart Rate Target Heart Rate and Age vs Zone Graph Target Heart Rate...

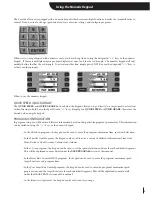
Страница 13: ...pad PROGRAM CONFIGURATION In program setup you will be asked different information based on that particular program s parameters This information can be dialed in using the keys or the numeric keypad In the 5 Built in programs the keypad can be used to enter the program s maximum time speed and elevation In the Specific Goal Programs the keypad can be used to enter a variety of different informati...

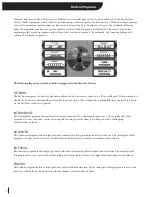
Страница 14: ...vated heart rate for most of the workout then gradually bring your heart rate down via the last three cool down segments INTERMEDIATE The Intermediate program features five elevation peaks matched to a challenging speed curve The overall goal of this program is to vary your heart rate by elevating and lowering it several times providing you with a challenging cardiovascular workout ADVANCED The Ad...

Страница 15: ...the program s parameters Use the designated keys or the numeric keypad to adjust the Program Time Maximum Speed and Maximum Elevation Once you are content with your modifications you have the option to START or PREVIEW your changes in the Program Preview before starting As soon as you start the program the Program Progress Screen becomes available as one of the selectable displays You can press NE...

Страница 16: ...SEGMENT to view the 2nd segment in detail To view other segments use the designated NEXT PREVIOUS SEGMENT keys to navigate through the entire 3 segment program When you finish modifying your User Program press BACK to preview your modified program EXAMPLE If you want to modify your user program to be more than 3 segments up to 20 follow these steps To make a 3 Segment User Program 4 segments 1 Aft...

Страница 17: ...otice that it reads NEW SEGMENT This is an indication that you are creating a new segment the 1st segment During the first 10 seconds you can adjust the speed and grade settings for this segment After 10 seconds the segment settings will lock in and the banner will change to AUTO PROGRAM This is an indication that any future speed or grade changes will trigger the creation of a new segment You can...

Страница 18: ...lse Press GRADE key to toggle between Max Speed and Grade Once you are content with your modifications press START to begin or BACK to view the Program Preview with the updated changes you have made As soon as you start the program the Program Progress Screen becomes available as one of the motivational screens You can press NEXT or BACK to view the other motivational screens Also you can press th...

Страница 19: ...odify the 1st segment s time and target heart rate Press NEXT SEGMENT to view the 2nd segment in detail To view other segments use the designated NEXT PREVIOUS SEGMENT keys to navigate through the entire 3 segment program When you finish modifying your User Program press BACK to preview your modified program EXAMPLE If you want to modify your user program to be more than 3 segments up to 20 follow...

Страница 20: ...creen Use the top designated keys to select your workout s goal TIME DISTANCE or CALORIES After selecting your goal define its parameter using the bottom designated keys or the numeric keypad Time 10 99 Minutes Distance 0 1 99 9 Miles Calories 10 9999 Calories Press Start to begin As soon as you begin you ll notice that goal progress will be displayed in the different motivational screens The goal...

Страница 21: ...ed Notice that your personal best and previous times for this distance are posted at the top the setup screen Press START to begin the race As soon as you begin you will default to the Road Screen During the Race the Road Screen will display both you and the pacer the pacer is always the opposite gender The pacer will finish the race distance exactly at the time you selected in setup Since you are...

Страница 22: ...reases in difficulty in an effort to raise your heart rate to a target Upon reaching your target heart rate the test will terminate and calculate a fitness level based on your performance VO2 Max Score What is VO2 Max A person s fitness level can be measured by the amount of oxygen his or her body can consume while exercising at maximum capacity VO2 Max is a measurement of the maximum amount of ox...

Страница 23: ...are fully automated and will increase in difficulty from segment to segment until the user achieves the target heart rate Balke 80 of Max HR Firefighter 85 of Max HR Once you reach the target pulse a countdown will begin to ensure that your pulse has indeed stabilized at the target Any keystrokes during the test other than BACK MENU or NEXT will invalidate and terminate the test Balke Fitness Test...

Страница 24: ...esignated keys or the numeric keypad to adjust your age and gender Note If you feel discomfort at any point during the fitness test stop the test Press START to begin the test During the protocol you will retain manual speed control You ll also notice that the Road and Track screens have an added statistic projected score Projected score is the score you would receive if you were to complete the r...

Страница 25: ...s miles vs kilometers You can also access the Name Edit System Menu Fitness Profile Screen and select Scenery for the Road Screen Press Profile to enter the Fitness Profile Screen Use the designated keys or the numeric keypad to adjust your Weight Target Pulse Maximum Speed and Maximum Elevation The values that you select as your Fitness Profile will be the default values for all programs to exped...

Страница 26: ...t day at the top of the screen is incorrect see System Setup to adjust to the correct date Use the designated Select and Select to move the red square from day to day Move the red square over any date that you want to view in detail Press the designated View Stats key You can now see your workout in detail for that particular day You can move from day to day in this detailed view by pressing the d...

Страница 27: ...ou have access to Brightness Setup Time Date Setup and Diagnostics To set the Time and Date select the designated Set Date key In the Time Setup Screen use any of the necessary designated keys to correctly set the time and date Once set the Executive Trainer will maintain the current time and date even when you turn it off However unplugging the treadmill will deactivate the internal clock calenda...

Страница 28: ...ping on the traction strips on the sides of the running surface and press NEXT to continue The treadmill will now systematically test all of the individual components of the treadmill During some of its tests it will prompt you with simple Yes or No questions to assist with the diagnosis Once the Self Diagnostics has completed all of the tests it will read one of the two messages along the bottom ...

Страница 29: ...is low exercise intensity is low if your heart rate is high your exercise intensity is high What is maximum heart rate Maximum Heart Rate MHR is the maximum attainable heart rate your body can reach before total exhaustion True maximum heart rate is measured during a fatigue or stress test This test must be done in a clinical setting and is not practical or accessible for most people Fortunately y...

Страница 30: ...te of exercise The American College if Sports Medicine ACSM recommends that all individuals should work within a Target Heart Rate Zone of 60 to 85 of Maximum Heart Rate This means that your heart rate during exercise should not fall below 60 or rise above 85 of your maximum heart rate Let s look at John from our earlier example John is 35 years old so his estimated maximum heart rate is 220 minus...

Страница 31: ...nsmitter and the AccuTrack Contact Heart Rate Wireless Heart Rate Chest Strap Transmitter shown below To use the Wireless Chest Strap follow these steps Secure the Chest Strap Center the transmitter on the chest as high under the pectoral muscles breasts as possible Tighten the strap so that the belt is as tight as possible without being uncomfortable Apply Cardio Gel to the Electrodes A tube of L...

Страница 32: ... on several things such as body weight fitness goals and what you like to do Walking is the safest most compatible form of exercise for most people If you re just starting out are new to exercise or participate in aerobic activities less than three times per week we recommend that you walk On the other hand if you re an experienced runner stick with your program use your treadmill the way you want...

Страница 33: ...xercises Record that you completed the workout on your calendar KEEPING TRACK OF PROGRESS Keep a calendar that shows scheduled and actual workouts Record every workout you complete Compare planned with actual workouts completed Aim for 90 completion If you re averaging less than 90 reevaluate your schedule and examine why you re missing 10 of your workouts and the extra benefits from those missing...

Страница 34: ... of the treadbelt Repeat treadbelt tensioning instructions if required MOTOR DRIVE BELT TENSIONING pre set from factory The drive belt is tensioned by a nut located under the motor pan This nut is screwed to a hook which is attached to the motor bracket By turning the nut clockwise you will tighten the nut pulling down the motor bracket which will tighten the drive belt DO NOT OVER TIGHTEN DO NOT ...

Страница 35: ...d tighten the bolt using a 1 2 socket Do not over tighten Use a soft mallet to firmly set the rails inside the clamp Use a 3 16 allen wrench to tighten the rail clamp bolts Return to Step 9 in Assembly Instructions STEP 1 STEP 2 STEP 3 STEP 4 Fit the side rail to the bottom rail clamp ...

Страница 36: ...Worldwide excellence for over 40 years 111 Canfield Avenue Randolph NJ 07869 1 800 LANDICE Tel 973 927 9010 Fax 973 927 0630 www landice com ...

Отзывы: