background image

34

Installation

4.

Type the password again, and then press 

Enter

5.

When your password is accepted, press 

Enter

 again to return to the System 

Configuration menu.

6.

Continue with the next section, “

Change the root User Password

.” 

Change the root User Password

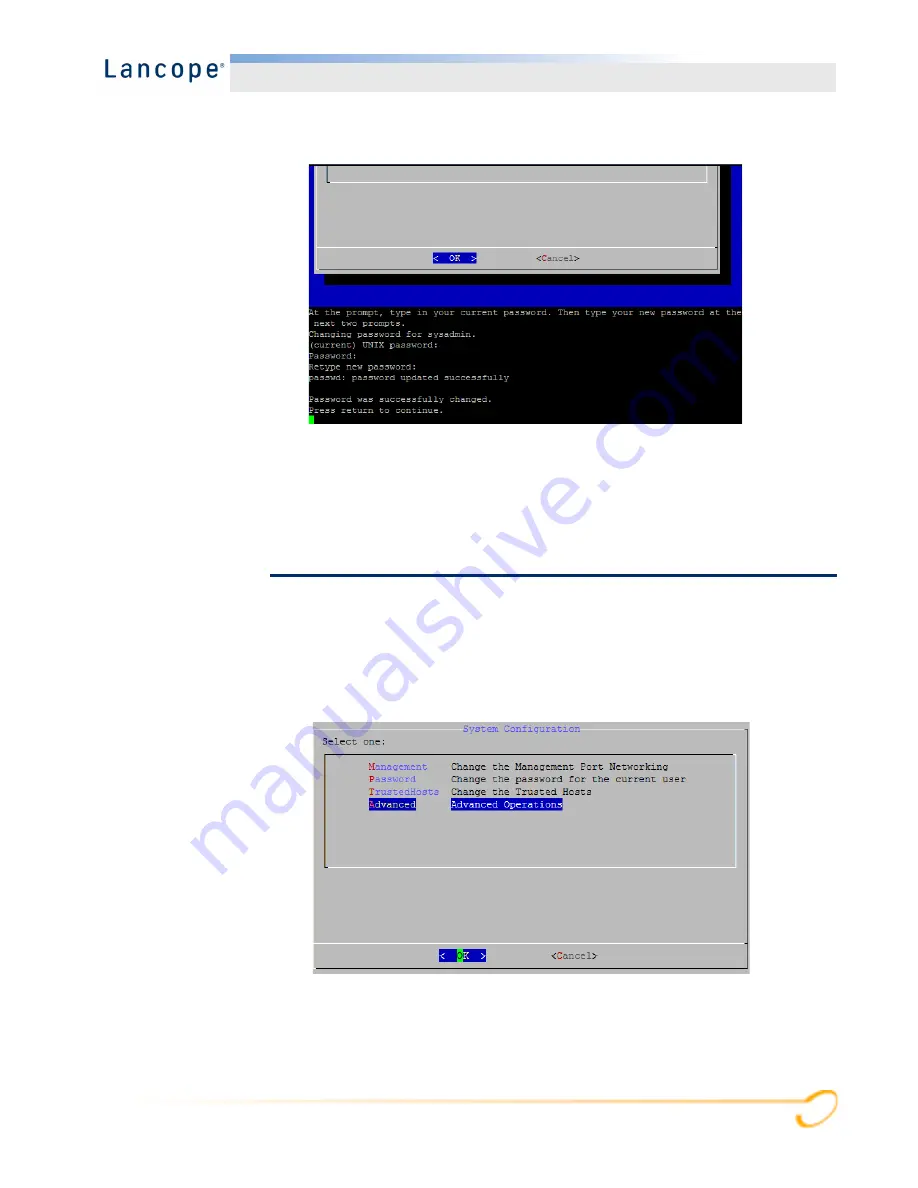
After you change the default sysadmin user password, you need to change the default 
root user password to protect the security of your network further. 

1.

To change the root user password, complete the following steps:
Now in following steps you can change the password for the root login. First 
you need to go to the root shell.

Содержание StealthWatch System

Страница 1: ...StealthWatch System Hardware Installation Guide for StealthWatch System v6 7 0 ...

Страница 2: ... 0 Hardware 2015 Lancope Inc All rights reserved Document Date March 19 2015 Trademarks Lancope StealthWatch and other trademarks are registered or unregistered trademarks of Lancope Inc All other trademarks are properties of their respective owners ...

Страница 3: ... 10 FlowCollector 10 FlowSensors 11 UDP Director also known as FlowReplicator 11 Identity Devices 11 Placement Considerations 12 Placing the SMC 12 Placing the StealthWatch FlowCollector 13 Placing the StealthWatch FlowSensor 13 Placing Other StealthWatch Products 13 Configuring Your Firewall for Communications 14 Communication Ports 14 Integrating the FlowSensor into Your Network 17 TAPs 17 Using...

Страница 4: ... root User Password 34 Connecting the Appliance to the Network 38 Types of Servers 38 SMCs 1000 2000 and FlowCollectors 1000 2000 38 UDP Director 2000 FlowSensors 2000 and 3000 39 FlowSensor 4000 39 FlowCollector 4000 40 FlowCollector 5000 Engine 40 FlowCollector 5000 Database 41 FlowSensor 250 41 FlowSensor 1000 and UDP Director also known as FlowReplicator 1000 41 SMC 1010 FlowCollectors 1010 40...

Страница 5: ...udes the following topics Audience How to Use This Guide Documentation Icons Common Abbreviations Other Resources Audience This guide is designed for the person responsible for installing StealthWatch system hardware We assume that you already have some general understanding of installing network equipment FlowSensor FlowCollector UDP Director also known as FlowReplicator and the StealthWatch Mana...

Страница 6: ...iguration of the firewall for communications 3 Installation Describes the mounting and installation of StealthWatch hardware Icon Meaning Description Note Additional information you may find useful Tip Helpful information such as shortcuts or easier ways of performing certain tasks Important Information you must observe to prevent significant consequences such as the malfunction of software Cautio...

Страница 7: ...Hz Hertz IP Internet Protocol ISE Identity Services Engine Mbps Megabits per second ms Milliseconds NAT Network Address Translation NIC Network Interface Card NTP Network Time Protocol PCIe Peripheral Component Interconnect Express SCP Secure Copy SMC StealthWatch Management Console SNMP Simple Network Management Protocol SPAN Switch Port Analyzer SSH Secure Shell TAP Test Access Port UPS Uninterr...

Страница 8: ...s blog http www lancope com blog provides a wealth of information about NetFlow the NetFlow industry and new StealthWatch features as well as tips and tricks on using StealthWatch StealthWatch Video Library The StealthWatch online video library http www lancope com resource center videos showcases the benefits of StealthWatch for network performance and security management Contacting Support If yo...

Страница 9: ...e installing and configuring your StealthWatch appliances It explains where to place StealthWatch system products and how to integrate them into your network This chapter includes the following topics StealthWatch Components Placement Considerations Configuring Your Firewall for Communications Integrating the FlowSensor into Your Network 2 ...

Страница 10: ...independence the SMC enables Centralized management configuration and reporting for up to 25 StealthWatch FlowCollectors Graphical charts for visualizing traffic Drill down analysis for troubleshooting Consolidated and customizable reports Trend analysis Performance monitoring Immediate notification of security breaches FlowCollector The StealthWatch FlowCollector for NetFlow gathers NetFlow cFlow...

Страница 11: ...cket loss for TCP sessions It includes all of these additional fields in the NetFlow records that it sends to the StealthWatch FlowCollector for NetFlow UDP Director also known as FlowReplicator The StealthWatch UDP Director also known as FlowReplicator is a high speed high performance UDP packet replicator The UDP Director s very helpful in redistributing NetFlow sFlow syslog or Simple Network Ma...

Страница 12: ... network at the perimeter or in the DMZ Placing the SMC As the management device the StealthWatch Management Console SMC should be installed at a location on your network that is accessible to all the devices sending data to it If you have a failover pair of SMCs it is recommended that you install the primary SMC and the secondary SMC in separate physical locations This strategy will enhance a dis...

Страница 13: ...etwork as follows Inside your firewall to monitor traffic and determine if a firewall breach has occurred Outside your firewall monitoring traffic flow to analyze who is threatening your firewall At sensitive segments of your network offering protection from disgruntled employees or hackers with root access At remote office locations that constitute vulnerable network extensions On your business n...

Страница 14: ...unicate through the network Consult with your network administrator to ensure that the following ports are open and have unrestricted access TCP 22 TCP 25 TCP 389 TCP 443 TCP 2393 UDP 53 UDP 123 UDP 161 UDP 162 UDP389 UDP 514 UDP 2055 UDP 3514 UDP 6343 Communication Ports The following table shows how the ports are used in the StealthWatch system From Client To Server Port Protocol Admin User PC A...

Страница 15: ...FlowReplicator 3rd Party event management systems UDP 514 SYSLOG FlowSensor SMC TCP 443 HTTPS FlowSensor FlowCollector NetFlow UDP 2055 NetFlow IDentity SMC TCP 2393 SSL NetFlow Exporters FlowCollector NetFlow UDP 2055 NetFlow sFlow Exporters FlowCollector sFlow UDP 6343 sFlow SMC Cisco ISE TCP 443 HTTPS SMC DNS UDP 53 DNS SMC FlowCollector TCP 443 HTTPS SMC FlowSensor TCP 443 HTTPS SMC IDentity T...

Страница 16: ...rious connections used by the StealthWatch system The ports marked as optional are ones that may be used according to your own network needs continued SMC Email gateway TCP 25 SMTP SMC SLIC TCP 443 SSL User PC All appliances TCP 22 SSH From Client To Server Port Protocol ...

Страница 17: ...ring needs It is recommended that you connect a FlowSensor so that it receives network transmissions to and from the monitored network and if desired receives interior network transmissions as well The following sections explain how to integrate a StealthWatch FlowSensor appliance into your network using the following Ethernet network devices TAPs SPAN Ports TAPs When a Test Access Port TAP is pla...

Страница 18: ...s 1 and 2 as shown Using Optical TAPs Two splitters are required for fiber optic based systems You can place a fiber optic cable splitter in line with each direction of transmission and use it to repeat the optical signal for one direction of transmission Note In a network using TAPs the FlowSensor can capture performance monitoring data only if it is connected to an aggregating TAP that is captur...

Страница 19: ... your firewall and other networks connect the StealthWatch management port to a switch or port outside of the firewall Note If the connection between the monitored networks is an optical connection then the StealthWatch FlowSensor appliance is connected to two optical splitters The management port is connected to either the switch of the monitored network or to another switch or hub WARNING Lancop...

Страница 20: ... Your Firewall To monitor traffic between internal networks and a firewall the FlowSensor must be able to access all traffic between the firewall and the internal networks You can accomplish this by configuring a mirror port that mirrors the connection to the firewall on the main switch Make sure that the FlowSensor Monitor Port 1 is connected to the mirror port as shown in the following illustrat...

Страница 21: ...shown below An optical splitter configuration is shown below SPAN Ports You can also connect the FlowSensor to a switch However because a switch does not repeat all traffic on each port the FlowSensor will not perform properly unless the switch can repeat packets transmitted to and from one or more switch ports This type of switch port is sometimes called a mirror port or Switch Port Analyzer SPAN...

Страница 22: ...network of interest and to other networks In this instance a network may be made up of some or all of the hosts connected to the switch A common way of configuring networks on a switch is to zone them into virtual local area networks VLANs which are logical rather that physical connections of hosts If the mirror port is configured to mirror all ports on a VLAN or switch the FlowSensor can monitor ...

Страница 23: ...is chapter includes the procedures for installing the StealthWatch hardware into your environment This chapter includes the following topics Mounting the Appliance Changing the Default User Passwords Connecting the Appliance to the Network 3 ...

Страница 24: ...uded with StealthWatch System products AC power cord Access keys for front face plate Rail kit for rack mounting or mounting ears for smaller appliances For the FlowCollector 5000 a 10G SFP cable Additional Required Hardware You must provide the following additional required hardware Mounting screws for a standard 19 rack Uninterruptible power supply UPS for each StealthWatch System product you ar...

Страница 25: ...pper Up to 3 Copper FC 5000 en 1 Copper FC 5000 db 1 Copper FS 250 1 Copper Up to 2 Copper FS 1000 1 Copper Up to 3 Copper FS 2000 1 Copper Up to 5 Copper OR Up to 3 Copper and Up to 2 Fiber Optic FS 3000 1 Copper Up to 2 Fiber optic FR 2000 1 Copper Up to 3 Copper SMC 500 1 Copper Not Used SMC 1000 1 Copper Not Used SMC 2000 1 Copper Not Used Total Ethernet Cables Needed Product Management Port M...

Страница 26: ...000 engine is above and the database is below Use the supplied 10G SFP cable to connect these units at the port labeled eth2 Place these servers adjacent vertically to each other in the rack in order for the 10G SFP cable to reach Each server uses a 1G copper Ethernet port to be used as a Management Port Each server also has a dedicated iDRAC Enterprise port Two onboard ports that are not used The...

Страница 27: ...ompletely Do not interrupt the boot up process 3 Connect the keyboard If you have a standard keyboard connect it to the standard keyboard connector If you have a USB keyboard connect it to a USB connector 4 Connect the video cable to the video connector The login prompt appears 5 Continue with the section Changing the Default IP Addresses on page 29 Note For new products SSH is disabled You must l...

Страница 28: ...p 3 Connect power to the appliance Press the Power button to turn on the appliance 4 On the laptop make a connection into the appliance 5 Apply the following the settings BPS 9600 Data bits 8 Stop bit 1 Parity None Flow Control None The login screen and login prompt are displayed 6 Continue with the next section Changing the Default IP Addresses Note The power supply fans turn on for some models w...

Страница 29: ...ould configure them to suit your network 1 Log in to the System Configuration program by doing the following Type sysadmin and then press Enter When the password prompt appears type lan1cope and then press Enter At the next prompt type SystemConfig and then press Enter The System Configuration menu opens 2 Select Management and then press Enter The IP Address page opens 3 Do the following ...

Страница 30: ...with the default value 4 Do the following Accept the default value or enter a new IP Netmask address based on your environment Select OK and then press Enter to continue The Broadcast Address page opens 5 Do the following Accept the default value or enter a new one based on your environment Select OK and then press Enter to continue ...

Страница 31: ...The confirmation page opens 7 Review the information Are the settings correct If yes select Yes and then press Enter to continue The system restarts and implements the changes On completion the Login page opens If no select No to make corrections The IP Address page opens so that you can enter your changes After the changes are made and you accept the settings the Restart page opens Press Enter to...

Страница 32: ...word complete the following steps 1 On the System Configuration menu select Password and press Enter Note Be sure that you have logged in as sysadmin to begin this procedure Important If you change the trusted hosts list from the defaults you must make sure each StealthWatch appliance is included in the trusted host list for every other StealthWatch appliance in your deployment Otherwise the appli...

Страница 33: ...2 Type the current password and then press Enter The prompt for a new password appears 3 Type the new password and then press Enter Note The password must be between 5 and 30 alphanumeric characters in length with no spaces You also may use the following special characters _ ...

Страница 34: ...tion Change the root User Password Change the root User Password After you change the default sysadmin user password you need to change the default root user password to protect the security of your network further 1 To change the root user password complete the following steps Now in following steps you can change the password for the root login First you need to go to the root shell ...

Страница 35: ...nu appears 3 Select RootShell and then press Enter A prompt for the root password appears 4 Type the current root password and then press Enter The root shell prompt appears 5 Type SystemConfig and then press Enter This returns you to the System Configuration menu so that you can change the root password ...

Страница 36: ...pe the new root password and then press Enter A second prompt appears 8 Retype the new root password and then press Enter 9 When your password change is successful press Enter You have now changed both of your default sysadmin and root passwords This returns you to the System Configuration Console menu ...

Страница 37: ...The System Configuration Console closes and the root shell prompt appears 11 Type exit and press Enter The login prompt appears 12 Press Ctrl Alt to exit the Console environment 13 Continue with the next section Connecting the Appliance to the Network ...

Страница 38: ...e Network on page 43 Types of Servers This section illustrates the types of StealthWatch appliances used in a network SMCs 1000 2000 and FlowCollectors 1000 2000 This appliance is used for the SMCs 500 1000 1000 and 2000 the FlowCollectors 1000 and 2000 and the FlowSensors 2000 and 3000 Height 1 68 inches 4 3 cm Width 18 99 inches 48 24 cm with rack latches 17 08 43 4 cm without rack latches Depth...

Страница 39: ...es and has four monitor ports Height 1 68 inches 4 26 cm Width 18 99 inches 48 24 cm with rack latches 17 08 43 4 cm without rack latches Depth 27 8 inches 70 67 cm with power supplies and bezel 28 6 72 53 cm without power supplies and bezel Heat Dissipation 2 891 BTUs per hour maximum Power 750 W AC 50 60 Hz Auto Ranging 100V to 240V Height 1 68 inches 4 26 cm Width 18 99 inches 48 24 cm with rac...

Страница 40: ... 559 BTUs per hour Power 2 redundant hot swappable 750W Auto Ranging 100V 250V Height 1 68 inches 4 26 cm Width 18 99 inches 48 24 cm with rack latches 17 08 43 4 cm without rack latches Depth 27 8 inches 70 67 cm with power supplies and bezel 28 6 72 53 cm without power supplies and bezel Heat Dissipation 2 891 BTUs per hour maximum Power 1100 W AC 50 60 Hz Auto Ranging 100V to 240V The picture s...

Страница 41: ...FlowSensor 1000 and the UDP Director 1000 Height 3 42 inches 8 67 cm Width 18 99 inches 48 24 cm Depth 32 02 inches 81 33 cm Heat Dissipation 2 891 BTUs per hour Power 2 redundant hot swappable 750W Auto Ranging 100V 240V Height 1 75 inches 4 4 cm Width 16 93 inches 43 cm Depth 10 83 inches 27 5 cm Heat Dissipation 341 BTUs per hour Power Single 100W Height 1 67 inches 4 2 cm Width 17 09 inches 43...

Страница 42: ...r 1010 and the UDP Director 1010 SMC 2010 and FlowCollector 2010 This appliance is used for the SMC 2010 and the FlowCollector 2010 Height 1 68 inches 4 3 cm Width 17 09 inches 43 4 cm Depth 29 25 inches 74 3 cm Heat Dissipation 2 891 BTUs per hour Power Redundant 750W Height 1 67 inches 4 2 cm Width 17 09 inches 43 4 cm Depth 15 5 inches 39 4 cm Heat Dissipation 1040 BTUs per hour Power Single 25...

Страница 43: ...are Configuration Guide Important For the UDP Director also known as FlowReplicator HA connect the two UDP Directors by crossover cables Connect the eth2 port of one UDP Director also known as FlowReplicator to the eth2 port of the second UDP Director Similarly connect the eth3 port of each UDP Director with a second crossover cable The cable can be fiber or copper Note Be sure to note the Etherne...

Страница 44: ...44 Installation ...

Страница 45: ......

Страница 46: ...ights reserved Lancope StealthWatch and other trademarks are registered or unregistered trademarks of Lancope Inc All other trademarks are properties of their respective owners sw hware install v0670 03192015 www lancope com ...

Отзывы: